Shake Node
T-H16NEW-004-001
The Shake node allows you to generate a fully animated, fully customizable shake animation, which can be used to create camera shakes or to make an element in your scene shake.
The Shake node is a more advanced version of the Quake node. Among many enhancements, you can make each shaking motion interpolate over several frames by reducing its Frequency parameter, and you can make each movement hold for 2 or more frames, if needed, by increasing its Step parameter. Additionally, you can configure each big shaking motion to have several smaller shaking motion across it, to make a more erratic looking shaking movement.
Connection
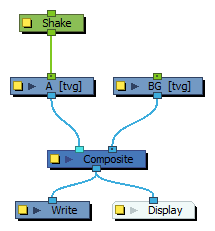
Just like a peg, you can connect the Shake node as a parent of the element you want it to move. Hence, if you want to shake an element in your scene, connect the Shake node as a parent of that element.
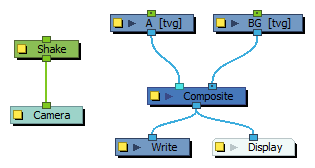
To create a Camera shake, connect the Shake node as a parent of the scene's Camera node.
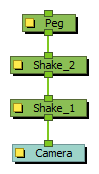
Like pegs, Shake nodes can be connected in chain, either with other Shake nodes or with other Move-type nodes, such as Peg nodes.
Layer Properties
| Parameter | Description |
|---|---|
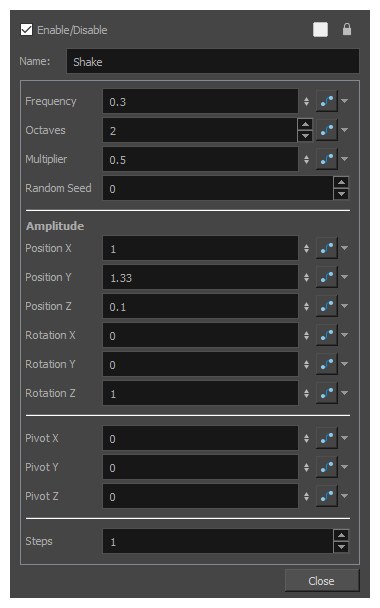
| Name | Allows you to change the name given to the node. |
| Frequency |
The speed of the big vibrations. This field takes a decimal value between 0 and 1. At 1, each vibration only takes a single frame. At 0.5, each vibration takes 2 frames, etc. When set to 0, the Shake node produces no vibration. You can animate this parameter to control when the Shake node has an effect and when it doesn't, as well as to increase or decrease the speed of the shake. |
| Octaves |
With the Octave parameter, you can add smaller vibrations to the big vibrations, making for a more erratic, forceful shake. This parameters takes an integer, which determines the amount of smaller vibrations to add to each big vibration.
|
| Multiplier | The strength of the smaller vibrations, relative to the big vibrations. This is set to 0.5 by default, which means smaller vibrations will have, at most, half the amplitude of big vibrations. |
| Random Seed |
This parameter determines the pattern of random motions it uses to simulate shaking. There is no wrong value for this parameter. Entering any value will simply make it uses a different random pattern. If you have two or more Shake nodes in your scene and they have the same Random Seed value, their shaking will be similar, if not exactly the same, as it will be based on the same pattern of random motions. Hence, you might need to assign different Random Seed values to all of your Shake nodes to make sure their motion pattern feel different. You should also assign a different Random Seed value to each Shake node if they make a shaking motion that goes on throughout several scenes so that it doesn't look like the motion pattern is repeating itself. You can also change the value of this parameter just to make the Shake node use a different shake pattern, and see if you can find a pattern that fits your expectations better. |
| Amplitude | |
| Position X | The maximum distance, in fields, to shake left or right. |
| Position Y | The maximum distance, in fields, to shake up or down. |
| Position Z | The maximum distance, in fields, to shake closer to or further from the camera. |
| Rotation X | The maximum angle, in degrees, to shake around the horizontal axis. |
| Rotation Y | The maximum angle, in degrees, to shake around the vertical axis. |
| Rotation Z | The maximum angle, in degrees, to shake clockwise or counterclockwise. |
| Pivot | |
| Pivot X | The horizontal offset of the pivot point, in fields, relative to its default horizontal position. |
| Pivot Y | The vertical offset of the pivot point, in fields, relative to its default vertical position. |
| Pivot Z |
The offset of the pivot point on the z-axis, in fields, relative to its default position on the z-axis. NOTES
|
| Steps | |
| Steps | The amount of frames to hold each movement. By default, this is set to 1, which means the Shake node will move each frame. You can set this to 2 or 3 if you animate on twos or threes, so that the motions of the Shake node match the pace of your animation. |
