The Colour Levels node allows you to adjust the levels in an element in your scene or for your entire scene. The levels can be adjusted for all the colour channels, for a specific colour channel or even for the alpha channel.
Colour Levels are a way to fine tune the balance of black and white in an image. A good way to illustrate how levels work is by taking a scanned pencil drawing. When you look at a clean pencil drawing in real life, your eyes will mostly see clean outlines unless you focus on the erroneous details on purpose. A scanner will however pick up on the details indiscriminately, resulting in smudges and feathered pale outlines. By tweaking the input levels of an image, you can process a pencil drawing like so:
- Increasing the Input Black level will make the darkest parts of the drawing black, or closer to black. This results in darker, crisper outlines.
- Decreasing the Input White level will make the lightest parts of the drawing white, or closer to white. This results in removing smudges. Also, if the background is grey, it will turn white.
By tweaking the output levels of an image, you can perform the reverse effect:
- Increasing the Output Black level will make the black pixels in the drawing appear lighter. All other pixels in the drawing will also appear lighter, but the closer to white they are, the less lightness is added to them. This can result in grey outlines.
- Decreasing the Output Black level will make
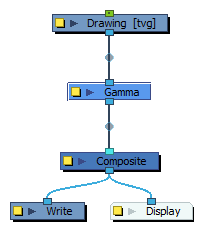
Connection
To use the Colour Levels node, simply connect it under the element, effect or composite to which you want to apply the levels effect. The node will take the input image from its top port, apply the level settings to it and output the modified image out of its bottom port.
Properties
The Colour-Levels node has five tabs, each with the same parameters. What is different between tabs is the colour channels that they affect:
- The RGB is for adjusting the levels of all colours.
- The Red, Green and Blue tabs is for adjusting the levels of a single one of these three colour channels.
- The Alpha tab is used for adjusting the level of the Alpha channel.
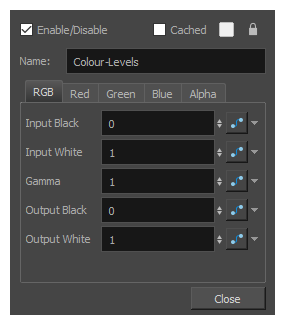
| Parameter | Description |
|---|---|
| Name | The name of the node as it appears in the Node View and the Timeline view. Each node must have a name that is unique to its containing group. |
| Input Black | The level under which a colour value is rendered as black. This varies between 0 and 1 and is set to 0 by default. At 0, only a colour with a level of 0 is rendered as black. At 1, all colours are rendered as black. At 0.5, all colours with a level between 0 and 0.5 are output as black, and colours with a level between 0.5 and 1 are rendered darker, proportionally to how close they are to 0.5. |
| Input White | The level past which a colour value is rendered as white. This varies between 0 and 1 and is set to 1 by default. At 1, only a colour with a level of 1 is rendered as white. At 0, all colours are rendered as white. At 0.5, all colours with a level between 0.5 and 1 are rendered as white, and colours with a level between 0 and 0.5 are rendered lighter, proportionally to how close they are to 0.5. |
| Gamma |
The gamma correction to apply to the colours after the input levels are applied and before the output levels are applied. Gamma correction is a curvilinear function applied to the colour values. It is used to modulate the difference in intensity between colour values. In other words, it affects how much differences between low, medium and high colour values translate to actual variations of intensity between colours. For example:
|
| Output Black |
The level at which black is output in the image. This varies between 0 and 1 and is set to 0 by default. For example, if you set this to 0.5, then black pixels in the image will actually appear gray, and all pixels will be made lighter proportionally to how close to black they are. |
| Output White | The level at which white is output in the image. This varies between 0 and 1 and is set to 1 by default. If you set this to 0.5, white pixels in the image will appear grey, and all other pixels will be made darker proportionally to how close to white they are. |