in Harmony Stand Alone
T-HFND-001-006
You can create your own custom resolution presets for your projects.
- Create a new scene from the Welcome screen or from the File menu in Harmony.
- Set the scene resolution by doing one of the following:
- Select a scene resolution from the Camera sizes drop-down menu.
- Set a custom resolution by changing the values in the Width and Height fields. This preset will not be saved.
NOTEThe different editions of Harmony support the following maximum render resolutions:
- Harmony Essentials: 2K (2048x1556)
- Harmony Advanced: 4K (4096x3112)
- Harmony Premium: Unlimited
- Add a new resolution to the list by clicking the Add
button. You can delete a custom resolution from the Resolution list by selecting it, and clicking the Delete
button.
-
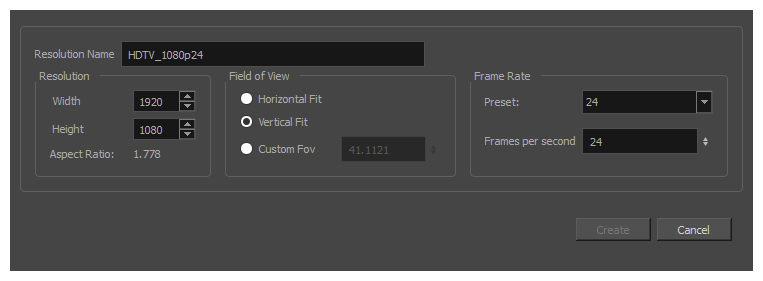
In the New Resolution dialog box, fill in the following fields and click Create.

- Resolution Name: Name your new resolution.
- Resolution: Set the width and height of the scene, in pixels.
- Field of View: Select how the angle of the field of view should be determined.
- Horizontal Fit: The angle of the field of view is adjusted to the width of the scene.
- Vertical Fit: The angle of the field of view is adjusted to the height of the scene.
- Custom Fov: Set the angle of the field of view to a custom value.
- Frame Rate: The amount of frames to play each second. You can select one of the preset frame rates in the Preset drop-down, or type in a custom frame rate in the Frames per second field.