In Unity, it's possible to assign a target to some part an imported Harmony animation. For example, in the Space Duck scene, the character has a gun. You may want to attach some other action to this animated gun, such as shooting spheres and cubes out of its end. For this, you need to place a locator at the end of the gun.
You can see some examples of this in the provided Unity project. The first example is in the demo scene DemoLocator, which shows a simple cylinder attached to the end of the gun.
The second example DemoCallback shows the gun shooting spheres and cubes.
You can access any drawing layer created in Harmony later in Unity and use its pivot point to attach objects and animated sequences. In Harmony, you should set the pivot points on your drawing layers with the Rotate tool.
You can also create an empty drawing layer in Harmony, when setting up your character, to be used later in Unity. Use Create Empty Drawing to create a blank drawing, then use the Rotate tool to set the pivot point on this drawing layer. In the Space Duck example, an empty drawing layer called hook_gun was created on which you can attach the locator in Unity.
When you access the imported Harmony character in Unity, you can access the data with a script.
- Select Game Object > Create Empty to add a new GameObject to extract the target's position, rotation, and scale.
- Drag and drop the new object so that it's a child of the character.
- Rename the GameObject to:
Hook Gun.
It becomes indented.

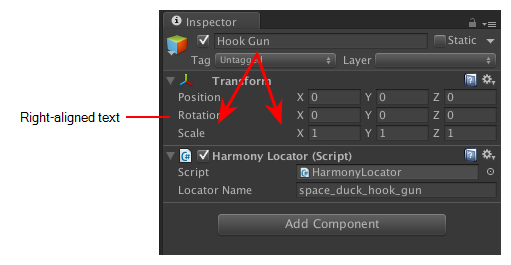
- In the Inspector of the target object, select Add Component > Scripts > Harmony Locator.
- Enter the name of the drawing layer to which you want to attach.

- To find the exact name for the Locator Name, look at the
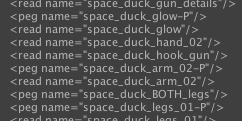
skeleton.xmlfile in the Streaming Assets folder. You can find it in Streaming Assets > Harmony Resources > Name of Harmony File > skeleton.

All the drawing and peg layers are listed. In this example, look for space_duck_hook_gun. Having drawing layers with distinctive names makes them easy to recognize when you need to retrieve them.
You can copy the name of the layer into the Locator Name to see the Transform information updating dynamically as you run the simulation.
- Now you can attach anything as a child of this Locator Object. For testing purposes, you could attach a cylinder for example. In a real example, you’d want something to shoot out of the end of the gun, so you can see the Callback example to verify how that works.