The Pencil tool allows you to draw simple contour lines that are defined by their centerline and their thickness.
When you select the Pencil tool, the Tool Properties view displays the different Pencil modes that control how the pencil line is drawn.
- In the Tools toolbar, select the Pencil
 tool.
tool.
The tool's properties are displayed in the Tool Properties view.

Pencil Properties
The following properties affect the pencil's
| Property | Description |
|---|---|
| Preview Area |
The Preview area lets you see a preview of the stroke your drawing tool will make.
|
| Pencil Properties Dialog |
The arrow button right of the preview area opens the Pencil Properties dialog.
While the Tool Properties view only gives you access to a few of the pencil properties, a list of pencil presets and other drawing options, the Pencil Properties dialog gives you access to all the available options for your pencil's shape and texture. For more information on the Pencil Properties dialog, see the Pencil Properties Dialog section below. |
| Maximum Size |
Defines the maximum width of the pencil line.
If the tool is used with a pressure sensitive pen tablet, the width of the stroke will vary between its maximum size and minimum size depending on the amount of pressure used. If used with a mouse, the width of the stroke will always be its maximum size. |
| Centerline Smoothing |
Defines the number of control points added to the centre line. The fewer the control points the smoother (but less faithful) the line. |
| Shape |
You can adjust the start, end, and join style of a pencil line.
|


Pencil Presets
These options allow you to select, create and manage pencil presets.
| Icon | Property | Description |
|---|---|---|
| Presets list |
Harmony provides a A thickness stencil saves the thickness information across the length of the line. When drawing with a thickness stencil, the pressure sensitivity of the tablet is discarded. A thickness stencil can be used while drawing, or applied afterwards. You also have the possibility to apply different textures to your lines by either using the default presets or to import your own. You can export the pencil presets that you have created and import those that others have created. This is a good way for you and project collaborators to keep a consistent look for the project. |
|
|
|
New Brush Preset |
Creates a new preset based on the current tool properties. |
|
|
Delete Brush Preset |
Deletes the currently selected preset. |
|
|
Brush Presets Menu |
Open a menu that contains the following options:
|
Drawing Options
These options affect the way your drawing strokes are added to your artwork.
| Icon | Property | Description |
|---|---|---|
|
|
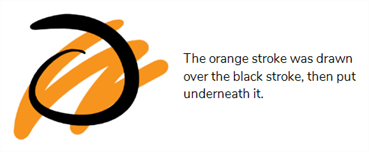
Draw Behind |
When enabled, your brush strokes will appear behind the existing artwork.
NOTE Your brush stroke will temporarily appear over your artwork as you draw it, until you release the mouse cursor or tablet pen.
|
|
|
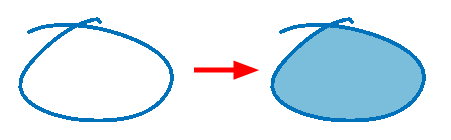
Auto Fill |
When enabled, drawing a closed shape will automatically fill it with the currently selected
TIP
By default the pencil line and its fill will be the same colour. To select different colours for the line and its fill, do the following:
|
|
|
Trim Extra Lines |
When enabled, drawing a closed shape will automatically remove the outstanding lines.
|
|
|
Align Handles After Trim |
When the Trim Extra Lines option is enabled, enable this option to make the point where the beginning and end of the stroke meet into a smooth curve rather than a hard corner.
|
|
|
Automatically Create Colour Art |
As you draw in the Line Art layer, the Automatically Create Colour Art option instantly creates the corresponding strokes in the Colour Art layer.
|
|
|
Auto Flatten |
By default, when drawing
NOTE
Using the Select tool, you can select and remove a segment of flattened pencil lines. Overlapping pencil lines drawn with the Auto-Flatten mode are essentially cut into segments by the overlap and can be treated as individual lines.
|
|
|
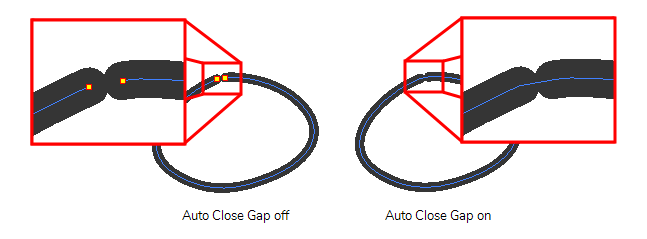
Auto-Close Gap |
When enabled, small gaps between the pencil lines you draw will be closed by an invisible stroke to make sure your shapes are closed and that they can be filled with the Paint tool. When drawing contours with pencil lines, the centreline is used to determine whether or not the contour is closed, but the visible tips of the pencil line will extend a bit beyond the tips of its centreline, making it possible to have shapes that appear closed, but are not really. This can prevent the shape from being filled with the Paint tool. Enabling this option when drawing with the Pencil or Line tool will prevent you from leaving invisible gaps in your contours.
|
|
|
Snapping |
Allows you to enable or disable snapping for this tool and all other animation and drawing tools that support snapping, as well as to select which types of snapping are enabled. If you double-click or long-click on this button, it will open a pop-up menu in which you can toggle different snapping modes. You can also click on this button to toggle it off, which will disable all snapping modes, and click on it again and toggle it on to re-enable the snapping modes which were previously enabled. This tool supports the following snapping mode:
|
|
|
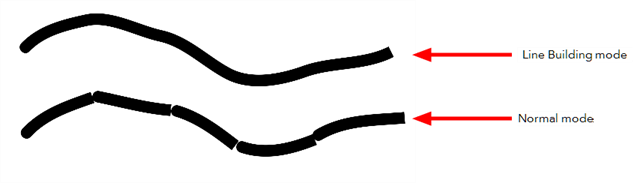
Line Building Mode |
The Line Building mode is very useful when drawing long lines and curves in small increments with pencil lines or the Line tool. As the pencil lines are central vector lines, it may be difficult to align the line tips perfectly to create a uniform stroke and close all gaps. In this mode, you can draw lines in small increments and the tips are merge into one single stroke.
NOTE This mode only works with pencil lines or the line tool.
|
|
|
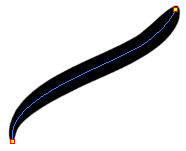
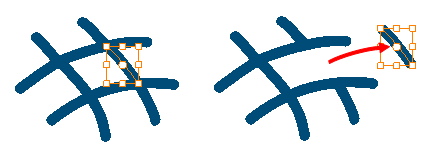
Auto Adjust Thickness |
The Auto Adjust Thickness tool is useful when you want to render a portion of a line thicker. When tracing a drawing on paper, you will often go back to a section of a curve to make it thicker to add dynamism to the line. Using the Auto Adjust Thickness tool, you can draw highlight strokes over the section to make thicker. Once you release the pen or mouse, the line becomes thicker following the shape and curve of the original stroke. This way is much faster and smoother than using the Pencil Editor tool. You do not have to add extra points and adjust the position and Bezier handles.
The default overlay colour is light yellow. If this colour is difficult to see because of the background or drawing colour, you can adjust the colour. |
|
|
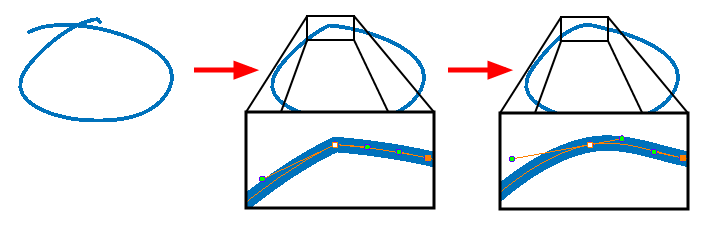
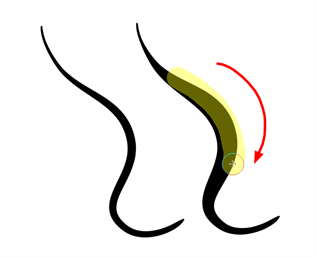
Line Pushing Mode |
The Line Pushing Mode option lets you draw highlight strokes over existing pencil lines. You can reshape the curves. Depending how you draw the pushing stroke over your line, the highlighted section will be reshaped in one direction or the other. The default overlay colour is light yellow. If this colour is difficult to see because of the background or drawing colour, you can adjust the colour. |
| Colour |
You can change the colour of the temporary strokes that appear in the drawing space when using the Line Pushing Mode or the Auto Adjust Thickness option by clicking on the Colour swatch and selecting a new colour in the Colour Picker dialog.
|


Pencil Properties Dialog
Pencils have extra parameters which are not accessible from the Tool Properties view. To open the Pencil Properties dialog, click on the arrow button right of the stroke display area.

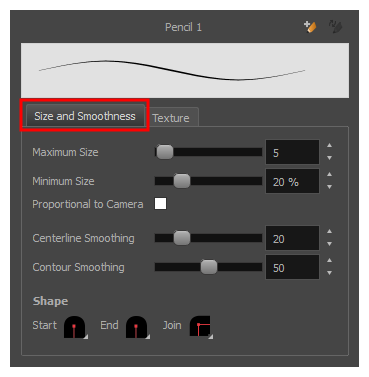
Size and Smoothness Tab
The Size and Smoothness tab allows you to select your pencil's size, its smoothing parameters as well as the shape of its tips and corners.
| Property | Description |
|---|---|
| Maximum Size | Defines the maximum size of the pencil line. If the tool is used with a pressure sensitive pen tablet, the width of the stroke will vary between its maximum size and minimum size depending on the amount of pressure used. If used with a mouse, the width of the stroke will always be its maximum size. |
| Minimum Size |
Defines the minimum size of your stroke as a percentage of the maximum size. If you do not have pressure sensitivity from a pen table, the minimum size value will be ignored. |
| Proportional to Camera |
If you check this option, the size of the pencil will be adjusted to the position of the camera on the z-axis. This means that if the camera is zoomed in on the scene, the pencil will be proportionally smaller so that it appears the same size in the rendered image. Likewise, if the camera is zoomed out, the pencil will be proportionally bigger. |
| Centerline Smoothing | Defines the amount of smoothing Harmony should perform on the central line of the pencil stroke. A higher setting will prevent your line from being shaky and will reduce the amount of control points it has, making it easier to tweak, but is liable to reduce drawing precision and turn sharp angles into curves. |
| Contour Smoothing |
Defines the amount of smoothing Harmony should perform on the outer contour of the pencil stroke. A pencil line is defined by its centreline and its variations in thickness, rather than its apparent shape. When drawing a pencil line with a mouse, its thickness is uniform. Therefore, its outer contour does not have any control point, except at its extremities, and no smoothing is required for its contour. However, when drawing a pencil line with a pressure sensitive tablet, its contour will have control points and Bezier curves to define the line's variations in thickness, and thus smoothing must be performed on its contour. An increased contour smoothing will reduce the amount of control points on the line's thickness and smoothen its curves, but may affect the precision of the variations in line thickness. |
| Shape |
You can adjust the start, end, and join style of a pencil line.
|
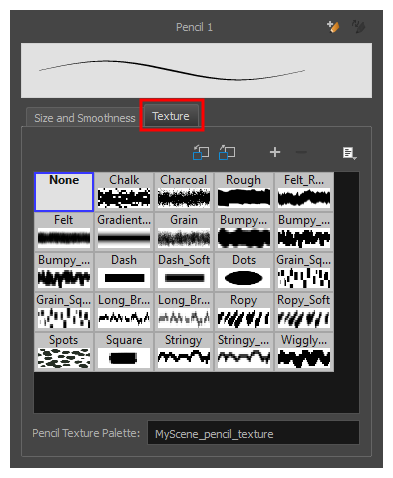
Texture Tab
In the Pencil Properties view, the Texture tab allows you to select a pencil texture from the currently selected pencil texture palette to use with the Pencil tool. You can also add, remove or rename textures, save the current pencil texture palette as the default one, or import the pencil texture palette into your scene.
The pencil texture palette used in the Texture tab of the Pencil Properties dialog is the one selected in the Colour view. You can select a pencil texture palette by selecting it from the pencil texture palette list in the Colour view—see Colour View.
| Icon | Property | Description |
|---|---|---|
|
|
Use as Default Pencil Texture Palette |
This option is available from the menu |
|
|
Reload Default Texture Palette |
Imports the default pencil texture palette as a new pencil texture palette into your scene's palette list, and selects it as the current pencil texture palette. |
|
|
New Texture |
Allows you to import an image file into a new pencil texture swatch in the current pencil texture palette. The pencil texture's effect on your pencil line will be based on the image's transparency channel, and will follow your pencil lines on its horizontal axis. This option is also available from the menu |
|
|
Delete Texture |
Deletes a pencil texture swatch from the current pencil texture palette. This option is also available from the menu |
| Rename Texture |
Renames the selected pencil texture swatch in the current pencil texture palette. This option is also available from the menu |
|
| Pencil Texture Display |
Displays the pencil textures in the current pencil texture palette and allows you to select one to use with the Pencil tool. |
|
| Pencil Texture Palette | Displays the name of the currently selected pencil texture palette, for reference. To select a different pencil texture palette, you must select it in the Colour view—see Colour View. |