The Camera view is the centre of operations in Harmony. In this view, you can draw, paint, animate, set up your scene, manipulate objects, open symbols and preview your animation.
The Camera view also has a top and bottom toolbar that you can use to navigate in the view, change the display mode or go up your symbol hierarchy.
Do one of the following:
- From the top menu, select Windows > Camera.
- From any of the other views, click the Add View
 button and select Camera.
| Icon | Section | Description |
|---|---|---|
|
|
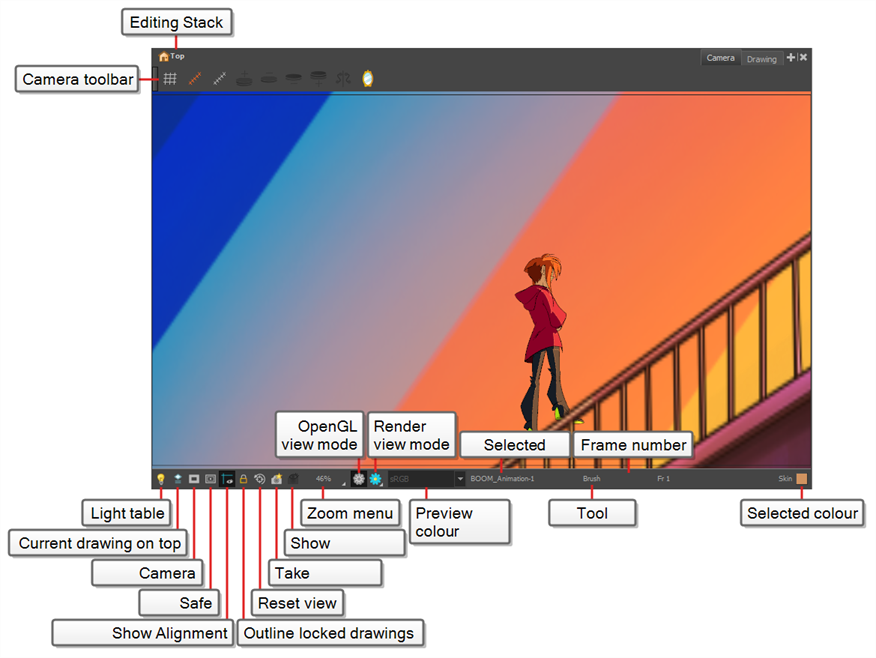
Editing Stack |
The Editing Stack menu displays the names of the symbols and their hierarchy when you are editing a symbol. You can click on the different names to go back up to the different parent symbols or the top/current project. |
|
Camera View Toolbar |
The Camera View toolbar contains all the tools and options you can use in the Camera view to draw, animate or set up the scene. The toolbar can be displayed or hidden by right-clicking on it and selecting or deselecting the Camera View toolbar. |
|
|
|
Light Table |
When you have a drawing layer or drawing selected, the Light Table button button allows you to fade the colours of the other layers so you can see the current artwork better as you edit with a drawing tool. Note that the light table does not work when using a layer editing tool, such as the Transform tool.
|
|
|
When this button is enabled, the drawing that you are currently editing with a drawing tool is temporarily displayed in front of all the other elements. The actual scene is not modified.
|
|
|
|
The Camera Mask button shows or hides Displays a black mask around the scene’s frame to avoid seeing the unnecessary artwork. This option is handy when you're animating and setting up the scene. It allows you to see your scene’s composition better. You can also access this from the top menu by selecting View > Show > Camera Mask.
|
|
|
|
The Safe Area button shows or hides Displays the TV safety zone and the centre of the camera frame. The safe area adapts to the scene resolution, as well as the safety zone and frame’s centre. You can also access this feature from the top menu by selecting View > Show > Safe Area.
|
|
|
|
Show Alignment Guides |
When enabled, alignment guides will be visible in the Camera and Drawing views. This is enabled by default. Disabling this option will hide and disable alignment guides, meaning that animation and drawing tools will not snap to them, even if the |
|
|
Drawings that are locked in the Timeline view (cannot be selected in the Camera view) are displayed as wireframes.
|
|
|
|
The Reset View button resets any panning, zooming or rotation done in the Camera view and returns the display to the initial settings. You can also press Shift + M. |
|
|
|
Take Snapshot |
Saves the preview image of the Camera view in memory as a snapshot. NOTES
|
|
|
Show Snapshot |
Displays the snapshot currently in memory. To display the snapshot, you must click and hold the button. Releasing it will restore the Camera view preview. NOTE The snapshot is displayed as it was taken, regardless of the preview mode of the Camera view. For example, if you took a screenshot in Render View mode, and display it while in OpenGL View mode, the snapshot will display as it was taken in Render View mode.
|
|
The Zoom menu lets you enlarge or reduce the Camera or Drawing view display. To make the camera frame size always match the size of your view, select the Fit to View option. Click the drop-down arrow and select a zoom level or press 1 and 2.
|
||
|
|
The OpenGL View Mode button switches the Camera view to fast display, letting you see your animation play in real time. The OpenGL display requires less memory. The final look of your effects is not shown in the OpenGL View Mode. You must switch to the Render View Mode to see your effects.
|
|
|
|
The Render View Mode button switches the Camera view to a fully rendered display showing the final image of the current frame. If a modification is done to your current frame or if you move to a different frame, click the Update Preview button to update the display if your preview does not update automatically.The Render View Mode display lets you see the final look of your frames including effects and antialiasing. You cannot play back your scene in Render View Mode. To see your scene fully rendered and to play it back, you must press the Render and Play button in the Playback toolbar.
|
|
|
|
The Matte View Mode button switches the Camera view to a matte display showing the alpha channel of the elements in your scene. The transparency level ranges from 0 to 100 percent. Zero percent is completely transparent and represented by black and 100 percent is completely opaque and represented by white. Everything in between these extremes has a transparency level somewhere between 1 and 99 percent and is represented in various shades of grey.
|
|
|
|
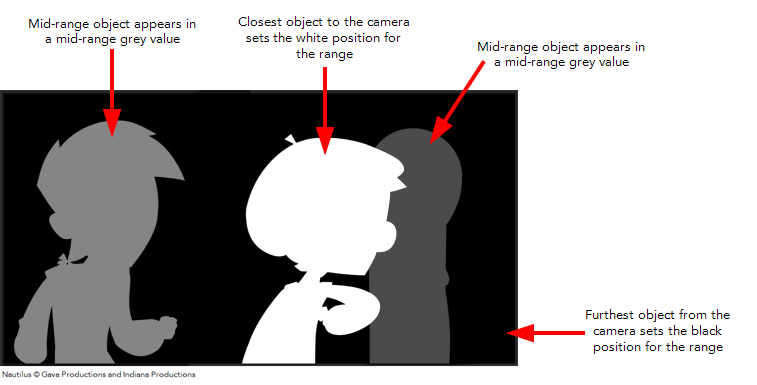
The Depth View mode displays images in a relative white to black gradient scale. The object(s) closest to the camera are displayed in white and the object(s) furthest from the camera are displayed in black. If the position of the last object changes along the z-axis, that object will still remain black, so long as it retains its position as the object the farthest back. It does not matter where that object is in 3D space, it just matters what its position is relative to the other object in the same space. The objects closest and farthest from the camera set the range of the white to black scale. All the other objects fall somewhere in between.
|
|
| Preview Colour Space |
The colour space in which to display the preview image when in You can set this to any colour space supported by Harmony. It is recommended to set this to the colour space intended for rendering your frames, unless that colour space is not supported by your monitor. In the latter case, it’s recommended to set this to the closest colour space available that your monitor can display. The following colour spaces are available:
NOTE You can only select the display colour space in
TIP You can have multiple Camera views in your workspace, each set to their own colour space. Hence, you can preview your scene on multiple monitors with different colour spaces by having a Camera view on each monitor.
|
|
|
Drawing Name |
The Drawing Name field displays the name of the selected drawing, as well as the layer containing it. If the cell does not contain any drawing, an |
|
|
Tool Name |
The Tool Name field displays the name of the selected tool. If you temporarily override a drawing tool using a keyboard shortcut, the tool’s name will be highlighted in red. You can temporarily override a tool by holding its keyboard shortcut without the Alt key. For example, the Select tool shortcut is Alt + S. If you hold down the S key, you will switch to the Select tool. When you release the key, you will return to the tool you were using. |
|
|
Frame Number |
The Frame Number field displays the number of the current frame. |
|
|
Selected Colour |
The colour swatch displays the currently selected colour in the Colour view. |