The Line tool allows you to quickly draw a line segment by dragging the mouse from its starting point to its end point.
- In the Tools toolbar, select the Line
 tool.
tool.
The tool's properties are displayed in the Tool Properties view.

Pencil Properties
Just like other shape tools, this tool creates pencil lines. Hence, its tool properties are similar to the ones of the Pencil tool and it can be used with pencil presets.
| Tool Name | Description |
|---|---|
| Preview Area |
The Preview area lets you see a preview of the stroke your drawing tool will make.
|
| Size |
Defines the width of the pencil line used to draw the line. |

Pencil Presets
These options allow you to select, create and manage pencil presets.
| Icon | Property | Description |
|---|---|---|
| Presets list |
Harmony provides a You can export the pencil presets that you have created and import those that others have created. This is a good way for you and project collaborators to keep a consistent look for the project. |
|
|
|
New Brush Preset |
Creates a new preset based on the current tool properties. |
|
|
Delete Brush Preset |
Deletes the currently selected preset. |
|
|
Brush Presets Menu |
Open a menu that contains the following options:
|
Drawing Options
These options affect the way your drawing strokes are added to your artwork.
| Icon | Tool Name | Description |
|---|---|---|
|
|
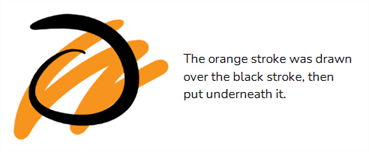
Draw Behind |
When enabled, your brush strokes will appear behind the existing artwork.
NOTE Your brush stroke will temporarily appear over your artwork as you draw it, until you release the mouse cursor or tablet pen.
|
|
|
Snapping |
Allows you to enable or disable snapping for this tool and all other animation and drawing tools that support snapping, as well as to select which types of snapping are enabled. If you double-click or long-click on this button, it will open a pop-up menu in which you can toggle different snapping modes. You can also click on this button to toggle it off, which will disable all snapping modes, and click on it again and toggle it on to re-enable the snapping modes which were previously enabled. This tool supports the following snapping modes:
|
|
|
Auto-Flatten Mode |
By default, when drawing, each new stroke is created as a separate drawing object, which can be edited independently from other parts of the artwork. When enabled, the Auto-Flatten option automatically merges strokes into existing artwork.
NOTE
Using the Select tool, you can use select and remove a segment of flattened pencil lines. Overlapping pencil lines drawn with the Auto-Flatten mode are essentially cut into segments by the overlap and can be treated as individual lines. |
|
|
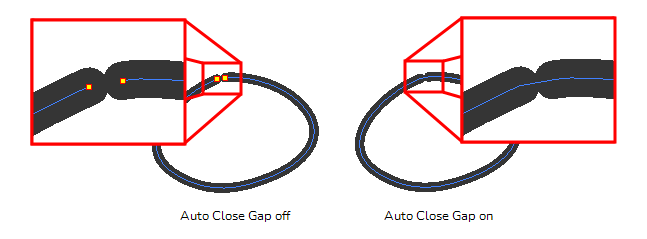
Auto-Close Gap |
When enabled, small gaps between the pencil lines you draw will be closed by an invisible stroke to make sure your shapes are closed and that they can be filled with the Paint tool. When drawing contours with pencil lines, the centreline is used to determine whether or not the contour is closed, but the visible tips of the pencil line will extend a bit beyond the tips of its centreline, making it possible to have shapes that appear closed, but are not really. This can prevent the shape from being filled with the Paint tool. Enabling this option when drawing with the Pencil or Line tool will prevent you from leaving invisible gaps in your contours.
|
|
|
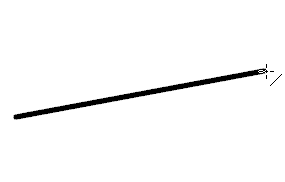
Straight Line Mode |
Draws a straight line. In this mode, you can draw curved lines with the following method:
|
|
|
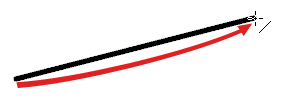
Curve Line Mode |
This mode allows you to draws a simple curved (quadratic Bezier) line in two clicks:
|
|
|
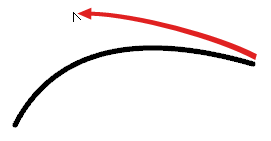
S Curve Line Mode |
Draws an S-shaped (cubic Bezier) line. This mode allows you to draw lines with finely tuned or even S-shaped curves with three clicks:
|