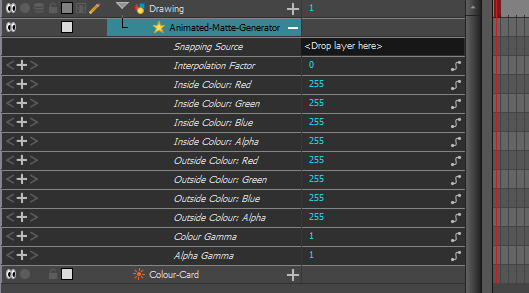
The Animated Matte Generator toolbar displays by default at the top of the Animated Matte Generator view, adding some extra functionalities for editing and animating Animated Matte Generator nodes.
- Add the Animated Matte Generator view to your workspace by doing one of the following:
- From the top-right corner of any currently visible view, click the Add View
 button and select Animated Matte Generator.
 - From the top menu, select Windows > Animated Matte Generator.
- Click on the Animated Matte Generator to set the focus on it.
- In the top menu, select Windows > Toolbars > Animated Matte Generator.
| Icon | Functionality | Description |
|---|---|---|
|
|
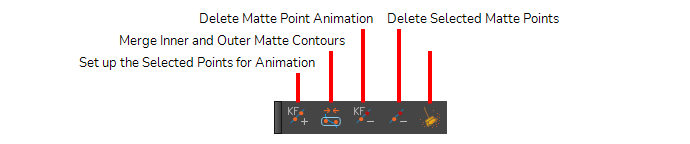
Set up the Selected Points for Animation |
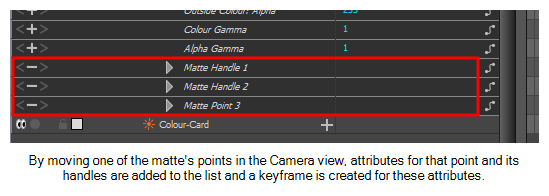
Adds the attribute for the position and handles of the selected matte point(s) to the list of visible attributes for the Animated Matte Generator node in the Timeline view. If you expand the parameters of an Animated Matte Generator toolbar in the Timeline view, by default, you will see its interpolation factor and its colour properties, which are animatable, but you will not see the attributes of each of the control points of the matte contours.
Attributes for a point are automatically added to the node's list of attributes if you animate the point in the Camera view. A keyframe is created at the same time for these attributes, to record the point's position.
You can use this button to add the attributes of the currently selected control points in the matte contour to the list of attributes of the Animated Matte Generator node in the Timeline view, without requiring you to animate them first.
This can serve as an indication to animators as to which control points they are supposed to animate and which ones should be left in their default position. |
|
|
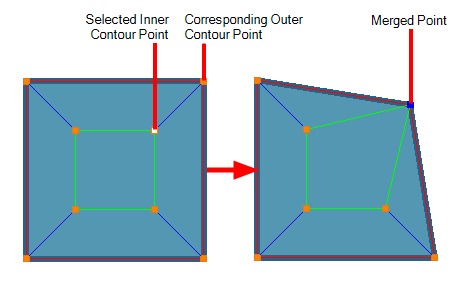
Merge Inner and Outer Matte Contours |
By default, the points in the animated matte generator's outer contour and their corresponding points from the inner contour are locked together, allowing you to animate a single matte instead of two mattes. If you disable one of the contours by toggling off the Outer Contour
|
|
|
Delete Matte Point Animation | Deletes every keyframe in the scene for the selected matte points, as well as their attributes in the Timeline view. This resets the selected points to their original position and makes them static throughout the scene. |
|
|
Delete Selected Matte Point |
Deletes the selected matte control points from the contour. NOTE If a point from one of the two contours is deleted, the corresponding point from the other contour will also be deleted. It is not possible to have a different amount of points on a matte's inner and outer contours.
|
|
|
Delete Unused Matte Generator Attributes |
This cleans up the list of attributes for the Animated Matte Generator layer in the Timeline view by removing attributes that have been created for points that no longer exist. For example, points that were created for a drawing that was deleted, or for a part of a drawing that was erased or modified. |