The Multi-Layer Write node allows you to export Photoshop Document (.psd) or OpenEXR (.exr) files with multiple layers inside them. It works just like a Write node, except that it takes several input images instead of just one, and each input image is used to generate one of the layers of the image files it outputs when rendering.
Connection
Like the Write node, the Multi-Layer Write node only takes input images. Its output is stored in image files when your scene is rendered. However, contrary to the Write node, the Multi-Layer Write node takes several input images.
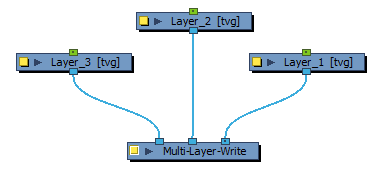
Each image connected to the Multi-Layer Write node will be used to make one of the layers of the image files the node creates. The image connected to the rightmost port will be the bottom layer, and the image connected to the leftmost port will be the top layer.
Layer Properties
Inputs Tab
The Inputs tab displays a list of the elements connected to the node's input ports. The input ports are listed from right to left. The layers listed in this list are ordered from the bottommost layer to the topmost layer. Hence, the layer appearing at the top of the list will be the bottom layer.
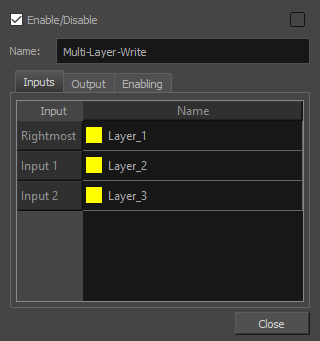
The layers will be named in the output file as they appear in the Name column. By default, each layer is named after their respective input node. If you prefer, you can customize the name of each layer. Simply double-click on a layer's name to be prompted to type a new name.
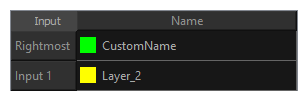
A coloured square appears to the left of each name to indicate whether the name is based on the node or is a custom name. If the square is yellow, the name is based on the node. If it is green, it is a custom name. Once a layer name has been customized, it will no longer automatically update based on the connected node's name.
Output Tab
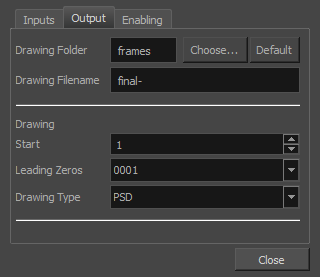
The output tab can be used to configure the path, file naming pattern and file type of images exported by the Multi-Layer Write node.
| Parameter | Description |
|---|---|
|
Drawing Folder |
The path to the folder in which to save the rendered frames. This path can be absolute or relative to the scene's folder. For example, the default path for rendered frames is frames, which means the images are saved in the frames subfolder of the scene folder. If you want to select an absolute path, you can click on the |
|
Drawing Filename |
The prefix for the file name of each exported frame. Frames will be named with this value, followed by the frame number and their image type extension. It is recommended to leave the hyphen (-) at the end of the prefix to separate the prefix from the frame number. |
|
Drawing |
|
|
Start |
Select the starting number for the image sequence. |
|
Leading Zeros |
Select the number of digits you want to see after the sequence prefix. |
|
Drawing Type |
Allows you to select the image type in which to export the frames. You can choose between the following file types:
|
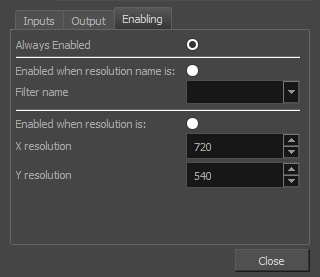
Enabling Tab
You can create several Write nodes for a single scene and, by default, when a scene is rendered, all of its Write nodes will perform their render. However, using the options in the Enabling tab, you can set up some Write nodes to only perform their render if the scene is rendered at a specific resolution. This is mostly useful on Harmony Server, as Harmony Server allows you select the resolution at which to render a scene when sending a scene for rendering by the Harmony database's render farm.
A good example of how this can be useful is if your scene has storyboard thumbnails in the corner, and a Write node connected to a composite that crops the picture to only include the storyboard thumbnail, so that your scene can export both the final animation and the animated storyboard when rendered. You can set up your scene's main Write node to only work when exporting the scene at the scene's original resolution, and the storyboard thumbnails Write node to only work when exporting at the desired resolution for an animated storyboard.
This option allows you to filter with either resolution presets, or by specifying the width and height of the chosen resolution in pixels. You can hence create custom resolution presets named after their Write node's purpose, to make it easier to choose the resolution when rendering a scene.
| Parameter | Description |
|
Always Enabled |
Makes this Write node render every time the scene is rendered. This is the default option. |
|
Enabled when Resolution Name is |
Makes this Write node render only when the scene is rendered at the specified resolution preset. |
|
Filter Name |
Select the resolution preset at which to render the scene to activate this Write node. |
|
Enabled when Resolution is |
Make this Write node render only when the scene is rendered at the resolution with the specified width and height, in pixels. |
|
X Resolution |
The width (in pixels) of the resolution at which to render the scene to activate this Write node. |
|
Y Resolution |
The height (in pixels) of the resolution at which to render the scene to activate this Write node. |