The animated matte generator is a very advanced tool in Harmony's suite of effects which, once connect to a drawing or character model, gives you three important capabilities.
- Digitally animate the lines and contours of vector drawings
- Create animated feathered (gradient) visual effects in specific shapes.
- Snap to the contours of a drawing to make the shape of its effect match the shape of the drawing.
The resulting image can be used as a deformed drawing or an effect, and can also be used as a transparency mask for other drawings or effects.
At the very least, the Animated Matte Generator node requires a vector drawing to be connected to its Image Source (right) input port. The node will generate animatable control points for each of the vector shapes in each of the drawings in its matte drawing layer, which can be manipulated and animated, allowing you to animate your drawing's vector points directly.

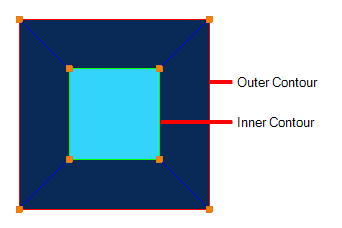
Based on its parameters, the Animated Matte Generator node will either output the source drawing after deforming it to match the position of the control points, or a feathered special effects matte gradating from its inner contour to its outer contour. In either case, this allows to animate the image source, either as a simple vector drawing, as a special effect or as part of a more complex rig, without making new drawings for it.
Optionally, another vector drawing may be connected to the node's Snapping Source (left) input port. Using the Set to Snap editing mode in the Animated Matte Generator view, you can set some of the points and contours of the input drawing to automatically snap to the snapping source drawing's contours, making it easier to animate a matte to follow the contours of a drawing in your scene. A contour that is set to snap to one of the snapping source's contours will even match the precise shape of this contour.

Often, an Animated-Matte-Generator will be used to add a fine-tuned effect, such as a glow or shadow, on part of a drawing. A typical set-up to accomplish this will make use of the Colour Selector node and Cutter nodes to trim the effect generated by the Animated Matte Generator so that it only affects zones of the drawing that are painted with the specific colour. Since the effect generated for this drawing should follow that drawing's movements, if any, pegging the Animated Matte Generator's drawing source to the drawing the effect is applied over will lock their position together. Likewise, it may be useful to connect the drawing the effect will be applied over as the Animated Matte Generator's snapping source, since the matte might need to be snapped to that drawing's contours.

You can instantly add this template to your scene by clicking on the Add Matte Generator button in the Animated Matte Generator view. As an alternative, the Add Matte Generator as Mask button will add a similar template, except that the Animated-Matte Generator will be connected to the Cutter's matte port, and the drawing's Colour-Selector will be connected to the Cutter's input port. This can be used for example to use the Animated Matte Generator as a sophisticated transparency filter for an effect or element in your scene.
The contours of an Animated Matte Generator can be configured and animated by using the Animated Matte Generator view along with its control points in the Camera view.
- Do one of the following:
- From the top-right corner of any currently visible view, click the Add View
 button and select Animated Matte Generator.
 - From the top menu, select Windows > Animated Matte Generator.
- In the Tools toolbar, select the Transform tool or press Shift + T.
- In the Timeline or Node view, select the Animated Matte Generator node you wish to configure or animate.
- In the Camera view toolbar, click on Show Controls
 or press Shift + F11.
Layer Properties
Using the Layer Properties dialog or view, you can configure the kind of matte the Animated Matte Generator should output, how the matte's points and contours should snap to its snapping source as well as the colours and other parameters for generating a feathered effect.
Matte tab
The matte tab allows you to configure whether the Animated Matte Generator node will output a deformed version of its input source drawing or a feathered effect based on its outer and inner contour as well as how the contour's control points and lines should snap to the snapping source's contours, if any.

| Property | Description |
| Output | |
| Type |
Determines which one of the following type of matte the node generates:
|
| Interpolation Factor |
When the output type is set to Interpolate between contours, the matte drawing is deformed according to a contour that is an intermediate between the outer contour and the inner contour. The interpolation factor determines the percentage by which the intermediate contour is interpolated from the outer contour to the inner contour. For example, if the interpolation factor is set to 50, the intermediate contour will be halfway between the outer contour and the inner contour. By default, it is set to 0, which means the intermediate contour is the same shape as the outer contour. If it is set to 100, the intermediate contour will match the inner contour.
TIP The Interpolation Factor parameter can be animated. This can be useful if you want your drawing to morph back and forth between two different shapes, one of which would be defined by the outer contour and the other defined by the inner contour.
|
| Snap | |
| Drag-to-Snap Distance |
If the Animated Matte Generator mode has a drawing connected to its Snapping Source port, and some of the matte's control points or contours are set to snap to that drawing, those points will always snap to the closest contour in the snapping source drawing, as long as it can find a contour within a certain distance. This distance is determined by the Drag-to-Snap distance parameter. By default, it is set to 15. You can increase it if you want the snapping points to snap to contours from a further distance to their actual position, or decrease it if you only want snapping points to snap to contours that are very close to their actual position. |
| Snap to Outlines Only |
Make Snapping points and contours only snap to the outlines of the snapping source drawing. In this case, a contour is an outline that defines the silhouette of the drawing.
|
| Snap to | Allows you to select which ones of the snapping source drawing's art layers the matte's points and contours will snap to, if they are set to snap. This can be useful if your snapping source drawing has its line art and colour art on different layers, as both art layers are likely to have a lot of meshing contours. |


Advanced Tab
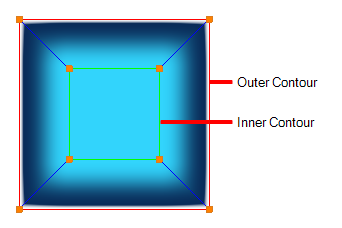
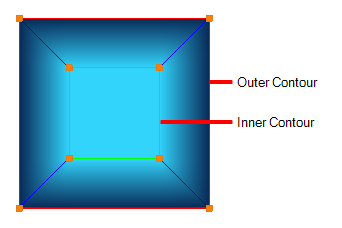
The settings in the Advanced tab are only available when the matte's output type is set to Feathered. A feathered matte ignores the colours and pencil lines in the drawing and, instead, uses the outer and inner matte's shape to generate a gradated colour effect, the colours and parameters of which can be set in the Advanced tab.

| Property | Description |
| Feathering | |
| Interpolation Mode |
Determines the way the colour is gradated from the inner contour to the outer contour:
|
| Colour | |
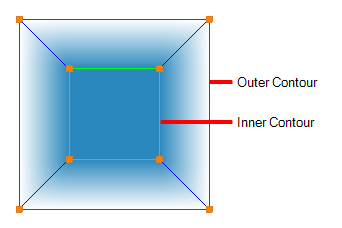
| Colour Interpolation |
Determines the way the colours between the inner and outer contours are generated:
|
| Colour Gamma |
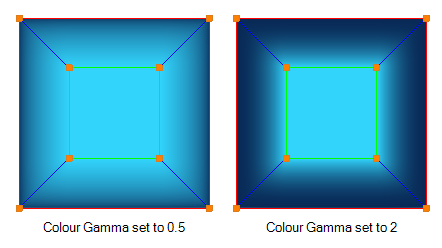
When the Colour Interpolation parameter is set to Gamma 2 Colours, use this field to enter the gamma power used to generate the gradient. By default, it is set to 1, creating a linear gradient. When set to any value between 0 and 1, the gradient will ease in from the inner colour to the outer colour. When set to any value above 1, the gradient will ease out from the inner colour to the outer colour.
|
| Inner Colour |
The colour used to fill the matte's inner contour. |
| Outer Colour |
The colour used for the matter's outer contour. NOTE If the Interpolation mode is set to None, this colour will fill the outer contour. Otherwise, it is used to create a gradient going from the inner contour to the outer contour.
NOTE If the Colour Interpolation parameter is set to Constant, this parameter is ignored and the outer colour will be set to the same colour as the inner colour, except with an alpha value of zero, making the matter a single solid colour with a transparency gradient.
|
| Alpha | |
| Alpha Mapping |
Determines the way the alpha between the inner contour and the outer contour is gradated:
|
| Alpha Gamma |
When the Colour Mapping parameter is set to Gamma, use this field to enter the gamma power used to calculate the alpha values in the gradient. By default, it is set to 1, creating a linear alpha gradient. When set to any value between 0 and 1, the gradient's alpha values will ease in from the inner contour's alpha value to the outer contour's alpha value. When set to any value above 1, the alpha values of the gradient will ease out from the inner contour's alpha value to the outer contour's alpha value.
|