Deformers give the ability to animate objects and parts of a character model using computer generated deformations. Deformations work by creating control points on a drawing and, when you move those points, the drawing is bent or distorted so that the parts of a drawing that are bound to a control point follow that control point wherever you position it.
Deformers can substantially increase the range of movements and animations a cut-out character rig is able to perform without having to draw new poses for it or resorting to frame-by-frame animation. A cut-out character rigged with deformations can be animated in a way that likens the fluidity and flexibility of traditional animation. Additionally, deformers can be used to tweak, enhance or facilitate frame by frame animation when needed.
Deformers work by rigging them on the body part you wish to deform, building the deformation structure, then animating it. This can be done easily using the ![]() Rigging tool.
Rigging tool.
There are
- Bone
- Game Bone
- Curve
- Envelope
- Free Form
Bone Deformer
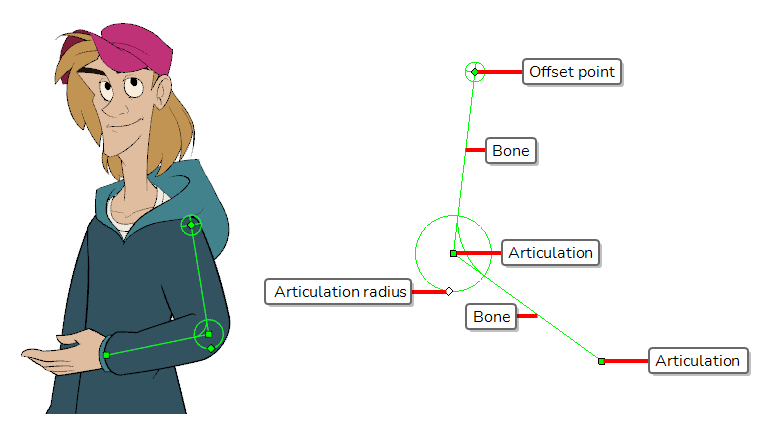
The Bone deformation allows you to create a bone-like structure in which each part is solid, but with articulations that are flexible. This is mostly useful for animating a character's limbs, such as the arms or legs, or other parts that can be articulated such as torsos or fingers.
For example, a Bone deformation can be used to articulate an arm that is made of a single drawing, so that the upper arm and forearm can be moved independently, without having to draw the upper arm and the forearm on different layers. Harmony will deform the drawing to make it look articulated. The different parts of a Bone deformation can be rotated around their joint, extended and shortened, giving you the same capabilities as animating articulations on different layers, without having to worry about parts detaching, pivot points, or clipping outlines.
Game Bone Deformer
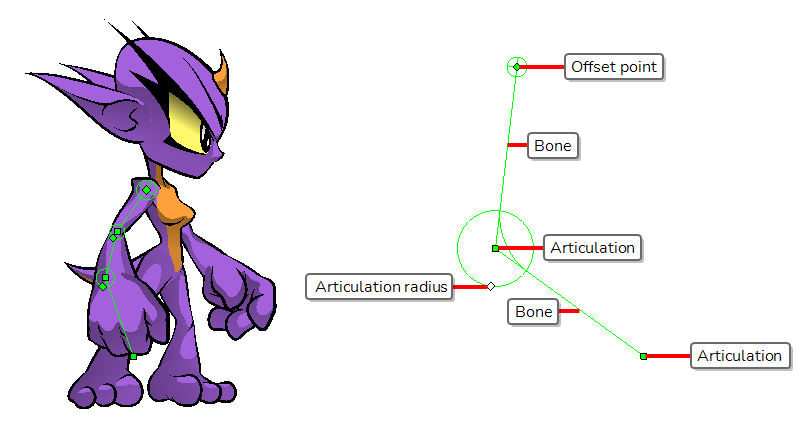
The Game Bone deformation is very similar to the Bone deformation. It allows you to create structured comprised of points, which represent the articulations, and straight line segments linking those points together, representing the bones. The Game Bone deformation is different in that it is optimized to be exported to game engines such as Unity. Hence, it is usually only used to animated characters destined to be imported to Unity games, rather than for animation productions.
Contrary to the Bone deformations, Game Bone deformations do not have
Curve Deformer
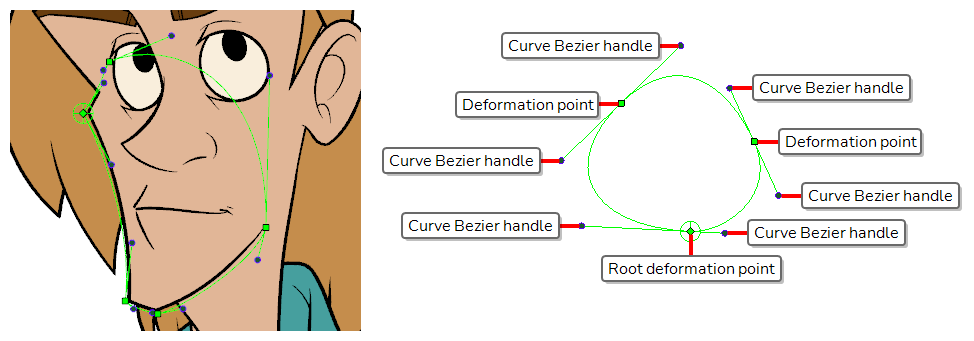
The Curve deformation allows you to deform parts of a character using a Bezier curve. It is different from the Bone deformation in that the lines connecting the points are curvilinear. Hence, Curve deformations are typically used to deform parts of a character that are flexible, such as hair, mouths, eyebrows, or torsos. They can also be useful to animate limbs in a rubber hose style, where arms and legs are animated like extensible, flexible tubes rather than articulated bone structures.
By manipulating the curve's points and their Bezier handles, you can change the curve's direction, shape and length. A drawing rigged with a curve deformation does not merely bend, it will deform along its entire length to match the curve deformation's shape.

Envelope Deformer
The Envelope deformation allows you to create an envelope around a drawing, then deform the entire drawing by manipulating the envelope's points and curves. They can be used to deform parts of a character with a fluid shape, such as hair, cloaks, shoulders, chins and so on. Envelope deformations can also be used to deform rigid parts of a characters so as to make them look like they are seen from different angles. This is commonly done to make character rigs rotate without swapping drawings, and using this technique makes it possible to animate a character rig going from one angle to another without having to swap drawings or character models.
Envelope deformations are very similar to Curve deformations, except that their last point connects to their first point to make a closed shape. Also, contrary to Curve deformations, all points move independently from one another, whereas the first point of a Curve deformation offsets all its other points.
Free Form Deformer
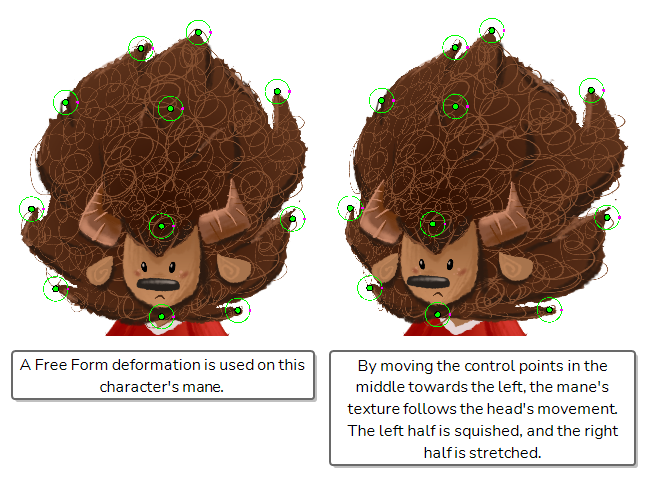
The Free Form deformation allows you to deform drawings by creating points anywhere, either on their contour or inside their surface, and moving them around freely. It works a bit like laying down a piece of cloth with a pattern on a surface, then pulling on parts of this cloth to warp its shape and its pattern.
The Free Form deformation's main purpose is to deform textured shapes and complex drawings. Contrary to the Envelope deformation, which merely bends the contours of a drawing without deforming the texture inside it, the Free Form deformation stretches and squashes all the artwork between its control points. Moreover, since the Free Form deformation allows you to create points anywhere on a drawing, including inside its contour, you can actually control precisely how the texture is deformed.
Creating Deformers
The most simple way of creating deformers is to use the ![]() Rigging tool, available in the Deformation toolbar. With this tool, all you need to do to create a deformer is to select the layer you wish to deform, then place each point of your deformer in the Camera view.
Rigging tool, available in the Deformation toolbar. With this tool, all you need to do to create a deformer is to select the layer you wish to deform, then place each point of your deformer in the Camera view.
Deformers exist in your scene as a hierarchy of deformation
Since every deformation point is a separate node, creating long deformation chains is likely to add bulk to the Timeline and Node views. It is recommended to make sure that the ![]() Automatically create a group when creating a new deformation rig option is enabled in the Tool Properties view before building a deformer. This option is enabled by default. When enabled, deformation nodes that are part of the same chain are automatically grouped together.
Automatically create a group when creating a new deformation rig option is enabled in the Tool Properties view before building a deformer. This option is enabled by default. When enabled, deformation nodes that are part of the same chain are automatically grouped together.

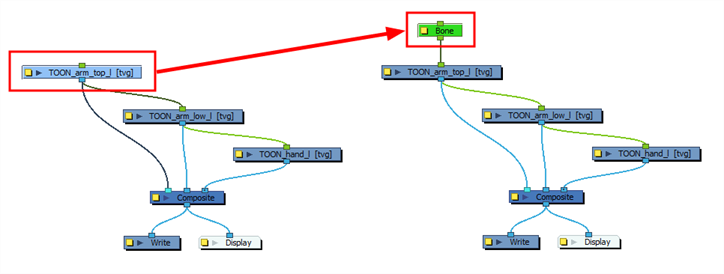
A deformer affects all the layers under its hierarchy. When you create a new deformer using the rigging tool, it is automatically created as a parent of the selected layer, and will affect the selected layer and all its children. Hence, it's important to select the right layer before attempting to create a deformer.
For example, if you wish to create a deformer for an arm, and the arm is broken into several layers, you could rig the arm in a hierarchy where the upper arm is the root, the forearm is the upper arm's child and the hand is the forearm's child. Then, if you create your deformer on the upper arm, it will be created as a parent of the upper arm, and will hence affect the whole arm.

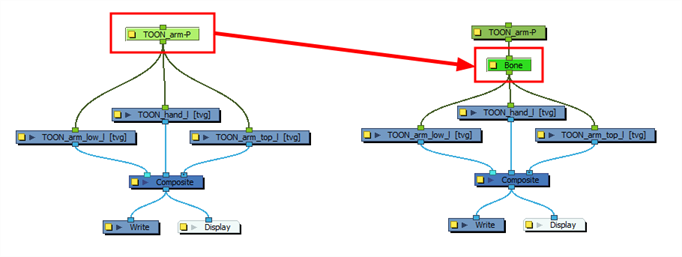
You can also group several layers under a peg, and create your deformer with this peg selected. When you create a deformer on a peg, the deformer is created as a child of the peg, but as a parent of all of this peg's children. This is because a peg is likely to be more useful over a deformer than under. If you move layers that are under a deformer, they will exit the intended deformation zone, and may appear severely warped and distorted. Hence, it's better to create deformations under pegs as much as possible, and pegs under deformers should only be animated if the deformer is left untouched. Since the deformer will be created as a parent of all the peg's children, it will affect all the layers under the peg.

- Once your element is selected, select the
 Rigging tool in the Deformation toolbar.
- In the Tool Properties view, enable the
 Bone mode.
- In the Tool Properties view, enable the
 Automatically create a group when creating a new deformation rig option so that your deformation chains are created inside groups. Every point in a deformation chain is an individual layer, so creating deformers with this option disabled is liable to clutter your Timeline and Node view.
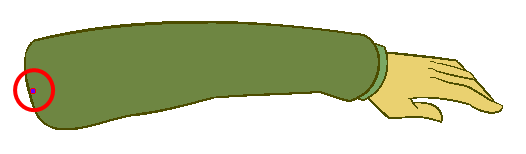
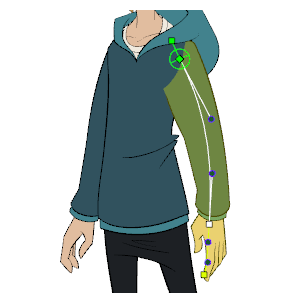
- Click where you want to create the root articulation of the bone structure. The root articulation should be the one that is bound to the remainder of the body. For example, for an arm, the root articulation would be its shoulder.
-
Click where you want the second articulation to be created.
A bone will be created between the first and second articulation.
- Click where you want the next articulation to be created.

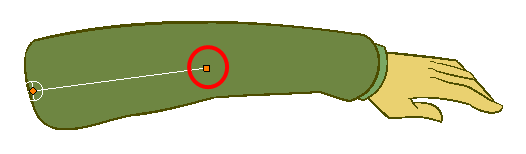
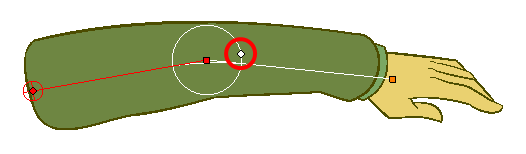
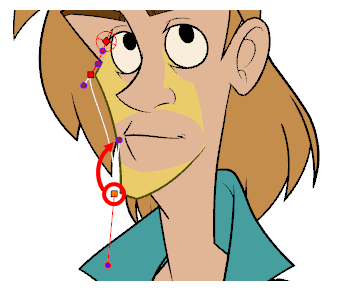
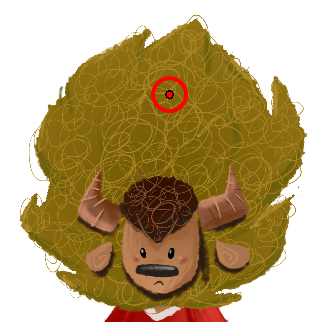
Observe that, as you create a new point, the previous point now has a circle around it. This is the radius of the articulation, which allows you to determine how much of the drawing should be part of the articulation. Every point in a bone deformer, except for the first and the last one, has a radius.
- Click and hold the previous articulation's radius control point and adjust the articulation's radius so that it properly covers the articulation.
- Repeat this until you are finished creating the Bone chain. Make sure you build each articulation in the right order going from the root to the extremity.
- Once your element is selected, select the Rigging tool in the Deformation toolbar.
- In the Tool Properties view, enable the
 Curve mode.
- In the Tool Properties view, enable the Automatically create a group when creating a new deformation rig option so that your deformation chains are created inside groups. Every point in a deformation chain is an individual layer, so creating deformers with this option disabled is liable to clutter your Timeline and Node view.
- Place the cursor where you want to create the root of your deformation chain. The root of the deformation chain should be where the body part is bound to the remainder of the body. For example, if you're creating a deformer for a whole arm, you should create its root point at the shoulder joint.
- Press and hold down the mouse button to create the point, then drag to towards the direction where you want your curve to bend to set the position of this curve's Bezier handle.

-
Press and hold down the mouse button at the location where you want the curve to end, then drag backwards and release the mouse button to create the Bezier handle before that point.
 NOTE The Bezier handle after the point will be symmetrical to the Bezier handle before the point.
- Repeat this process until you have finished building the Curve chain.

-
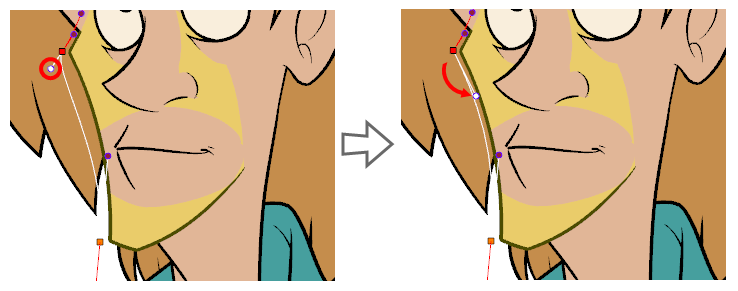
As you go, you click and drag on the Bezier handles to adjust the curves of the deformation chain.
TIPWhen manipulating a Bezier handle, by default, the opposite Bezier handle for the same point will rotate in the same direction, keeping the point curved. If you want to make the point into a corner, press and hold the Alt key, then click and drag on one of the Bezier handles to rotate it without affecting the opposite handle.

- Once your element is selected, select the Rigging tool in the Deformation toolbar.
- In the Tool Properties view, enable the
 Envelope mode.
- In the Tool Properties view, enable the Automatically create a group when creating a new deformation rig option so that your deformation chains are created inside groups. Every point in a deformation chain is an individual layer, so creating deformers with this option disabled is liable to clutter your Timeline and Node view.
- Place the cursor where you want to start creating your envelope.
- Press and hold the mouse button to create the point, then drag to towards the direction where you want your curve to bend to set the position of this curve's Bezier handle.
-
Press and hold down the mouse button to create another point, then drag backwards and release the mouse button to create the Bezier handle before that point.
 NOTE The Bezier handle after the point will be symmetrical to the Bezier handle before the point.
-
Repeat to create other points.
-
As you go, you can click and drag on the Bezier handles to adjust the curves of the envelope.
TIPWhen manipulating a Bezier handle, by default, the opposite Bezier handle for the same point will rotate in the same direction, keeping the point curved. If you want to make the point into a corner, press and hold the Alt key, then click and drag on one of the Bezier handles to rotate it without affecting the opposite handle.
-
Create every other point needed, until you're ready to close the envelope.
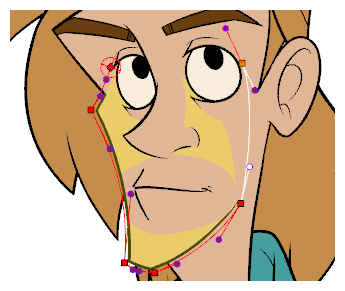
- When you're ready to close Envelope deformer, hold down the Alt key and click on the first point of your deformation chain.
- Select the drawing which you want to deform.
- In the Deformation toolbar, select the
 Rigging tool.
 - In the Tool Properties view, enable
 Free Form Mode.
 -
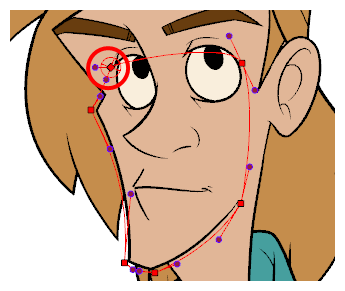
In the Camera view, click where you want to create your first deformation point.
-
Repeat for each point you want to create.
-
If you want to reposition a point, simply click and drag on it. If you move a point while the Rigging tool is selected, it will change the resting position of the point without deforming the drawing.
- If you want to delete a point, click on it to select it, then press Del.
Displaying Deformers
Harmony lets you control which deformers are displayed in the Camera view independently from the current selection. When you create a deformation chain, its deformation controls are displayed in the Camera view. However, if you select an existing deformer or a layer that's connected to existing deformers, its deformation controls won't display automatically. Likewise, deselecting a deformation chain will not hide its deformation controls.
Before you can animate or modify an existing deformation chain, you must manually display it.
- Do one of the following:
- In the
- In the Timeline
- In the Deformation toolbar, either:
- Click the
 Show the Selected Deformation Chain and Hide All Others button to show the selected element's deformation chain and hide any other deformation chain that is currently displayed.
 - Click the
 Show Selected Deformers button to show the selected element's deformation chain along with any other deformation chain that is currently displayed.
- Click the
The selected deformation controls appear in the Camera view.
- Do one of the following:
- Click in the negative space of the Camera view, Timeline view or Node view to discard the current selection, then click on the
- Select a layer that is not linked to any deformer, then click the
- In the Camera toolbar, click the
Hide All Controls button.
- From the top menu, select View > Hide All Controls.
- Press Shift + C.
Animating With Deformers
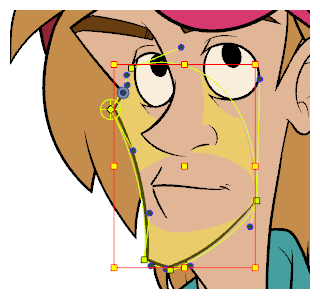
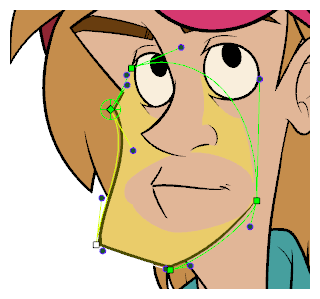
Just like with animating pegs and drawing layers, you can animate your deformers by creating keyframes on their corresponding layers in the Timeline. Animating deformers works exactly like making modifications to a deformer, except it requires using the ![]() Transform tool instead of the Rigging tool. When the Transform tool is selected, deformation controls in the Camera view display in green, which means they are in animation mode, whereas when the Rigging tool is selected, they display in red, meaning they are in rigging mode.
Transform tool instead of the Rigging tool. When the Transform tool is selected, deformation controls in the Camera view display in green, which means they are in animation mode, whereas when the Rigging tool is selected, they display in red, meaning they are in rigging mode.
- In the Timeline view, collapse your character using the Expand/Collapse arrow.

- Select the first frame of the scene.

- To ensure your model doesn't disappear after 1 frame, open the Extend Exposure dialog by doing one of the following:
- Right-click on the first frame in the Timeline and select Extend Exposure.
- Press F5.
- In the Extend Exposure dialog, type in the amount of frames in your scene and confirm. This will make your model exposed (visible) throughout your whole scene.
-
Now, we will make your character's first pose. First, make sure there is a keyframe on the first frame of every layer of the model. This ensures that when you make the second pose later, your first pose will not be affected. To do this do one of the following:
- In the Timeline toolbar, click the
 Add Keyframe button.
 - Right-click and select Add Keyframe.
- Press F6.
- In the Timeline toolbar, click the
A keyframe is added on the current frame.

- In the Tools toolbar, select the
 Transform tool or press Shift + T.
- In the Tools toolbar, if
 Animate Off or
  Animate Onion Skin Range mode is selected, click on it to open the Animate pop-up menu and select
  Animate Current Frame.
- Do one of the following:
- In the
- In the Timeline
- In the Deformation toolbar, either:
- Click the Show the Selected Deformation Chain and Hide All Others button to show the selected element's deformation chain and hide any other deformation chain that is currently displayed.
- Click the Show Selected Deformers button to show the selected element's deformation chain along with any other deformation chain that is currently displayed.
- Click the
The selected deformation controls appear in the Camera view.
- In the Camera view, do the following:
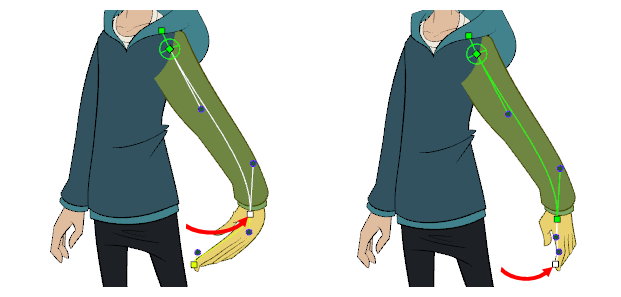
- To rotate the whole limb, click and drag on the first bone. This will rotate the first bone and all subsequent bones.
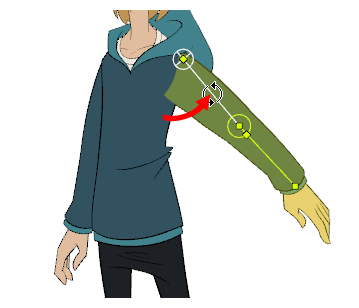
- To bend the limb, click and drag on another bone. This will rotate the bone and all subsequent bones, but will leave the bones before it in their current position.
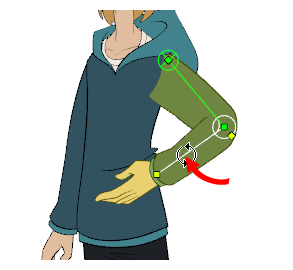
- To reposition an articulation, click and drag on its control point. This can be used to rotate, shorten or extend the bone, and will offset all subsequent bones.
To shorten or extend a bone without rotating it, press and hold the Alt key, then click and drag on its control point.
- To offset the whole limb, click and drag on its root point.
 TIP You can also nudge an articulation in any direction by selecting it, then pressing on the arrow keys.
- In the Timeline view, go to the frame on which you want to set the next key pose.
- Add a keyframe on the current frame by doing one of the following:
- In the Timeline toolbar, click the Add Keyframe
button.
- Right-click and select Add Keyframe.
- Press F6.
- Transform your deformer's points to make your new key pose.
- Repeat the previous steps until your animation is complete.
- In the Timeline view, collapse your character using the Expand/Collapse arrow.
- Select the first frame of the scene.
- To ensure your model doesn't disappear after 1 frame, open the Extend Exposure dialog by doing one of the following:
- Right-click on the first frame in the Timeline and select Extend Exposure.
- Press F5.
- In the Extend Exposure dialog, type in the amount of frames in your scene and confirm. This will make your model exposed (visible) throughout your whole scene.
-
Now, we will make your character's first pose. First, make sure there is a keyframe on the first frame of every layer of the model. This ensures that when you make the second pose later, your first pose will not be affected. To do this do one of the following:
- In the Timeline toolbar, click the Add Keyframe button.
- Right-click and select Add Keyframe.
- Press F6.
- In the Timeline toolbar, click the
A keyframe is added on the current frame.
- In the Tools toolbar, select the Transform tool or press Shift + T.
- In the Tools toolbar, if Animate Off or Animate Onion Skin Range mode is selected, click on it to open the Animate pop-up menu and select Animate Current Frame.
- Do one of the following:
- In the
- In the Timeline
- In the Deformation toolbar, either:
- Click the Show the Selected Deformation Chain and Hide All Others button to show the selected element's deformation chain and hide any other deformation chain that is currently displayed.
- Click the Show Selected Deformers button to show the selected element's deformation chain along with any other deformation chain that is currently displayed.
- Click the
The selected deformation controls appear in the Camera view.
- In the Camera view, do the following:
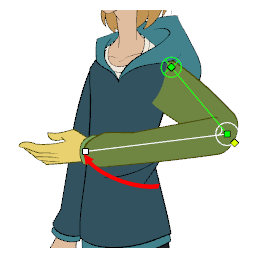
- Click and drag on one of the control points to shorten or extend the body part.
 TIP You can also nudge a deformation point in any direction by selecting it, then pressing the arrow keys.
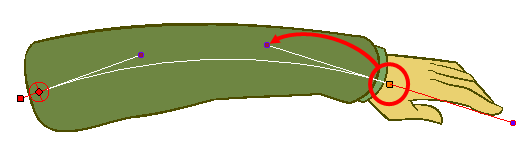
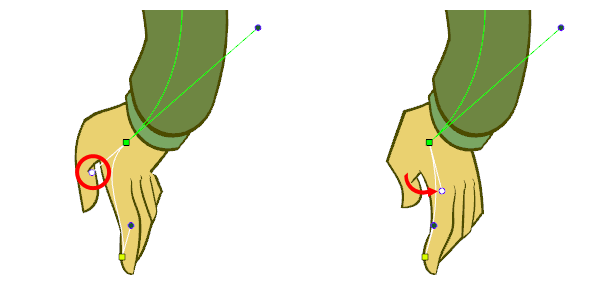
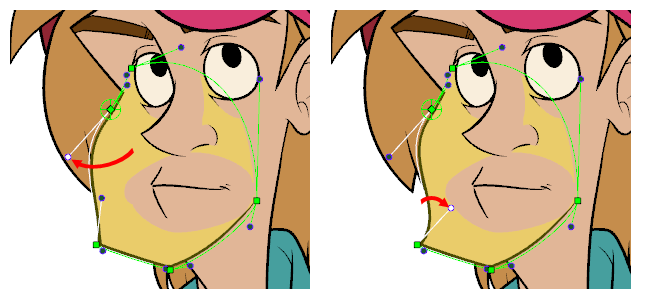
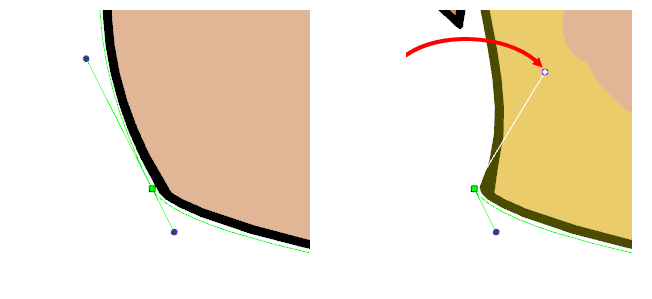
- Click and drag on one of the Bezier curve handles to deform the curve of the body part.
- By default, if you rotate a Bezier handle for a point, the opposite Bezier handle for the same point will rotate along with it, influencing the curve on the other side of it. To rotate a Bezier handle independently from its opposite handle, click on this Bezier handle to select it. Then, while pressing and holding the Alt key, click and drag on this handle to rotate it.
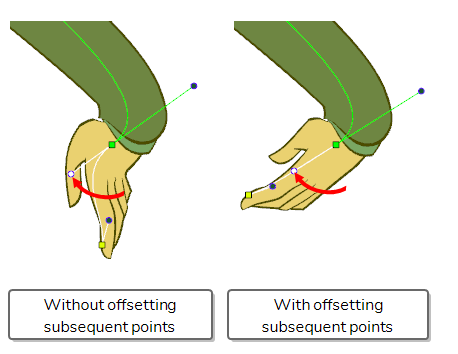
By default, transforming a point in a Curve deformation chain does not offset subsequent points. To offset a point and all its subsequent points, press and hold the Ctrl (Windows/Linux) or ⌘ (macOS) key, then click and drag on the first point you want to offset.
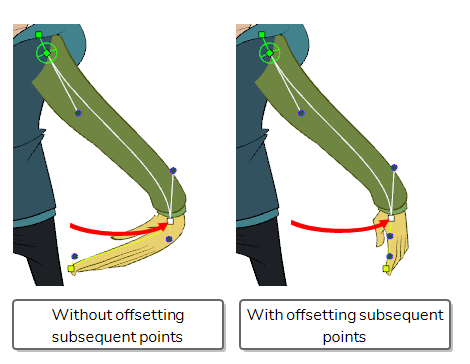
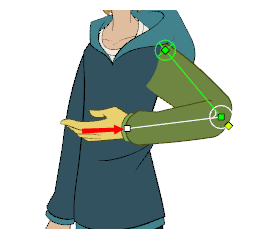
- To rotate a point and all subsequent points, click on the Bezier handle after the point around which want subsequent points to rotate to select it. Then, while pressing and holding the Ctrl (Windows/Linux) or ⌘ (macOS) key, click and drag on that handle to rotate it. All the subsequent points will rotate around this handle's point.
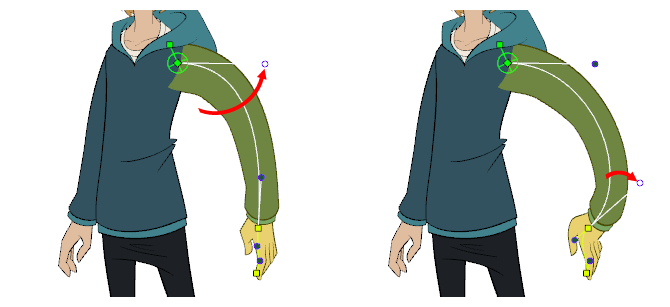
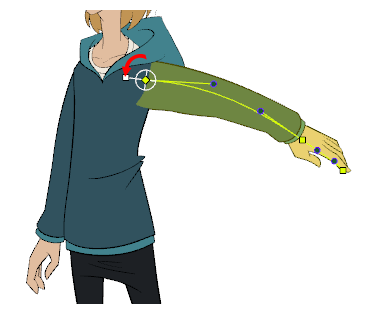
- Click and drag on the root point to offset the entire limb.
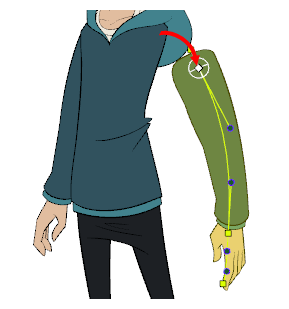
- Click and drag on the rotation handle behind the root pivot point to rotate the entire limb.
- In the Timeline view, go to the frame on which you want to set the next key pose.
- Add a keyframe on the current frame by doing one of the following:
- In the Timeline toolbar, click the Add Keyframe
- Right-click and select Add Keyframe.
- Press F6.
- Transform your deformer's points to make your new key pose.
- Repeat the previous steps until your animation is complete.
- In the Timeline view, collapse your character using the Expand/Collapse arrow.
- Select the first frame of the scene.
- To ensure your model doesn't disappear after 1 frame, open the Extend Exposure dialog by doing one of the following:
- Right-click on the first frame in the Timeline and select Extend Exposure.
- Press F5.
- In the Extend Exposure dialog, type in the amount of frames in your scene and confirm. This will make your model exposed (visible) throughout your whole scene.
-
Now, we will make your character's first pose. First, make sure there is a keyframe on the first frame of every layer of the model. This ensures that when you make the second pose later, your first pose will not be affected. To do this do one of the following:
- In the Timeline toolbar, click the Add Keyframe button.
- Right-click and select Add Keyframe.
- Press F6.
- In the Timeline toolbar, click the
A keyframe is added on the current frame.
- In the Tools toolbar, select the Transform tool or press Shift + T.
- In the Tools toolbar, if Animate Off or Animate Onion Skin Range mode is selected, click on it to open the Animate pop-up menu and select Animate Current Frame.
- Do one of the following:
- In the
- In the Timeline
- In the Deformation toolbar, either:
- Click the Show the Selected Deformation Chain and Hide All Others button to show the selected element's deformation chain and hide any other deformation chain that is currently displayed.
- Click the Show Selected Deformers button to show the selected element's deformation chain along with any other deformation chain that is currently displayed.
- Click the
The selected deformation controls appear in the Camera view.
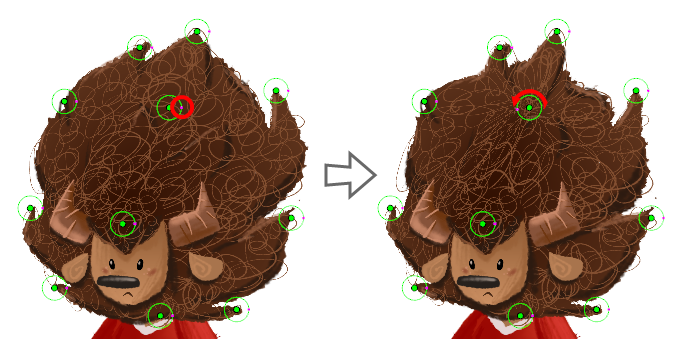
- In the Camera view, do the following:
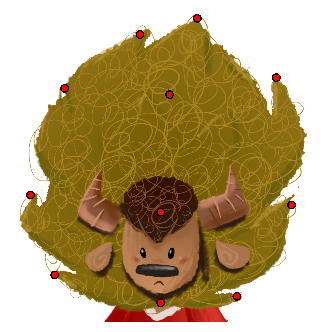
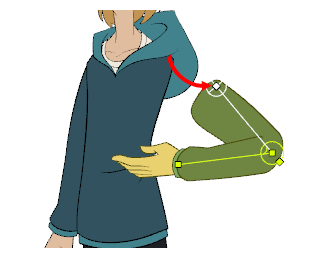
- Click and drag on any of the control points located along the envelope to deform your drawing.
 TIP You can also nudge a deformation point by selecting it, then pressing the arrow keys.
- Use the envelope's control point handles to modify the drawing's curves
- By default, if you rotate a Bezier handle for a point, the opposite Bezier handle for the same point will rotate along with it, influencing the curve on the other side of it. To rotate a Bezier handle independently from its opposite handle, click on this Bezier handle to select it. Then, while pressing and holding the Alt key, click and drag on this handle to rotate it.
- In the Timeline view, go to the frame on which you want to set the next key pose.
- Add a keyframe on the current frame by doing one of the following:
- In the Timeline toolbar, click the Add Keyframe
- Right-click and select Add Keyframe.
- Press F6.
- Transform your deformer's points to make your new key pose.
- Repeat the previous steps until your animation is complete.
- In the Timeline view, collapse your character using the Expand/Collapse arrow.
- Select the first frame of the scene.
- To ensure your model doesn't disappear after 1 frame, open the Extend Exposure dialog by doing one of the following:
- Right-click on the first frame in the Timeline and select Extend Exposure.
- Press F5.
- In the Extend Exposure dialog, type in the amount of frames in your scene and confirm. This will make your model exposed (visible) throughout your whole scene.
-
Now, we will make your character's first pose. First, make sure there is a keyframe on the first frame of every layer of the model. This ensures that when you make the second pose later, your first pose will not be affected. To do this do one of the following:
- In the Timeline toolbar, click the Add Keyframe button.
- Right-click and select Add Keyframe.
- Press F6.
- In the Timeline toolbar, click the
A keyframe is added on the current frame.
- In the Tools toolbar, select the Transform tool or press Shift + T.
- In the Tools toolbar, if Animate Off or Animate Onion Skin Range mode is selected, click on it to open the Animate pop-up menu and select Animate Current Frame.
- Do one of the following:
- In the
- In the Timeline
- In the Deformation toolbar, either:
- Click the Show the Selected Deformation Chain and Hide All Others button to show the selected element's deformation chain and hide any other deformation chain that is currently displayed.
- Click the Show Selected Deformers button to show the selected element's deformation chain along with any other deformation chain that is currently displayed.
- Click the
The selected deformation controls appear in the Camera view.
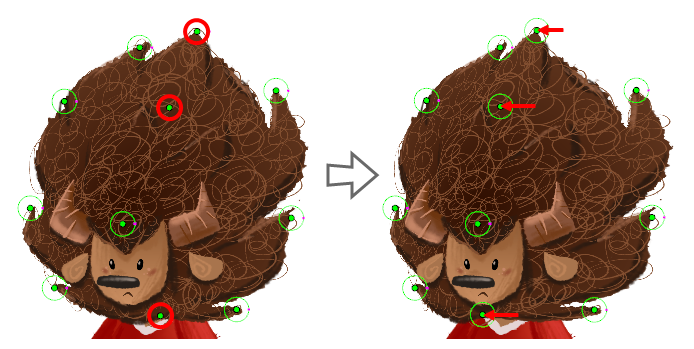
- In the Camera view, do the following:
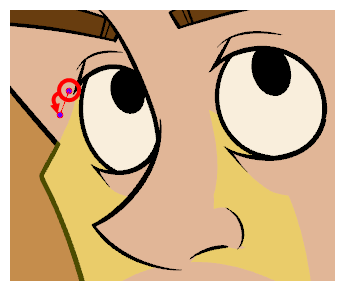
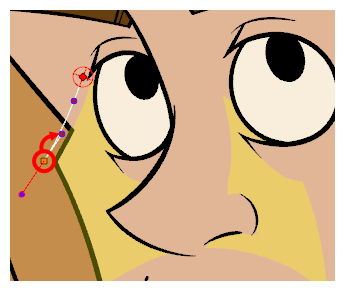
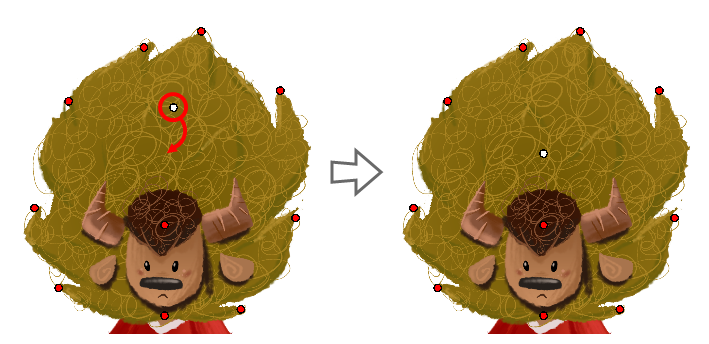
Click and drag on the centre of a control point to reposition it.
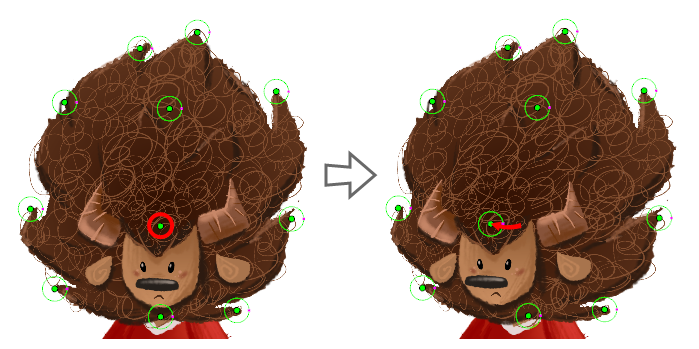 TIP You can also nudge a deformation point by selecting it, then pressing the arrow keys.
Click and drag on the purple handle right of a control point to rotate it.
-
Repeat for all the other control points until the drawing is deformed as intended.
- In the Timeline view, go to the frame on which you want to set the next key pose.
- Add a keyframe on the current frame by doing one of the following:
- In the Timeline toolbar, click the Add Keyframe
- Right-click and select Add Keyframe.
- Press F6.
- Transform your deformer's points to make your new key pose.
- Repeat the previous steps until your animation is complete.