The Brush tool allows you to draw by creating shapes based on your drawing strokes and filling them with colour. When used with a tablet, it is pressure sensitive, just like a real life brush.
- In the Tools toolbar, select the Brush
 tool.
tool.
The tool's properties are displayed in the Tool Properties view.
Brush Properties
The following properties affect the brush's size, smoothing and other properties for the drawing style of your brush. Those properties can be saved into brush presets for later use.
| Property | Description |
|---|---|
| Preview Area |
The Preview area lets you see a preview of the stroke your drawing tool will make.
|
| Brush Properties Dialog |
The arrow button right of the preview area opens the Brush Properties dialog.
While the Tool Properties view only gives you access to a few of the brush properties, a list of brush presets and other drawing options, the Brush Properties dialog gives you access to all the available options for your brush's tip and texture. For more information on the Brush Properties dialog, see the Brush Properties Dialog section below. |
| Maximum Size |
Defines the maximum width of brush strokes. If the tool is used with a pressure sensitive pen tablet, the width of the stroke will vary between its maximum size and minimum size depending on the amount of pressure used. If used with a mouse, the width of the stroke will always be its maximum size. |

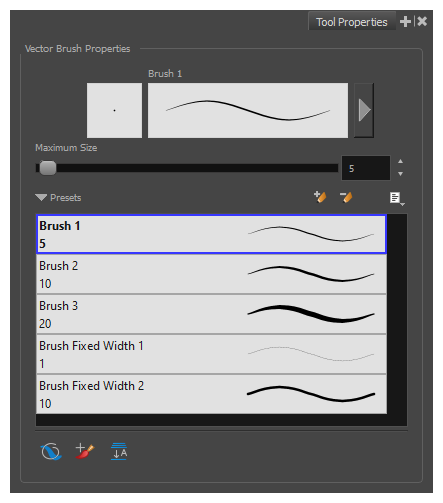
Brush Presets
These options allow you to select, create and manage brush presets.
| Icon | Property | Description |
| Presets list |
By default, Harmony has preloaded brush presets. You can also create your own brush presets by configuring your brush, then saving its properties into a new preset. It is also possible to export and import brush presets.
|
|
|
|
New Brush Preset |
Creates a new preset based on the current tool properties. |
|
|
Delete Brush |
Deletes the currently selected preset. |
|
|
Brush Presets Menu |
Open a menu that contains the following options:
|

Drawing Options
These options affect the way your drawing strokes are added to your artwork.
| Icon | Property | Description |
|
|
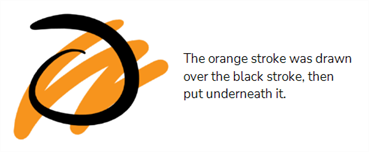
Draw Behind |
When enabled, your brush strokes will appear behind the existing artwork.
NOTE Your brush stroke will temporarily appear over your artwork as you draw it, until you release the mouse cursor or tablet pen.
|
|
|
Repaint Brush |
When enabled, your brush strokes will only repaint existing artwork and will not add colour to empty areas. If you repaint semi-transparent artwork, your artwork will not become more opaque than it already is.
|
|
|
Auto-Flatten Mode |
By default, when drawing, each new stroke is created as a separate drawing object, which can be edited independently from other parts of the artwork. When enabled, the Auto-Flatten option automatically merges strokes into existing artwork. |

Brush Properties Dialog
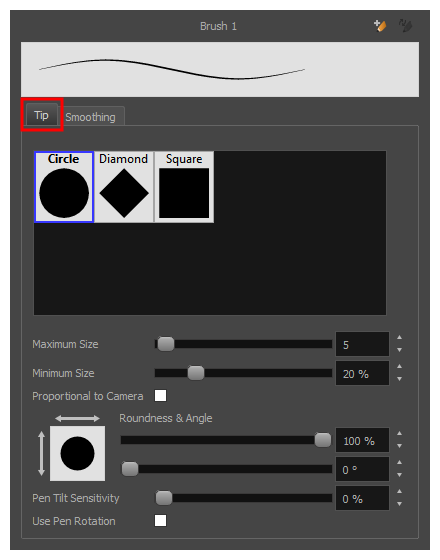
Brushes have an extensive set of options and properties that are not displayed in the Tool Properties view, but rather, in a dialog you can access from it. To open the Brush Properties dialog, click on the arrow button right of the stroke display area.

Tip Tab
The Tip tab allows you to configure the shape, size, hardness and spacing of your brush tip.
| Property | Description |
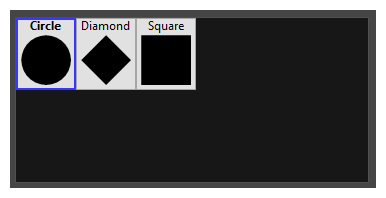
| Brush Tip Library |
This is where you select the shape of the brush tip. By default it is round. |
|
Minimum and Maximum Size |
The minimum and maximum sizes of your drawing tool produce the thick and thin effect on your stroke. This works with the pressure sensitivity of a pen tablet.
NOTE Setting the Minimum Size value to 100% eliminates the possibility of creating width variation on your stroke. In other words, you would be forcing a uniform line width using the Maximum Size value.
|
| Proportional to Camera |
If you check this option, the size of the brush will be adjusted to the position of the camera on the z-axis. This means that if the camera is zoomed in on the scene, the brush will be proportionally smaller so that it appears the same size in the rendered image. Likewise, if the camera is zoomed out, the brush will be proportionally bigger. |
|
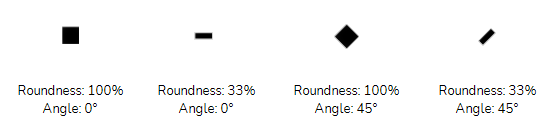
Roundness and Angle |
The Roundness and Angle parameters allow you to change the shape and orientation of the tip.
NOTE
The squashing is not relative to the angle—if the tip is rotated, the squashing will still be done relative to the tip's original orientation.
|
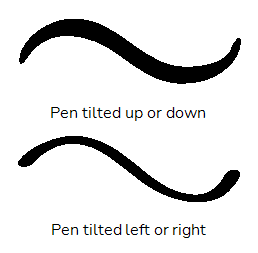
| Pen Tilt Sensitivity |
If your pen and tablet support tilt sensitivity, this option allows you to set whether your brush takes your pen's tilt angle into account, and how much. When your pen is fully tilted, your brush tip will be stretched by the percentage you set in this parameter, in the angle in which you tilt it. For example, if you set the Pen Tilt Sensitivity to 50%, and you tilt your pen all the way up or down, your brush tip will be stretched vertically by 50%. With the same setting, if you tilt your pen all the way left or right, your brush tip will be stretched horizontally by 50%.
|
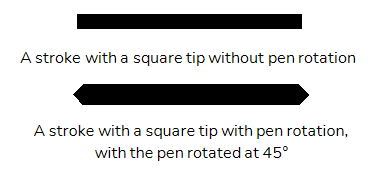
| Use Pen Rotation |
If enabled, and if your pen and tablet support tip rotation, your brush tip will rotate with the angle of your pen tip.
|
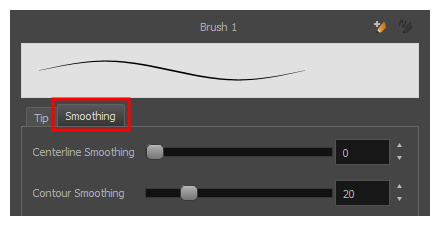
Smoothing Tab
The Smoothing tab contains options to configure how Harmony should automatically smooth your brush strokes as you paint.
| Property | Description |
| Centerline Smoothing | Defines the amount of smoothing Harmony should perform on the central line of the brush stroke. A higher setting will prevent your line from being shaky, but is liable to reduce drawing precision and turn sharp angles into curves. |
| Contour Smoothing |
Defines the amount of smoothing Harmony should perform on the outer contour of the brush stroke. A higher setting will round sharp corners and reduce the amount of control points for the resulting vector shape. |