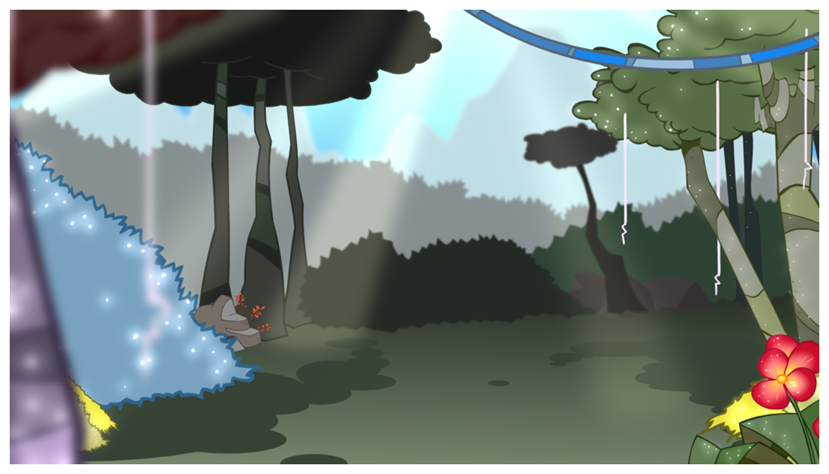
When creating a scene, rigging a character or once your animation is finished, you can add effects such as blurs, glows, shadows, colour filters and transparency filters and to enhance your project's quality. Effects change the way layers or groups of layers are rendered in your scene.
About Effects
Effects are special types of layers that you can add to your scene's structure. For an effect layer to work, it must be connected as the child of a drawing, a group, or another effect. Effects only alter the element that they are connected to. This gives you flexibility in deciding which elements of your scene are affected by an effect.
Some effects need to be linked to another layer, referred to as a matte layer, which is used to define the area they should affect.
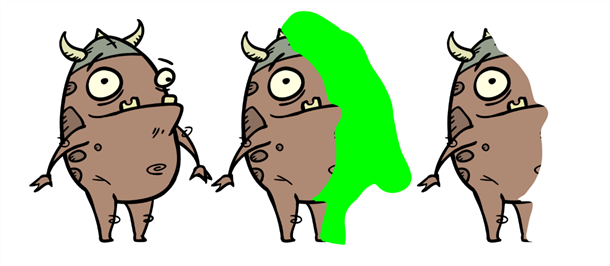
A matte layer is simply a regular drawing layer that is connected to an effect as its matte. The effect takes the shape of the drawing in the matte layer to determine the area of the drawing it affects. The colours and details in the matte layer are ignored by the effect, only its shape is taken in account.
In the Timeline view, an effect must be rigged as the child of the drawing layer or group it is meant to affect.

If the effect can use a matte layer, it will have a Matte parameter when you expand its parameters list. You can drag and drop the layer you want to use a matte for your effect onto the Matte parameter of your effect to link them.

If the effect can use a matte layer, it will have a matte port on its left to which the matte layer can be connected.
Once your effect is connected, you can adjust its parameters by selecting it, then adjusting its parameters using the Layer Properties view.
Adding an Effect
In Harmony, you can add effects by selecting the layer or group you wish to add an effect to, then adding the effect through the Timeline view's Add Layers menu. Then, you can achieve the intended effect by adjusting its parameters in the Layers Properties view, and connecting it to a matte layer if applicable.
- In the Timeline view, select the layer on which you want to add an effect.
- Do one of the following:
- In the top menu, select Insert > Effects and select the effect you want to add.
- In the Layers toolbar above the layer list, click the
Add Layers button, select Effects then select the effect you want to add.
- Right-click on the layer, then select Insert > Effects and select the effect you want to add.
The effect appears in the Timeline view, underneath the selected layer.

- In the Camera view, click the
Render View button to see the scene's rendered current frame and effect.
NOTE By default, your background will appear pitch black. To remedy this, you can add a Colour Card layer at the bottom of your layers list, and tweak its colour in the Layer Properties view.
- In the Timeline view, double-click on the effect layer to open the Layer Properties window. You can also select the effect layer and see its properties in the Layer Properties view.
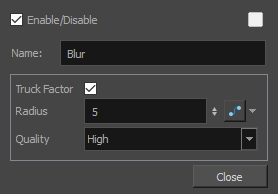
The Layer Properties view opens, displaying the parameters available for the selected effect.
-
In the Layer Properties view, adjust the effect’s parameters as needed.
NOTE Each time you make a change, the Camera view will need to refresh the rendered image, which may cause a little delay before you can observe its effect.
- Most effects will not play back in real time in Harmony. To play back your scene with the final effects, in the Playback toolbar, click the
Render and Play button in the Timeline view toolbar.
Using the Cutter Effect

The Cutter effect cuts out a portion of an image. To do this, it needs to be connected to the drawing it is intended to cut as well as to a matte layer. The cutter will take the shape of the drawing in the matte layer and cut this shape out of the drawing layer. This is especially useful if you want to make a character disappear between a background element, or if you want to cut out a hole in the middle of a character.
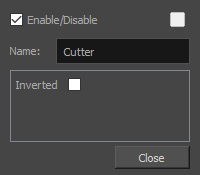
Like all effects that use a matte, the Cutter's effect has an Inverted parameter, which is disabled by default. When enabled, the Cutter will have the reverse effect: Instead of cutting the matte's shape out of the drawing, it will cut everything outside of the matte's shape out of the drawing, leaving only the parts of the drawing that are covered by the matte.

- Select a drawing layer.
- Do one of the following:
- In the toolbar above the layer list in the Timeline view, click on the
Add Layer button and select Effects > Cutter.
- Right-click on the layer and select Insert > Effects > Cutter.
- In the toolbar above the layer list in the Timeline view, click on the
The Cutter effect is created as a child of the selected layer.

- In the toolbar above the layer list in Timeline view, click on
Add Drawing Layer .
-
In the Add Drawing Layer dialog, give your new drawing layer a relevant name for a matte layer, such as "Matte-Drawing", then click on Add and Close.

-
In the new matte drawing layer, draw a matte for your effect. Your matte can be a simple shape, but should be filled with a colour, as only parts of the matte that are opaque will be taken in account.
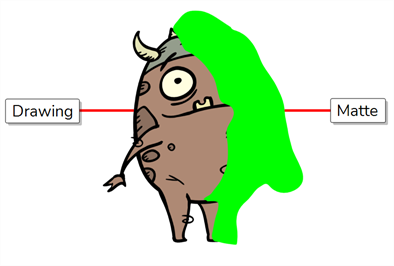 NOTE Mattes can also have semi-transparent areas. Areas of the drawing that are covered by semi-transparent areas of the matte are partially affected by the effect.
-
In the Timeline view, click on the Expand
button right of the Cutter layer.

The Cutter's Matte parameter appears below it.

-
Drag and drop your matte layer next to your Cutter layer's Matte field, under the Parameters column.

The matte drawing layer becomes the Cutter layer's matte. At this point, areas of the artwork that intersect with the artwork in the matte drawing layer are hidden.

- If you want to invert the Cutter's effect, so that the artwork that intersects with the artwork in the matte layer is visible and that everything else is hidden, double-click on the Cutter layer (but not on its name) to open its Layer Properties dialog, then check the Inverted parameter.
Animating an Effect
You may need to animate some effects to obtain the expected results. For example, you may want the radius of a Glow effect to slowly increase and decrease to make it pulsate throughout a scene, or you may want the transparency of a Transparency effect to increase from 0% to 100% to make a drawing vanish.
Almost all numerical parameters in an effect can be attached to a function. A function allows you to set a parameter to different values at different points in the scene by adding keyframes to it, and setting each keyframes to a specific value. Between keyframes, the value of the parameter will progress from the value of the previous keyframe to the value of the next keyframe. Drawing layers are animated by having their coordinates associated to functions. Likewise, effects can be animated by associating their parameters to functions.
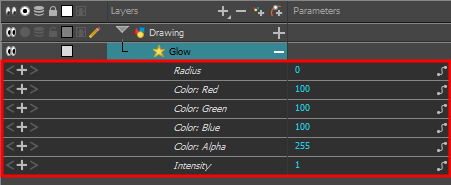
Some effect parameters can be animated directly in the Timeline view, but not all. When you expand an effect's parameters in the Timeline view, some of its parameters may be hidden to avoid cluttering the Timeline view. You can animate those parameters from the Layer Properties view or the Layer Properties dialog, which display all of a layer's parameters.
-
In the Timeline view, locate the effect you want to animate, and click on the
Expand button right of its name.

The list of parameters that effect's paramaters that are available in the Timeline view appears.
-
In the right area of the Timeline view, in the same row as the parameter you want to animate, select the frame where you want to create the first animation keyframe for the effect.

-
Create a keyframe by doing one of the following:
- In the Timeline toolbar, click the
Add Keyframe button.
- Right-click and select Add Keyframe.
- Press F6.

- In the Timeline toolbar, click the
- In the left area of the Timeline view, under the Parameters column, adjust the value of the parameter for this keyframe by doing one of the following:
Click and hold on the value of the parameter, then drag it towards the left to reduce its value, or towards the right to increase its value.

Click on the value of the parameter. A text field will appear. Type in the new value of the parameter, then press Enter.

-
In the right area of the Timeline view, click on the frame where you want to create the second animation keyframe for the effect.

-
Create the second keyframe for your effect's animation by doing one of the following:
- In the Timeline toolbar, click the
Add Keyframe button.
- Right-click and select Add Keyframe.
- Press F6.

- In the Timeline toolbar, click the
- In the Parameters column, adjust the value of the parameter at the current keyframe.
- Repeat the steps to create as many animation keyframe for your effect as needed.
- To adjust the timing between the keyframes of your animation, select the first keyframe.
-
In the Timeline toolbar, click on the
Set Ease for Multiple Parameters button.
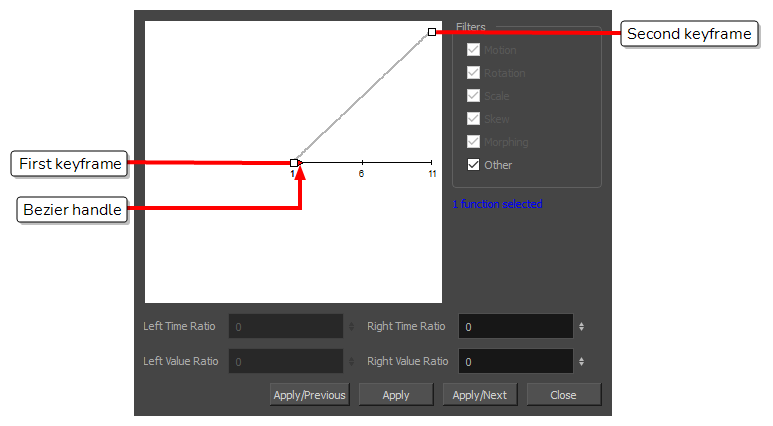
The Set Ease for Multiple Parameters dialog appear. The function graph in this dialog will be focused on the first
 keyframe in your animation, which should have a
  Bezier handle right next to it, pointing to the right.
-
Click on the
 Bezier handle and drag it towards the right, at any angle, to adjust the ease-in of the animation.
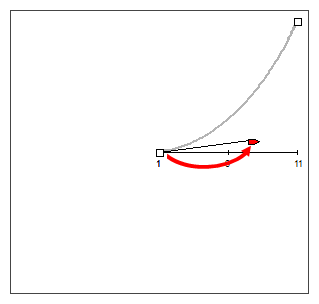
-
Click on Apply/Next.
The Set Ease for Multiple Parameters dialog will focus on the second keyframe. If this is the last keyframe in the animation, it will only have one Bezier handle, pointing towards the left. If there are more animation keyframes after this one, it will have two Bezier handles, one pointing in each direction.
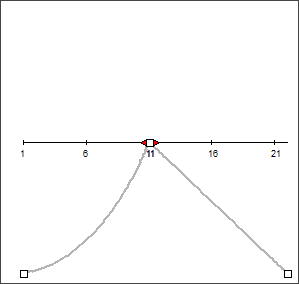
-
Click on the left
 Bezier handle and drag it towards the left, at any angle, to adjust the ease-out of the animation between the previous keyframe and the current keyframe.
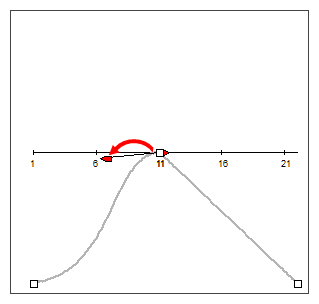
-
If there is a
 Bezier handle pointing towards the right, click on it and drag it towards the right, at any angle, to adjust the ease-in of the animation between the current keyframe and the next keyframe.
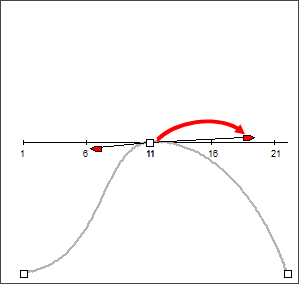
- Repeat the previous steps until the timing for your animation is adjusted throughout the entire scene.
- Open the effect's Layer Properties by doing one of the following:
- Add the Layer Properties view to your workspace, then select the effect in the Timeline view.
- In the Timeline view, double-click on the effect layer, but not on its name.
-
In the effect's layer properties, locate the parameter that you want to animate and click on the
Function button to its right.
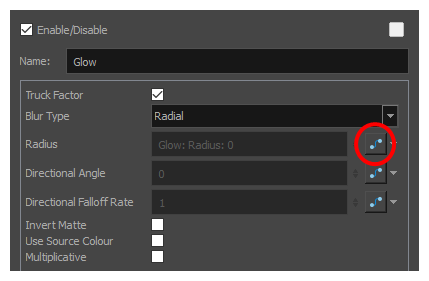
The parameter's input field will be greyed out. This is because you cannot directly edit a parameter once it is attached to a function. The field will indicate the name of the function that was created for it, in this format:
Name of layer: Name of function: Value at current frame
-
Click on the parameter's Function button again.
The Bezier Editor dialog opens.
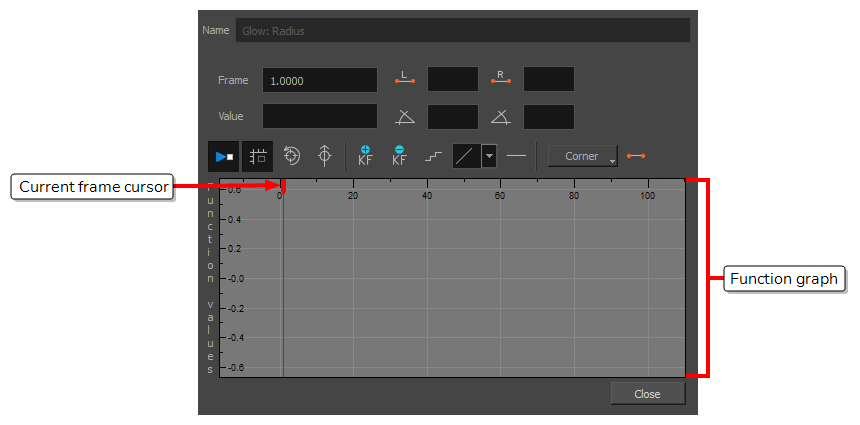
This dialog will allow you to animate the function. The function graph at the bottom is made to represent the values of the function throughout each frame in the scene.
-
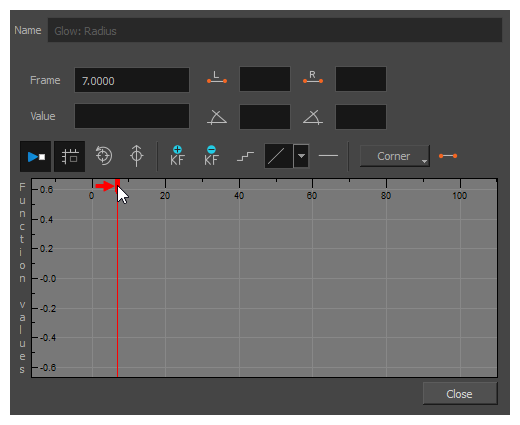
In the function graph, click and drag on the red cursor
 to move it to the frame where you want to create your first animation keyframe.
-
Click on the
Add Keyframe button to create the first animation keyframe for the effect.
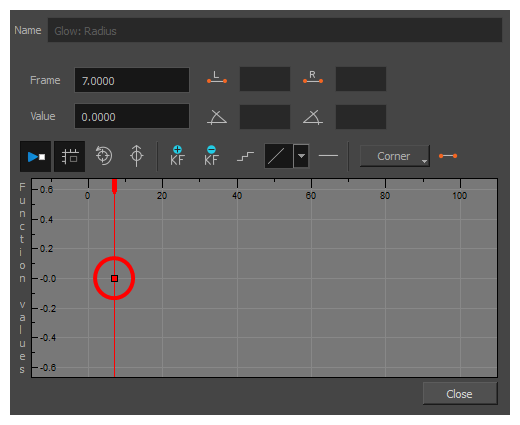
A keyframe
 is created and should be visible in the function graph. If you do not see it, that is because the function graph is not positioned to include the keyframe within its frame. To move the function graph to view the function's keyframe, click on the
 Reset View or
Reset View Vertically button.
- Adjust the value of the parameter at the current frame by doing one of the following:
- In the Value field over the function graph, type in the desired value for the parameter.
In the function graph, click and drag on the
 keyframe , and move it up to increase its value, or down to decrease it. TIP If you want to set the keyframe to a value that is outside of the function graph's frame, you can press the 1 key to zoom out. You can also press the 2 key to zoom back in.
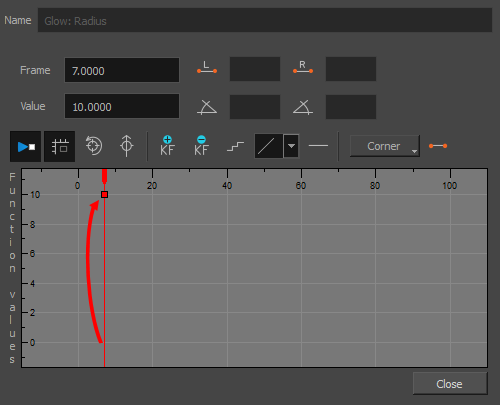
-
Click and drag on the red cursor to move it to the frame where you want to create your second animation keyframe.
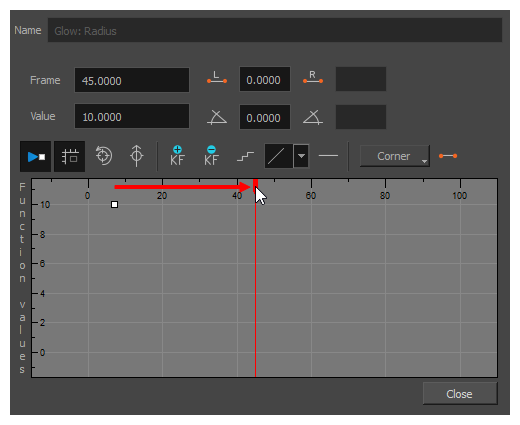
-
Click on the Add Keyframe
button to create the second animation keyframe for the effect.
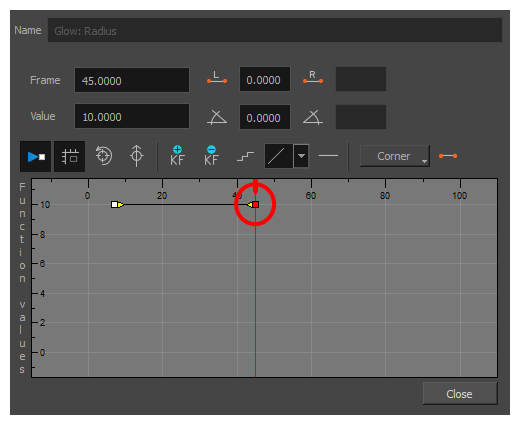
- Adjust the value of the parameter at the current frame by doing one of the following:
- In the Value field over the function graph, type in the desired value for the parameter.
- In the function graph, click and drag on the
 keyframe , and move it up to increase its value, or down to decrease it.
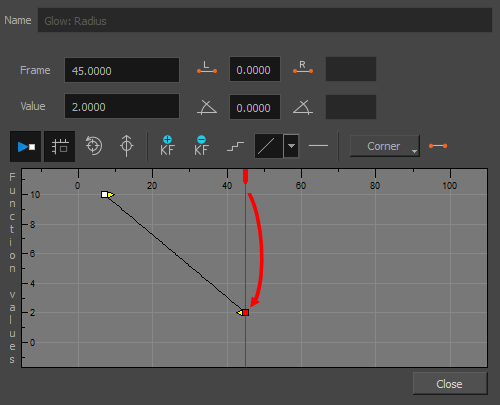
-
If you want to adjust the timing of the animation between the first and second keyframes, do the following:
-
Click and drag the
 Bezier handle of the first keyframe towards the right, in any direction, to affect the ease-in of the animation.
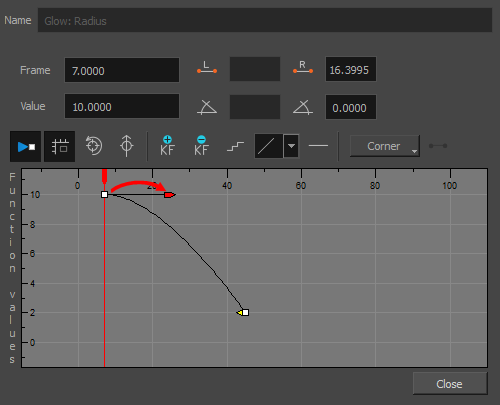
-
Click and drag the
 Bezier handle of the second keyframe towards the left, in any direction, to affect the ease-out of the animation.
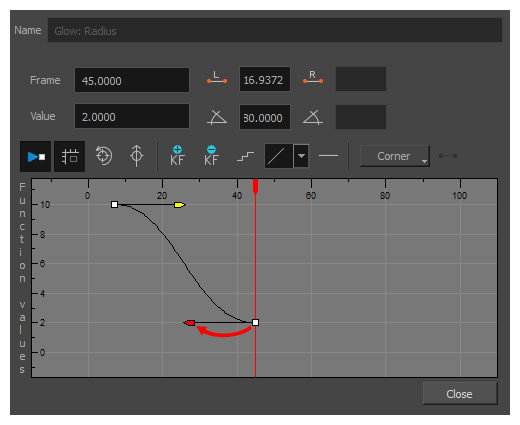
-
- Repeat these steps until you created and timed every animation keyframe required to animate your effect.
Creating an Effect Based on an Animated Character
The following tutorial demonstrates how to combine Effects with other Harmony functionalities to easily create a drop shadow for an animated character. By following these steps, you can create a drop shadow that will automatically follow your character's animation, even if you change the animation afterward.
- In the Timeline view, select all the layers making your character's rig. If your character is under a master peg, selecting the master peg will also work.
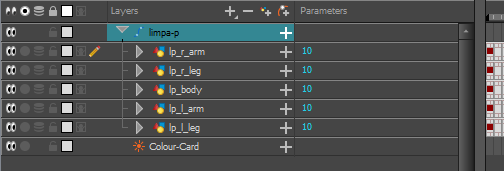
- Make sure your character's rig is in a group. If it is not, right-click on your selection, then select Group Selection.
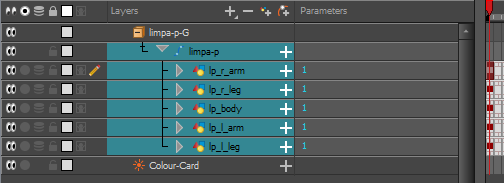
- With your character selected in the Timeline view, create a Clone of your character by doing one of the following:
- Right click on your selection, then select Clone Selected Layers: Drawings and Timing.
- From the Top menu, select Edit > Clone: Drawings and Timing.

- Add a Shadow effect to your group by doing one of the following.
- In the Timeline view's layers toolbar, click on Add Layers
and select Effects > Shadow.
- Right-click on your selection, then select Insert > Effects > Shadow.

- In the Timeline view, select the root layer of your character's clone.
- Create a parent peg for your clone by doing one of the following:
- From the Timeline View layers toolbar, click the Add Peg
button.
- Press Ctrl + P (Windows/Linux) or ⌘ + P (macOS).

- In the Timeline view, select your clone's parent peg.
- In the Tools toolbar, select the Transform
tool.
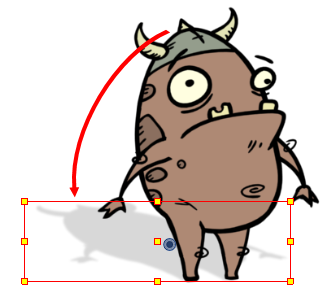
- In the Camera view, scale and skew your clone so that it looks like a drop-shadow.
