Toon Boom Harmony 16.0.0 Release Notes
Here is the list of changes in Harmony 16.0.0, build 14155.
Features
Harmony Server
| Feature | Description |
|---|---|
| Local Caching |
When opening a scene in a Harmony Server database, you can choose to cache the scene's drawings locally as you open the scene. Harmony will load the drawings from the cache on your computer instead of over the network, which will increase its performance and stability when working on heavy scenes. If you make changes to the drawings in your scene, Harmony will automatically upload the updated drawings back to the database when you save, so you do not have to worry about doing it yourself. To use the local cache, check the Cache scene assets locally checkbox at the bottom of the Database Selector dialog when browsing for a scene to open |
Master Controller
| Feature | Description |
|---|---|
| Interpolation Slider Wizard |
The new Interpolation Slider wizard allows you to create a slider widget which can be used to pose a character, or part of a character, based on a series of linear poses.
You can launch the Interpolation Slider Wizard by clicking on the |
| Master Controller Toolbar |
The new Master Controller toolbar includes buttons to access the Interpolation Grid wizard and the Interpolation Slider wizard |
| Master Controller View |
The new Master Controller view can help you quickly find, select and display Master Controllers in your scene, so that you do not have to navigate your scene's node system to select and display Master Controllers |
| Widget Keyframes |
New Master Controllers generated with one of the Master Controller wizards will store the position of their widget in keyframes when you manipulate them. Hence, Harmony will remember where the widget was positioned at every frame where it was manipulated. This will allow animators to easily tweak the position of the character from where they last set it. |
| Performance Enhancements | Master Controller are now faster at reading and updating node attributes, making their manipulation smoother and less resource-intensive. |
| Automatic Extra Files Set-Up | When creating a Master Controller with the Interpolation Grid Wizard or the Interpolation Slider Wizard, the Master Controller node will automatically have a list of files it requires in its Extra Files parameter, so you do not have to add them manually. |
| Monitor Attributes of Collapsed Layers | When you select a layer with collapsed children layers in the Timeline view and run one of the Master Controller wizards, the attributes for the selected layer and all of its children will be added to the list of monitored attributes. Hence, you no longer need to individually select all the layers which you want the Master Controller to control. Just collapsing your layers and selecting the top peg or the top group of your rig will be enough. |
| Add/Remove Attributes |
When creating a Master Controller with the Interpolation Grid or Interpolation Slider Wizard, you can add or remove nodes or attributes on the fly:
For more information, see Interpolation Grid Wizard Dialog Box and Interpolation Slider Wizard Dialog Box. |
| 2D Point Widget Size | The size of 2D Point Widget no longer changes when zooming in or out of the scene, allowing you to zoom in to see any detail it obstructs, and to easily select it even when zoomed out. |

Deformations
| Feature | Description |
|---|---|
| Envelope Creator |
The Envelope Creator dialog box allows you to quickly generate an Envelope or Curve deformation chain based on the shape of your artwork.
To use the Envelope Creator, select a drawing, then select Animation > Envelope Creator > Create Envelope in the top menu |
| Multiple Deformation Point Manipulation |
By enabling the
|
| Nudge Deformation Points | When one or several Curve or Envelope deformation points are selected, you can now nudge them using the arrow keys on your keyboard. |

Digital Animation
| Feature | Description |
|---|---|
| Drawing Substitutions View |
The new Drawing Substitutions view displays all of the drawings contained in the selected layer as thumbnails, and allows you to quickly swap which drawing is exposed at the current frame simply by clicking on it
|
| Animate Onion Skin Range |
With the Animate Onion Skin Range mode, you can animate a layer or peg on every frame in the Onion Skin range simultaneously. This can allow you to offset the position of a layer or peg in several keyframes simultaneously. It can also work with any range of frames, even if it does not have keyframes, as this mode creates keyframes at the beginning and end of the Onion Skin range if needed. To use the Animate Onion Skin Range mode, double-click on the |
| Hide Pivot for Advanced Animation Tools | You can now hide the pivot of the selected layer when using the |

Paperless Animation
| Feature | Description |
|---|---|
| Shift and Trace Tool |
The new Shift and Trace tool allows you to temporarily move, rotate and scale drawings, then trace over them in other drawings directly in the Camera view. About the Shift and Trace Tool To use the Shift and Trace tool, add the Shift and Trace toolbar to your workspace, then select the |
| Advanced Onion Skin |
Advanced Onion Skin allows you to include or exclude any of the 10 drawings before and after the current frame, as well as to set the individual opacity of each drawing. To use Advanced Onion Skin, in the Tools toolbar, double-click on the Show Onion Skin button and select Show Advanced Onion Skin. Then, add the Onion Skin view to your workspace so you can configure which drawings are displayed as well as their opacity |
| Better Onion Skin Handles |
When Onion Skin is enabled, the handles around the Timeline playhead, with which you can set the amount of frames before and after the current frame to display in the Onion Skin, have been made significantly easier to see and to use
|
Drawing
| Feature | Description |
|---|---|
| Stamp Tool |
The new Stamp tool can be used to stamp one or several drawings into your artwork. It can be used to stamp drawings one at a time or to draw strokes with it. The behaviour of the stamp tool when drawing strokes can be customized in many ways.
To use the Stamp tool, simply select the NOTE The Stamp tool replaces the Dynamic Brush option of the Brush tool in Harmony 15.0 and earlier.
|
| Apply to All Drawings / Drawings in Onion Skin Range |
You can now use the It is also easier to use these tools on all drawings in the current layer. Previously, to do this, you had to enable the Permanent Selection and Apply to Multiple Drawings tool modes at the same time. Now, you can just enable the For more information, see Painting Several Drawings Simultaneously, Paint Tool Properties, Selecting Artwork in Several Drawings, Select Tool Properties, Cutting Artwork in Several Drawings and Cutter Tool Properties |
| Apply to Selected Layers / All Layers |
You can now use the
For more information, see Painting Several Layers Simultaneously, Paint Tool Properties, Selecting Artwork in Several Layers, Select Tool Properties, Cutting Artwork in Multiple Layers, Cutter Tool Properties |
| Relative Brush Size |
The new Proportional to Camera option of the Brush To enable this option, click on the |
| Easy Drag |
The To enable Easy Drag mode, click on the |
| Mirror View |
You can now temporarily flip the contents of the Camera and Drawing views horizontally by enabling Mirror View. To enable Mirror View, click on the |
| Lasso/Marquee Selection Mode |
In the Tool Properties view, if you set the selection mode for the current tool to either NOTE The selection mode can be set when using the
|
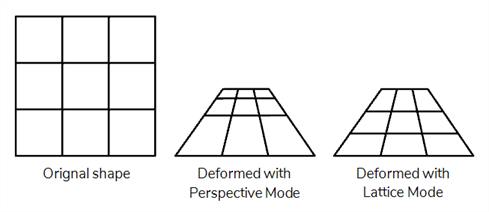
| Perspective tool modes |
The Perspective tool can now be used in either Perspective
|

Colour
| Feature | Description |
|---|---|
| Consolidate Colours into a Palette |
Using the Create Palette from Selection dialog box, you can now instantly generate a palette containing all of the colours in the selected artwork. To use the Create Palette from Selection dialog box, select all the layers for which you want to create a palette. Then, in the Colour View, click on the |
Effects
| Feature | Description |
|---|---|
| Shake Node |
The new Shake node will apply an earthquake like motion to any node rigged under it. It is an improvement on the Quake node, with a more realistic and erratic-looking shaking motion, as well as more parameters than the Quake node |
| Transform-Loop Node |
The new Transform-Loop node will take the animation from its parent peg and loop it for the entire duration of the scene. This can be used to animate the motion of a looping background only once, and let the Transform-Loop node take care of repeating this animation. When repeating the animation, it skips the first frame, as it is typical for the first and last frame of a looping background to look exactly the same. The default behavior of the Transform-Loop is to loop the animation forward. By setting its Loop Type property to Ping-Pong, the Transform-Loop node will alternate between looping the animation forward and backward. By setting its Loop Type to Repeat and Offset, it will accumulate the effect of the animation each time it repeats it, offsetting the drawing rigged under it more and more each time the animation is repeated |
3D
| Feature | Description |
|---|---|
| Render 3D Model as 2D Layer |
You can now import a 3D model as a pre-rendered 2D bitmap layer. This can be useful if you need to use a 3D model as a reference to draw backgrounds, characters or other assets. To import a 3D model as a pre-rendered 2D image, select File > Import > 3D Models from the top menu. Then, in the Import 3D Model dialog, check the Convert to 2D option. You will be prompted to position the 3D model before rendering it in another dialog |
| Scale Factor |
You can now apply a scale factor to your 3D models. This allows you to scale your 3D models up or down without actually changing the value of their scale coordinate, hence changing their default size in your scene. You can also set a default scale factor for when you import 3D models into your scene. To apply a scale factor to a 3D Model, locate it in the 3D Models library of the Library view, right-click on it and select Set Scale Factor |
Node View
| Feature | Description |
|---|---|
| Waypoints |
It is now possible to organize the connection cables in the Node view with the use of waypoints. A waypoint can have two purposes:
You can create a waypoint on a cable by clicking and dragging on the circle in the middle of a cable in the Node View. You can also right-click on a cable and select Create Waypoint. To connect a waypoint to another node, hold the Shift key, then click an drag on it to create a new cable than can be connected to a node. For more information, see About Waypoints. |
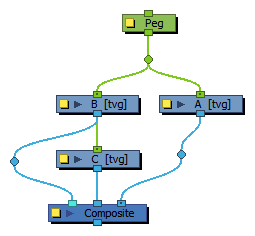
| Connecting Composites |
If you select several nodes and create a composite, this composite will be instantly connected to all of the selected nodes |
| Keyboard Navigation |
You can now navigate the Node view using keyboard keys. To do this, you must select a node's port, then use the arrow keys to navigate from port to port or from now to node, as well as the Enter/Return key to enter or exit groups |
| Snapping Nodes | When you move nodes in the Node view, their horizontal position will snap to make their connection cables straight, and their vertical position will snap to align to other nodes. This will make it easier to make clean-looking organized node systems. |
| Nudging Nodes |
You can now nudge the position of nodes by selecting them and pressing the arrow keys on your keyboard |
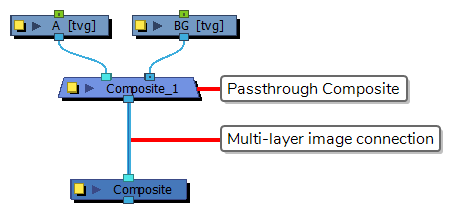
| Pass Through Cables |
Node view cables that carry several layers of image information—typically output cables of pass through composites—now appear thicker, to differentiate them from cables that carry single layers of image information
|
Playback
| Feature | Description |
|---|---|
| Mini Playback |
The new Mini Playback toolbar allows you to quickly play a short span of animation before and after the current frame. This can be useful for previewing the part of your scene's animation that you're working on |
| Persistent Start and Stop frames | The Start and Stop frames set in the Playback toolbar are now saved in the scene. They will persist after closing and reopening the scene. |
Staging
| Feature | Description |
|---|---|
| Tiled Bitmap Backgrounds |
Images imported as original bitmaps can be made to tile infinitely beyond its boundaries. Bitmap images can either be tiled horizontally, vertically or both. This can be used to make looping backgrounds. To tile bitmap images, open the Layer Properties dialog for the layer and, in the Drawing tab, under Bitmap File option, check the Tile Horizontally or Tile Vertically checkboxes—see Element / Drawing Node. NOTE This only works images imported as original bitmap images, not Toon Boom bitmap drawings.
|
Scene Settings
| Feature | Description |
|---|---|
| Decimal Frame Rate |
Harmony now supports setting the scene's frame rate to a decimal number. This can accommodate pipelines that use 23.976 frames per second or 29.970 frames per second as their frame rate for compatibility with legacy standard displays |
Import / Export
| Feature | Description |
|---|---|
| Import PSD with Groups and Blending Modes |
You can now import Photoshop Document (.psd) files in Harmony and preserve their group and layer structure as well as the blending modes of layers and groups. The old way of importing multi-layer PSDs into Harmony, which is still available, imported each group in the PSD file as a layer, and each layer in the each group as a drawing in its respective layer. This new method simply imports each layer as a layer, each group as a group, and if any layer or group has a specific blending mode, it will be attached to a Blending node with the same blending mode, so as to replicate the look of the Photoshop Document as accurately as possible. To import multi-layer PSDs and preserve their group, layer and blending mode structure, select File > Import > Images in the top menu and select your PSD file for import. Then, the Multilayer Image Import Settings dialog will appear. In the Create drop-down, select Individual Layers. To import multi-layer PSDs and convert groups to layers with multiple drawings, select Groups as Layers in the Create drop-down instead. For more information, see About Importing a Multi-Layer PSD |
| Export Animated GIF |
You can now export a scene, or part of your scene, as an animated GIF image. To export an animated GIF, select File > Export > Animated GIF from the top menu—see |
Preferences
| Feature | Description |
|---|---|
| Automatic Bitmap Pixel Density |
If the new Pixel Density Proportional to Camera preference is enabled, new drawings will have their pixel density adjusted to the camera's current zoom level. This preference is available at the bottom of the Drawing tab in the Preferences dialog |
| Default 3D Model Scale Factor | The Default Scale Factor preference allows you to set the default scale factor for 3D models you import into your scene. You can set this option in the General tab of the Preferences dialog |
| Render View Image Cache | You can now set the maximum cache size of the render preview as a percentage of your machine's RAM instead of a set amount of RAM. You can also enable or disable caching on the disk. Both preferences can be found in the Render tab of the Preferences dialog, in the Render View Image Cache section |
Gaming
| Feature | Description |
|---|---|
| Timeline Markers in Harmony Essentials | Timeline Markers, a feature previously exclusive to Harmony Advanced and Harmony Premium, are now available in Harmony Essentials to accommodate the creation of gaming rigs. |
Scripting
| Feature | Description |
|---|---|
| Smart Script Management |
In the past, scripts packaged with Harmony were all automatically copied to your preferences folder, in the same location as your custom scripts. Now, scripts packaged with Harmony are only copied to your preferences if you make modifications to them. Otherwise, they are stored and executed from the Harmony installation folder. This solves several problems:
For more information, see Editing a Script Packaged with Harmony, Restoring a Harmony Script and Script Editor View. |
| Custom Script Folder |
You can now set a custom location in which to store scripts. To do this, you must set the TOONBOOM_GLOBAL_SCRIPT_LOCATION environment variable to the location where you want to store scripts. The scripts in this location will be available in the Script Editor alongside scripts that are packaged with Harmony and scripts in your user preferences |
| Show Attribute Information |
By enabling the Show Attribute Information option in the Node View, a button is added next to each attribute in the Layer Properties dialog and view. Clicking on this button will display information on how to access this attribute in the Harmony scripting interface, as well as a sample script to store the attribute's value in a variable. You can enable this option by clicking on the |
| User Interface Responders | The scripting interface now provides you with a list of responders from the Harmony user interface. You can obtain this list with the getResponderList() method. You can obtain the list of actions for a given responder with the getActionList() method |
| Scene Modification Callbacks | It is now possible to bind callbacks to scene modifications using the SceneChangeNotifier class. This class contains several signals that are triggered when different kinds of changes are done to the scene, and which can be bound to functions |
| Perform actions on specific nodes | It is now possible to perform actions on specific nodes by specifying their absolute path in the Node view. Previously, the Action.perform() method would only take two parameters: The action to executre and its target responder, and would always work on the selected nodes only. You can now optionally specify the target node or nodes as its third parameter |
| Documentation of widgets | Examples of how to create and configure user interface widgets has been added to the Harmony scripting interface documentation |
| Documentation of the node class | Examples of how to use the node class have been added to the Harmony scripting interface documentation |
| Documentation of the Attribute class | Examples of how to use the Attribute class have been added to the Harmony scripting interface documentation |
| Set the value of an attribute at any frame |
The new setValueAt method of the Attribute class can set the value of the attribute at a specific frame rather than at the current frame |
| Obtain an attribute's sub-attributes | The new getSubAttributes() method of the Attribute class will now return the list of the attribute's sub-attributes |
| Convert a coordinate for single axis between fields and OpenGL coordinates |
The following methods were added to the scene class to convert the coordinate for a single axis from field coordinates to OpenGL coordinates, and from OpenGL to field coordinates: toOGLX(), toOGLY(), toOGLZ(), fromOGLX(), fromOGLY() and fromOGLZ() |
| Get individual version numbers | The new getMajorVersion(), getMinorVersion(), getPatchVersion() and getBuildNumber() methods of the about class will provide their respective values from the currently installed version of Harmony |
| Waypoints | The waypoint class was added to allow you to create and manipulate waypoints in the Node View |
| Scriptable Toolbars and Views |
It is now possible to create toolbars and views using the Harmony scripting interface, by creating packages containing their functionalities, user interface and assets. You can find an example of a package containing a toolbar and a view created through the scripting interface in the Plugins/ScriptingInterfaces/Resources/packages/MasterController directory inside the Harmony installation directory:
You can create user packages in the packages sub-directory of the 1600-scripts directory of your user preferences. This directory is the following location:
|
| Slider widget coordinates in fields |
It is now possible to set the position of a Slider widget in true field coordinates. To do this, you must create a Point2D widget, set its position, and set this Point2D widget as the position property of your SliderWidget. This will set the position of your Slider widget on a true fields coordinate system. You can also use the screen_space property of the SliderWidget class to decide if its position is relative to the screen rather than the scene |
| Set the Extra Files attribute of a Master Controller or Script Node |
It is now possible to set the Extra Files attribute of a Master Controller node or Script Node using the scripting interface. This is used by the Interpolation Grid and Interpolation Slider wizards to set the Extra Files attribute of the new Master Controller nodes they generate to include every file these Master Controllers depend on. Here is an example of how to set this attribute to "scripts/" for a MasterController node at the root of the scene: var colName = column.generateAnonymousName();
column.add(colName, "FILE_LIBRARY");
node.linkAttr("Top/MasterController", "files", colName);
column.setEntry(colName, 1, 1, "scripts/");
|
| Multiply Quaternions | The multiply method was added to the Quaternion class. It allows you to multiply the quaternion with another quaternion |
| Set pencil texture | The setCurrentPencilTextureById method was added to the PaletteManager class. It can be used to select a pencil texture |
| Environment variables for external processes |
The addEnvVariable() method was added to the Process class. It can be used to set a specified environment variable to a specified value for the process before running it. Additionally, the resetEnvVariableList() method will unset all the environment variables set by the addEnvVariable() method |
| Get exit code of external process | The getLastErrorCode() method was added to the Process class. When the process has ended, this method can be used to obtain the exit code or error code of that process |
| List of attribute names and keywords for a node |
The getAllAttrNames() and getAllAttrKeywords() methods were added to the node class:
For more information, see Harmony Scripting Interface Reference |
Enhancements
- It is no longer possible to make any changes to a layer's exposure or keyframes in the Timeline view when that layer is locked.
- The Layer Properties dialog now displays the type of node in its title bar. Likewise, the Layer Properties view displays the type of node in the Type field, just under the Enable/Disable checkbox and above the Name field.
- The
 Control Selection Mode of the Transform tool can now be toggled on or off with a keyboard shortcut. There is no default shortcut for this command, but a shortcut can be assigned to it in the Shortcuts tab of the Preferences dialog, under General.
 - Complex operations, such as pasting a character pose using the Pose Copier, now store their Undo/Redo data in a disk cache instead of in the RAM. This will prevent such operations from taking too much RAM in the Undo history.
-
Performance when using the Render Preview mode of the Camera view has been improved.
- Performance when rendering images imported as original bitmaps has been improved.
- Performance when using Master Controllers in long scenes with a lot of keyframes has been improved.
-
Users must now double-click on a layer's name in the Timeline view to rename them, to avoid making the rename field appear by accident when selecting the layer.
- When creating a new Harmony Server database, the sample resolution.conf file is now automatically copied to the resolution sub-folder of the database.
Fixed Issues
The following issues have been fixed in this release:
- Fixed memory leak when selecting an Alembic 3D model with vertex colours.
- Fixed a rare crash when moving a Master Controller 2D Point widget.
- Fixed slow rendering of drawings with deformations in the Top and Side views.
- Fixed issue causing OpenGL Cache nodes to influence the rendered image.
- Fixed issue where setting a workspace with Unicode characters in its name as the current workspace would make Harmony load the default workspace on launch.
- Fixed issue causing some layers in imported PSD files to be imported with incorrect proportions.
-
Fixed issue causing users to be prompted to activate their software when upgrading to a new version of Harmony that requires an update to the licensing system.
- Fixed issue where the input and output ports of a Master Controller node or Script node would not update when changing their port configurations until the user closed and reopened the scene.
- Fixed issue where burn-ins would be rendered in the wrong font on GNU/Linux. Burn-ins on GNU/Linux are now rendered using the Liberation Sans font by default.
- Fixed issue where scripted actions affecting nodes would not cause all instances of the Node View to update, if several instances were opened.
- Removed the Game Skinning toolbar
- Removed the Control Selection Mode tool property of the Transform tool from Harmony Essentials and Harmony Advanced, as it is only useful for features that are exclusive to Harmony Premium.
-
Fixed issue causing the scope of variables declared by a script called by the include() method to be corrupted. .
- Fixed small a memory leak that occurred when instantiation a node containing a 3D model with the Model3D class in the Harmony scripting interface.
-
Fixed issue causing the Select tool to sometimes fail selecting artwork in a drawing layer rigged as the parent of another drawing layer.
- Fixed issue causing Harmony to fail rendering some frames when a Crop node is connected between the main scene Composite and the Write node.
- Fixed issue causing script buttons added to a toolbar when running Harmony in Japanese or Chinese to not run and to not display their icon.
- Fixed a small imprecision in the coordinates reported by the Master Controller 2D Point Widget.
- Fixed a memory leak occurring when rendering a Gaussian Blur
- Fixed issue causing the number input field widget (NumberEdit) created through the Harmony scripting interface to ignore its minimum and maximum value properties.
- Fixed issue preventing users from replacing a cable going from a group node to another node with a cable going from a different port of the same group to the same node.
- Fixed freeze when moving a layer attached to a composite node that is visible in the Timeline view between two other layers.
- Fixed issue preventing from changing the scale of a 3D model with the Transform tool when that 3D model's x, y and z scale values are locked together.
- Fixed issue causing the Master Controller wizards to add both a node's 3D Path and separate position functions to the list of monitored attributes if the node had both functions in its attributes. Now, only the node's currently used position functions are added to the list.
- Fixed issue where creating a Master Controller with one of the Master Controller wizards would create multiple entries in the Undo history and would hence require using the Undo command multiple times to fully undo its creation.
- Fixed issue causing some effects to stop working in the Render Preview mode of the Camera view, specifically when the Transform tool is slected and the mouse cursor is in the Camera view.
- Fixed issue causing rendered frames to have various rendering errors when a 3D model is in the scene and is rendered through OpenGL.
- Fixed performance issue when rendering a scene with several Colour-Override nodes.
- Fixed issue where the middle mouse button could not be used to move nodes in the Node View when the Middle Mouse Button Pans the View preference is disabled.
- Fixed issue where the bounding box of a layer selected with the Transform tool would not rotate when rotating the Camera view.
- Fixed issue where attempting to install an older version of Harmony over a more recent version of Harmony could corrupt the installation on Windows.
- Fixed issue preventing custom grid presets for the Interpolation Grid Wizard from being saved.
- Fixed issue where GNU/Linux would add the fully qualified domain name of the machine to the Harmony Server database's machine-list file when installing the batch processing daemon. To avoid this problem, the installer no longer attempts to add the machine's name to the list, so it must be added manually.
- Fixed a syntax error reported by the installer when installing Harmony on CentOS 6.
- Fixed issue preventing the Interpolation Grid Wizard from working in Harmony Server.
- Fixed issue causing some layers to be hidden in the OpenGL preview of the Camera view if the Enable Rendering Caching of Composite Nodes preference is enabled.
- Fixed issue where a Master Controller's onFrameChanged() callback would keep getting triggered after deleting its node.
- Fixed issue causing OpenGL anti-aliasing to stop working when the Transform tool is selected, the cursor is inside the Camera view and the Enable Rendering Caching of Composite Nodes preference is enabled.
- Fixed issue causing the OpenGLBypass node to process the image from a Passthrough composite as if it was a flat image.