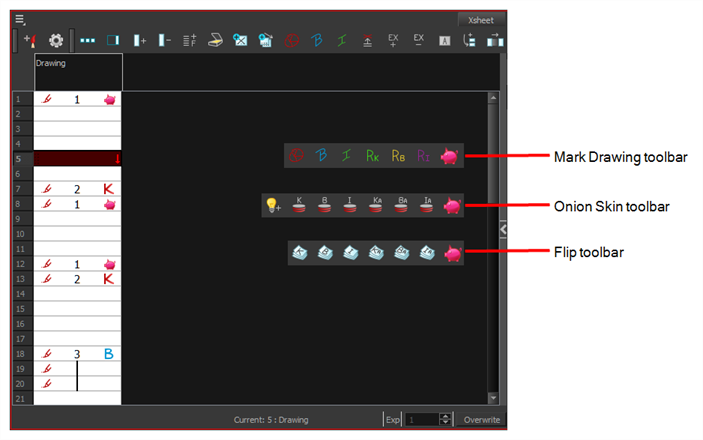
If your production requires you to mark drawings with markers other than the ones available by default in Harmony, it is possible to create custom markers. Custom markers have the same capabilities as other markers: You can mark drawings with it using the Mark Drawing toolbar, you can make Onion Skin only display drawings marked with your custom marker and you can use the Flip toolbar to only flip through drawings with your custom marker.
Before you can add a custom marker to Harmony, you must first design its icons. A custom marker needs the following icons:
- Mark Drawing Toolbar icon (24 x 24 pixel)
- Onion Skin Toolbar icon (24 x 24 pixel)
- Flip Toolbar icon (24 x 24 pixel)
- Xsheet Column icon (16 x 16 pixel)
Once this is done, to add your marker to Harmony, you will need to add its information to an Extensible Markup Language (.xml) file. XML is a type of computer language often used for configuration and to store project data. The steps below explain in detail how to do this. Hence, although it is preferable to have scripting or programming background to do this, it is not required.
- Close Harmony.
- Using an image editor, create the required icons for a drawing marker. Create one file in Portable Network Graphics (.png) format, with the following dimensions, for each required icon type:
- Mark Drawing Toolbar icon (24 x 24 pixel)
- Onion Skin Toolbar icon (24 x 24 pixel)
- Flip Toolbar icon (24 x 24 pixel)
- Xsheet Column icon (16 x 16 pixel)
- In a file browser, browse to the location of your custom markers in your user preferences:
Windows: C:\Users\[username]\Toon Boom Animation\AppData\Roaming\Toon Boom Animation\Toon Boom Harmony Premium\full-1600-pref\drawingTypes.d
NOTE The AppData folder is hidden by default. To see it, open the View menu in Explorer and check the Hidden Items option.macOS: /Users/[username]/Library/Toon Boom Animation/Toon Boom Toon Boom Harmony Premium/////drawingTypes.d
NOTE The Library folder is hidden by default. Access it, press and hold the Alt key and then, in the Finder top menu, select Go > Library.- GNU/Linux: /home/[username]/Toon Boom Animation/Toon Boom Toon Boom Harmony Premium/////drawingTypes.d
- Copy and paste the icons for your marker inside this
drawingTypes.ddirectory.
- Open the file
drawingTypes.xmllocated in this directory in a text editor.
-
Copy and paste the following line just above </DrawingTypes> near the bottom:
<DrawingTypetext="MarkerName"pixmapFile="XsheetIcon.png"commandIcon="MarkerIcon.png"flipIcon="FlipIcon.png"onionIcon="OnionSkinIcon.png"/>
- Fill the line with the appropriate information for your marker:
- Replace MarkerName with the name of your custom marker.
- Replace XsheetIcon.png with the file name of the icon to display for your marker in the Xsheet view.
- Replace MarkerIcon.png with the file name of the icon to display in the Mark Drawing toolbar.
- Replace FlipIcon.png with the file name of the icon to display in the Flip toolbar.
- Replace OnionSkinIcon.png with the file name of the icon to display in the Onion Skin toolbar.
- Save the file and close it.
-
Start Harmony.
Your drawing marker will be available in the Mark Drawing, Flip and Onion Skin toolbars.
- Close Harmony.
- Using an image editor, create the required icons for a drawing marker. Create one file in Portable Network Graphics (.png) format, with the following dimensions, for each required icon type:
- Mark Drawing Toolbar icon (24 x 24 pixel)
- Onion Skin Toolbar icon (24 x 24 pixel)
- Flip Toolbar icon (24 x 24 pixel)
- Xsheet Column icon (16 x 16 pixel)
- Using a file browser, browse to the location of the custom drawing markers configuration package which is a directory named drawyngTypes.d, and which is bundled with Harmony at the following location:
- Windows: C:\Program Files (x86)\Toon Boom Animation\Toon Boom Harmony 16.0 Premium\resources
- macOS (Server): /Applications/Toon Boom Harmony 16.0 Premium/tba/resources
- macOS (Stand Alone): /Applications/Toon Boom Harmony 16.0 Premium Network/tba/resources
- GNU/Linux: /usr/local/ToonBoomAnimation/harmonyPremium_16.0/resources
- Right-click on drawingTypes.d and select Copy.
-
Browse to the root directory of your Harmony database:
/USA_DB
-
Right-click inside the directory and select Paste.
The drawingTypes.d directory will be copied to your database, along with the icons and configuration for the RetakeKey, RetakeBD and RetakeIK markers, which are custom drawing markers bundled with Harmony.
- Open the drawingTypes.d folder.
- Copy and paste the icons for your marker inside this
drawingTypes.ddirectory.
- In the same directory, open the
drawingTypes.xmlfile in a text editor.
-
Copy and paste the following line just above </DrawingTypes>, at the bottom:
<DrawingTypetext="MarkerName"pixmapFile="XsheetIcon.png"commandIcon="MarkerIcon.png"flipIcon="FlipIcon.png"onionIcon="OnionSkinIcon.png"/>
- Fill the line with the appropriate information for your marker:
- Replace MarkerName with the name of your custom marker.
- Replace XsheetIcon.png with the file name of the icon to display for your marker in the Xsheet view.
- Replace MarkerIcon.png with the file name of the icon to display in the Mark Drawing toolbar.
- Replace FlipIcon.png with the file name of the icon to display in the Flip toolbar.
- Replace OnionSkinIcon.png with the file name of the icon to display in the Onion Skin toolbar.
- Save the file and close it.
-
Start Harmony.
Your drawing marker will be available in the Mark Drawing, Flip and Onion Skin toolbars.