Scene Settings Dialog Box
The Scene Settings dialog box lets you select settings for the resolution of your scene, its alignment and the resolution of bitmap drawings and textured brush strokes.
You are already required to select resolution and alignment settings when creating a scene, but those settings can also be modified later using the Scene Settings dialog box.
Resolution Tab

The resolution tab allows you to set the width and height of your scene in pixels, the angle of the field of view and the way elements are projected across the depth of your scene.
| Icon |
Parameter |
Description |
| |
Resolution Presets |
You can select your project’s resolution (camera frame size) from this preset list.
- HDTV_1080p24: The standard definition for high definition television at 24 frames per second, mostly used in the Americas and some Asian countries that used the NTSC standard for analogue television.
- HDTV_1080p25: The standard definition for high definition television at 25 frames per second, usually for broadcasting in European, African, Asian and Australian countries that used the PAL or SECAM standard for analogue television.
- HDTV_720p24: The former standard high definition resolution at 24 frames per second.
- 4K_UHD: A standard ultra HD (4K) format for television productons. 4K implies that the width of the image is of, give or take, 4000 pixels.
- 8K_UHD: A standard ultra HD (8K) format for television productions. 8K implies that the width of the image is of, give or take, 8000 pixels.
- DCI_2K: A standard HD format for cinema.
- DCI_4K: A standard ultra HD (4K) format for cinema.
- film-2K: A standard HD format for film projectors with a low aspect ratio.
- film-4K: A standard ultra HD (4K) format for film projectors with a low aspect ratio.
- film-1.33_H: The standard resolution for the academy film format that conforms to the standard 4:3 aspect ratio.
- film-1.66_H: The standard resolution for widescreen film format that conforms to the 16:9 aspect ratio.
- film-1.66_V: The standard resolution for widescreen film format, but with a vertical field of view.
- Cineon: The standard format for 35 mm Kodak/Cineon film.
- NTSC: The standard resolution and framerate for analogue standard definition televisions in most of the Americas (except Brazil, Paraguay, Uruguay and Argentina), Japan, Taiwan, South Korea, the Philippines and Myanmar.
- PAL: The standard resolution and framerate for analogue standard definition televisions in Europe, Africa, Australia, most of Asia, Brazil, Uruguay and Argentina.
- 2160p-240p: A series of standard widescreen presets named after their resolution heights.
- low: A resolution based on NTSC with half of its standard dimensions.
- Web_Video: A legacy format for web streaming.
- Game_512: A preset for the gaming pipeline, with a square canvas.
- Game_512_Ortho: Like Game_512, except with Orthographic projection so that elements moved on the Z axis do not appear smaller or bigger.
- WebCC_Preview: The preset used by WebCC to render previews of scenes in a Harmony Server database.
- HDTV: The standard definition for high definition television at 24 frames per second, with a horizontal fit field of view.
- HDTV_Vertical: The standard definition for high definition television at 24 frames per second, with a vertical fit field of view.
|
| |
Selected Resolution Preset |
Displays the name of the selected resolution preset just below the presets list. If you have made any changes to the resolution since selecting a preset, this will display "(custom)".
|

|
Save Resolution Setting |
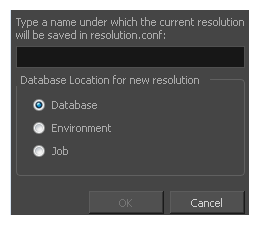
Allows you to save the current resolution settings as a new preset. If you have a resolution preset selected, this button is only available if you have made changes to the resolution since selecting the preset. You will be prompted to type in the name of the new resolution preset. If using Harmony Server, you will also be asked to select in which part of the database you want the preset to be saved.
|
| |
Resolution |
The resolution of the scene defines the width and height of the canvas in pixels. By default, the scene will be rendered in this resolution. If using bitmap layers or textured brush strokes, the definition of the pixels in your artwork will also be based on the scene's resolution. |

|
Scene Width |
The width of the resolution for the scene, in pixels. |

|
Scene Height |
The width of the resolution for the scene, in pixels. |
| |
Aspect Ratio |
Displays the ratio between the horizontal and vertical dimensions of the scene. For example, if the scene width and height are the same value, this ratio equals 1. The standard aspect ratio for widescreen televisions is 1.777. For legacy displays, it is 1.333.
|
| |
Frame per second |
The amount of frames in your scene that should play out every second. The standard framerate for film production is 24 fps. However, televisions in some countries play at 25 fps.
|
| |
Field of View |
The angle of the field of view, which determines the size of the camera cone as well as the way the field grid used to position elements is adjusted to fit the scene.
- Horizontal Fit: The field of view is automatically adjusted so that the field grid and camera cone fit the horizontal length of the scene.
- Vertical Fit: The field of view is automatically adjusted so that the field grid and camera cone fits the vertical length of the scene.
- Custom FOV: Enter the angle of the field of view manually. A greater angle will make a wider camera cone and smaller fields. A smaller angle will mean a more narrow camera cone and bigger fields.
- Objects in Harmony are positioned in fields, based on a traditional animation grid which, by default, extends to 12 fields from the center in each direction, and which has 4:3 proportions by default. In a scene with 4:3 proportions, this grid fits the camera field perfectly. However, since most scenes have an aspect ratio of 16:9, the grid does not fit the camera field perfectly. If the field of view is Horizontal Fit, the grid's width will match the scene's width, but will extend beyond its vertical edges. If the field of view is Vertical Fit, the grid's height will match the scene's height, will not extends to its horizontal edges.
- To avoid distorting elements, the field of view angle is applied directly to the vertical axis, and the one applied on the horizontal axis is calculated proportionally to the aspect ratio of the scene.
- The field of view may affect the way 3D-rotated elements and 3D objects are rendered. If too wide, objects may appear distorted when seen from an angle. If too low, objects may seem flat and may lack foreshortening.
|
| |
Projection |
The Projection settings allows you to modify the type of camera your scene is using. You can either use a perspective camera (regular camera) or orthographic camera (no perspective).
- Perspective: Objects placed closer to the camera will be displayed bigger and objects placed further away will be displayed smaller. Elements that are 3D-rotated as well as 3D objects will be rendered in a realistic perspective.
- Orthographic: The size of objects does not depend on their position on the Z-axis. Moving an element forward or backward will not change its apparent size, only its order relative to other elements. 3D-rotated elements and 3D objects will have no foreshortening. This option is more often useful when using Harmony for gaming, and more information about this option is available in the Gaming guide. This option can also be useful if you don't need any perspective in your project and want to use the Z-axis to order elements, or if you want to
In order to create scenes with the Orthographic camera by default, you need to create a new custom scene resolution.


|
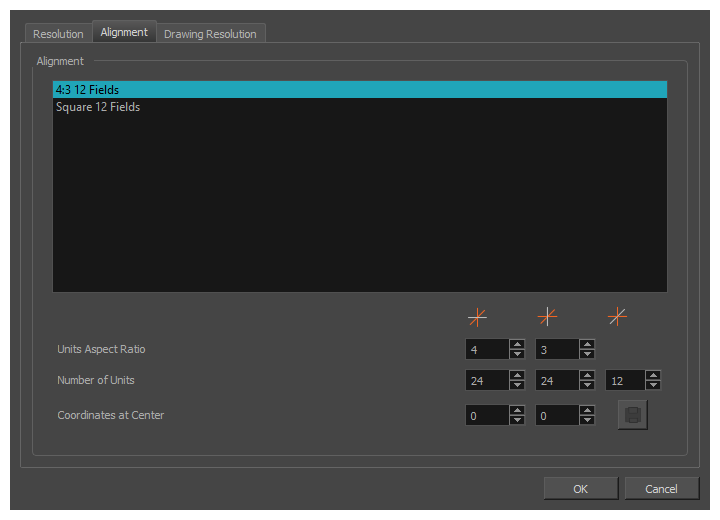
Alignment Tab
The alignment tab is used to determine the aspect ratio, the position and the size of the field grid used to position elements in the scene.
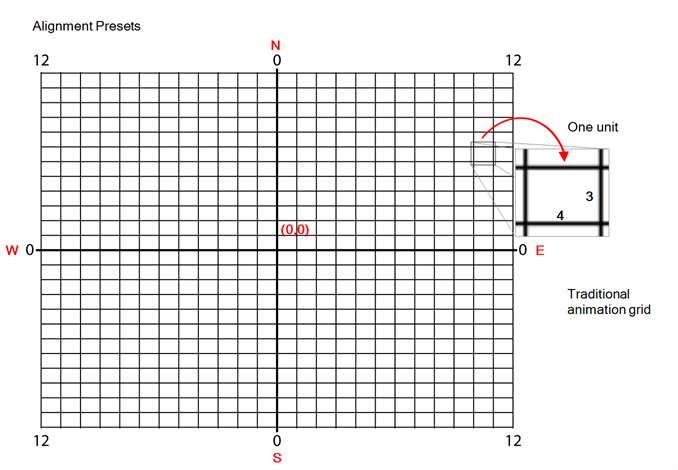
In Harmony are positioned in fields, a unit used in traditional animation which traditionally ranges from 0 to 12 followed by a cardinal direction, and in which 0,0 is the center of the scene.
The default Alignment setting in Harmony is based on such a traditional 4:3 drawing grid. In a scene with an aspect ratio of 4:3, this means that positioning an element 12 fields in any direction will make it reach one of the edges of the camera field. For example, 12 North is the vertical position of the upper edge of the camera field, and 12 East is the horizontal position of the right edge of the camera field.
However, since the most commonly used scene resolutions have an aspect ratio of 16:9, and the default grid is in a 4:3 proportion, the grid used to position element will not be in the same proportions as the camera field. The way this is handled is determined by the Field of View setting in the Resolution tab. If your field of view is set to Horizontal fit, the field grid will be made to fit the scene horizontally, and stretch beyond the vertical edges of the scene. This means that 12 East will still be the right edge of the screen, but the position of the upper edge of the scene will be about 9.36 North. Likewise, if the field of view is set to Vertical Fit, the upper edge of the field will be at 12 North, but the right edge will be at about 16 East.
Some artists or studios may prefer to use a square fields grid, where fields have the same size horizontally and vertically.
| Parameter
|
Description
|
| Alignment |
The list of alignment presets. By default, Harmony has these two alignment presets:
- 4:3 12 Fields: Defines the units of your project to have a 4:3 ratio and sets up 12 of these units to run both vertically and horizontally in four cardinal quarters (NW, NE, SW, SE). This is the default setting, and it corresponds to an animation grid used in traditional animation. Hence, coordinates based on a traditional animation grid can be entered in Harmony as is to position elements where they are expected to be.
- Square 12 Fields: Defines the units of your project to have a 1:1 or square ratio and sets up 12 units to run both vertically and horizontally in four cardinal quarters (NW, NE, SW, SE).
When the Grid is displayed in the Camera and Drawing view, it is always based on the 4:3 12 Fields alignment preset, regardless of your scene's alignment setting. To display the grid, from the top menu, select View > Grid > Show Grid.
|
| Units Aspect Ratio |
The aspect ratio of each field. This describes the proportional difference between the width and the height of the field. By default, it is set to 4:3, which means the width of each field will take 4 unites of length for each 3 units the height of the field takes. In other words, the width of a field is 1.333 times its height. If set to, for example, 1:1, the fields will be perfectly square.
|
| Number of Units |
The number of fields the grid should have in each direction. In the Number of Units fields, enter the number of horizontal, vertical and depth units for your scene’s grid.
The grid is a specific size based on the scene's resolution and field of view angle. Changing the amount of units for each direction will not change the size of the grid, but rather, the size of the units. Hence, if an element is offset at 3 North, 4 East, and you change the number of horizontal and vertical units from 24 to 12, the element will become offset twice as far from the centre as it originally was.
The third setting in this field determines the amount of units across the Z axis. This determines how far each unit will take an element further or closer to the camera when moved on the Z-axis. By default, the grid has 12 fields across the Z-axis, which is half the amount of fields on the X and Y axes by default. Hence, each field on the Z-axis is worth exactly twice the length of a field on the horizontal axis.
Animators who are familiar with traditional animation method will understand the default setting of 24 units horizontal by 24 units vertical as it corresponds to a traditional animation grid.
|
|
Coordinates at Centre
|
The offset for the centre of the fields grid. The centre of the fields grid is where elements are positioned by default, when they themselves are at coordinates 0,0. To change the centre, you must enter its offset from the actual centre of the grid in fields. For example, if your fields grid is 24 x 24, and you want the centre to be at the top-left corner, you should enter -12,-12.
|
| Save |
Saves your current Alignment settings and be able to select them later from the list. |
If you prefer working in pixel-based positions, you must set the aspect ratio of your units to be the same as the aspect ratio of your scene resolution, set the horizontal number of units to the width of your scene in pixels, the vertical number of units to the height of your scene in pixels, and the depth number of units to the width of your scene in pixels. This way, each unit will translate to exactly 1 pixel, in all directions.
Each layer also has an alignment rule, which determines how it is positioned relative to the fields grid. By default, it is set to "Centre First Page". However, this alignment rule is made to be compatible to 4:3 fields grids. Hence, if you change your scene's alignment rules, your layers will be offset. To avoid this issue, change the alignment rules of your layers to "Centre" via the Advanced tab of the Layer Properties view.
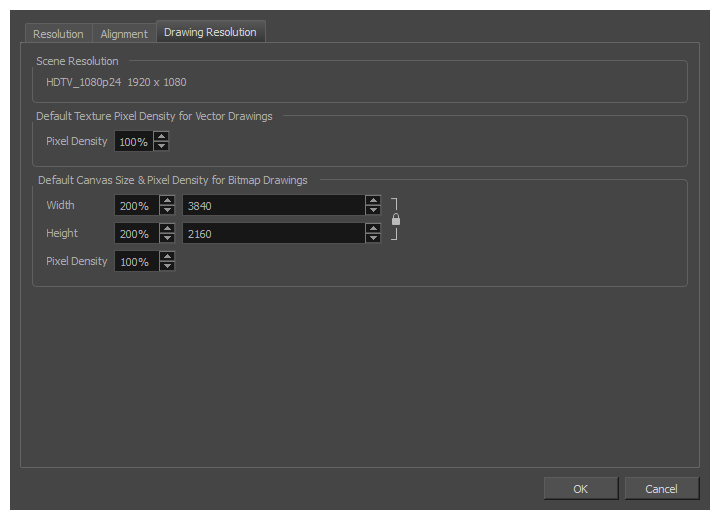
Drawing Resolution Tab
The drawing resolution tab is used to set the pixel density of bitmap drawings as well as of bitmap textures in textured brush strokes in vector drawings. Also, it is used to set the size of the canvas for bitmap drawings relative to the size of the scene.
These settings are applied to newly created drawings in the scene, but not to existing drawings in your scene. To change the pixel density of existing vector drawings, you must select Drawing > Change Vector Drawing Brush Resolution from the top menu. To change the pixel density and canvas size of existing bitmap drawings, you must select Drawing > Change Bitmap Drawing Resolution from the top menu.
You can change the default drawing resolution settings for new scenes in the Drawing tab of the Preferences dialog.
| Parameter
|
Description
|
| Scene Resolution |
This indicates the currently selected scene resolution preset and its dimensions in pixels. |
| Default Texture Density for Vector Drawings |
Pixel Density:Determines the amount of pixels to store for each of a textured brush stroke's pixels that display when the scene is not zoomed in or the drawing is not scaled. For example, at 100%, zooming in or scaling up textured brush strokes will make them lose texture quality. If set to 200%, textured brush strokes can be zoomed in or scaled up until they're twice their original size without losing picture quality. |
| Default Canvas Size and Pixel Density for Bitmap Drawings |
Width: The default width of the canvas when creating drawings in a bitmap drawing layer. The percentage is relative to the width of the scene. Its default value, 200%, makes the width of the canvas twice the width of the stage.
Height: The default height of the canvas when creating drawings in a bitmap drawing layer. The percentage is relative to the height of the stage. Its default value, 200%, makes the height of the canvas twice the height of the stage.
Pixel Density: Determines the amount of pixels to store for each of a bitmap drawing's pixels that display when the scene is not zoomed in and the drawing is not scaled. For example, at 100%, zooming in or scaling up a bitmap drawing will make it lose picture quality. If set to 200%, bitmap drawings can be zoomed in or scaled up until they're twice their original size without losing picture quality.
|