Some effects can use, or even require the use of a matte layer. The matte layer is a drawing that determines the area that the effect affects.
For example, a Cutter effect needs to be connected to a matte layer, because it uses the drawing in the matte layer to determine which part of the drawing to cut out. However, a Colour-Scale effect can be used without a matte layer, in which case it will affect the colour of all of the drawing it is connected to, but if it is connected to a matte layer, it will only affect the colours of the part of the drawing that is covered by the matte drawing.
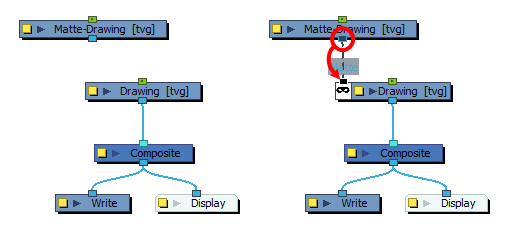
In the Node view, effects and nodes that require a matte layer will always have a matte port  at their left. Effects and nodes that can use a matte layer, but which don't require it, will have their matte port hidden by default, and it will appear if you bring a connection cable near their left edge.

The same mechanic works with Drawing nodes. Although they do not have a matte port by default, but if you connect a drawing or a composite near their left edge, a matte port will appear. When a Drawing node is connected to a matte, the part of the drawing covered by the matte is cut out from that drawing, which is the same as if the drawing was connected to a Cutter node—see About Masking and Cutting Parts of Elements in your Scenes.
- In the toolbar above the layer list in Timeline view, click on Add Drawing Layer
.
-
In the Add Drawing Layer dialog, give your new drawing layer a relevant name for a matte layer, such as "Matte-Drawing", then click on Add and Close.

-
In the new matte drawing layer, draw a matte for your effect. Your matte can be a simple shape, but should be filled with a colour, as only parts of the matte that are opaque will be taken in account.
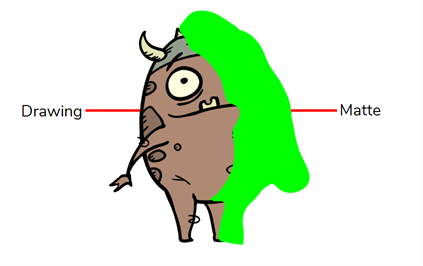 NOTEMattes can also have semi-transparent areas. Areas of the drawing that are covered by semi-transparent areas of the matte are partially affected by the effect.
-
In the Timeline view, locate the effect layer for which you created a matte and click on the Expand
button right of its name.

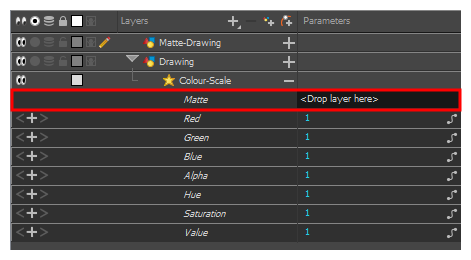
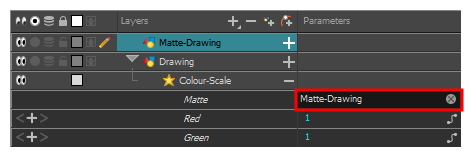
Just below the effect, a list of parameters for the effect appears. If the effect has a matte connection, the first parameter in the list will be Matte, and its value will be <Drop layer here>.
-
Click and hold on the matte layer, then drag and drop it over <Drop layer here>.
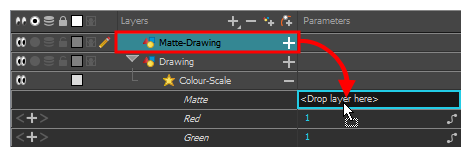
The matte layer will be set as the effect's matte property.
 <NOTES
- When a drawing layer is used as an effect's matte, the artwork in that layer is not visible in the scene, since it is only used as the effect's matte.
- If you want to disconnect the effect from the matte, you can click on the Unlink
button at the right of the Matte parameter to unlink the matte layer from the effect. This will make the matte drawing visible in the scene again.
- By default, the effect is applied to the matte's opaque areas and the matte's transparent areas are ignored. If you want to invert this effect, which means apply the effect on the matte's transparent areas and ignore the matte's opaque areas, double-click on the layer (but not on its name) to open its Layer Properties dialog.
-
In the Layer Properties dialog of the effect, there should be an Invert Matte parameter. If the effect has several tabs in its layer properties, you might have to look through each tab to find this parameter. Check the check box for this parameter to invert the effect of the matte.
NOTEFor Cutter nodes, this parameter is just named Inverted.
- In the toolbar above the layer list in Timeline view, click on Add Drawing Layer
.
-
In the Add Drawing Layer dialog, give your new drawing layer a relevant name for a matte layer, such as "Matte-Drawing", then click on Add and Close.

-
In the new matte drawing layer, draw a matte for your effect. Your matte can be a simple shape, but should be filled with a colour, as only parts of the matte that are opaque will be taken in account.
 NOTEMattes can also have semi-transparent areas. Areas of the drawing that are covered by semi-transparent areas of the matte are partially affected by the effect.