
How to Create a Multiplane
In live action, when the camera moves through the scene, objects near the camera will move by a greater distance than objects far from the camera. In 2D animation, multiplanes can be used to achieve a similar effect without resorting to 3D backgrounds.
In Harmony, a multiplane can be easily achieved by creating a scene's background over several layers, and positioning them at different depths relative to the camera.
Before creating a multiplane, make sure you have a proper understanding of the environment in which your scene happens. Picture what your scene's background would be like in 3D, then image the camera moving through the space, and how the objects in the picture move at different speeds depending on where they are in relation to the camera lens.
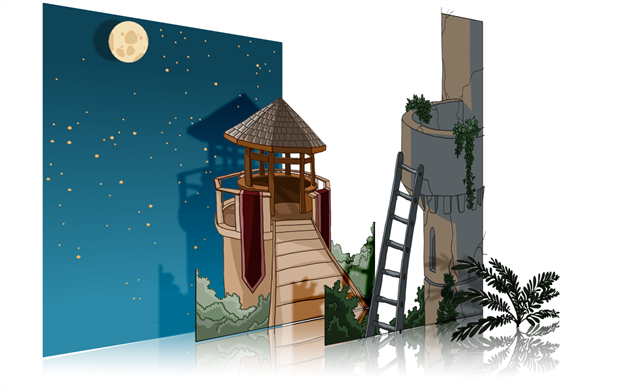
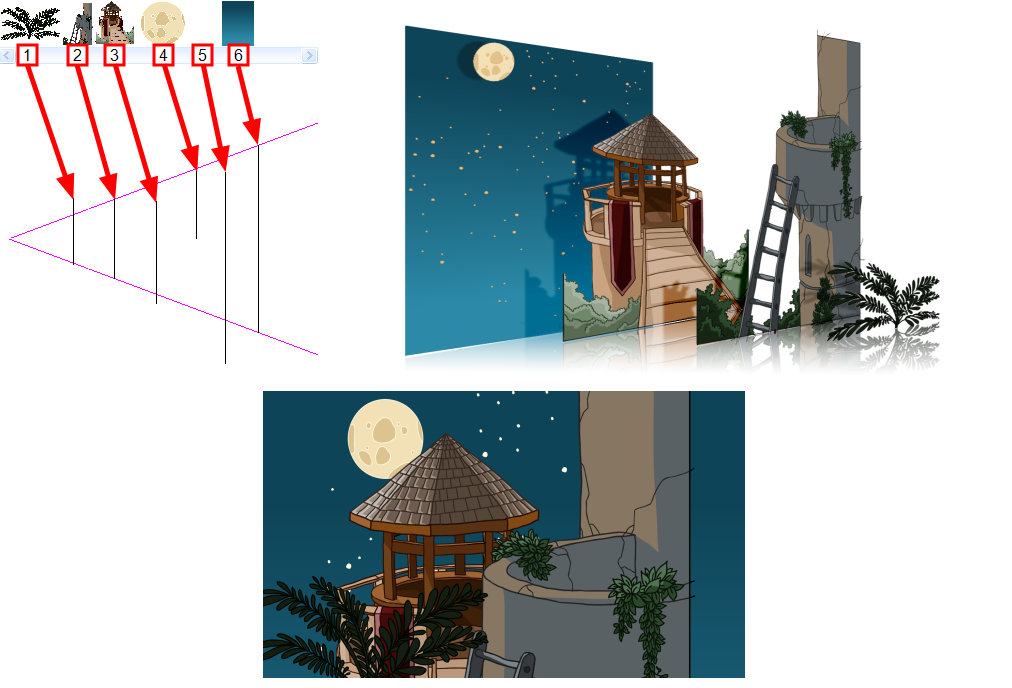
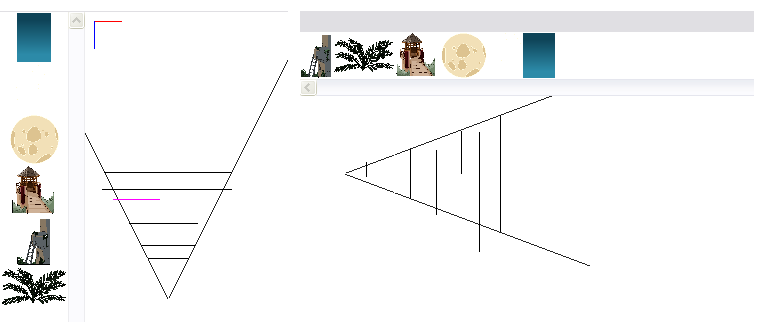
In the following example, the background is made of 6 different layers, each picturing an object that is at a different distance from the camera. On the left, you can see how each object is positioned relative to the camera, as if you were looking at them from the side. On the right, you can see how layers are positioned relative to each other as if you were looking at the scene from a corner. Below, you can see the scene from the camera's point of view.
In order to move a layer further from or closer to the Camera, you must change its position on the Z-axis. You can do this by moving a layer using the Transform Tool ![]() in the Side or Top views. You can also move a layer on Z-axis directly from the Camera View by holding Alt and dragging the layer up or down. Positioning your element closer to the camera makes them appear bigger, and moving them further makes them appear smaller. It is also possible to move elements on the Z-axis without affecting their apparent size by using the Maintain Size
in the Side or Top views. You can also move a layer on Z-axis directly from the Camera View by holding Alt and dragging the layer up or down. Positioning your element closer to the camera makes them appear bigger, and moving them further makes them appear smaller. It is also possible to move elements on the Z-axis without affecting their apparent size by using the Maintain Size ![]() tool in the Advanced Animation toolbar.
tool in the Advanced Animation toolbar.
It is a good idea to keep a Camera view open to see what your scene looks like while positioning elements in the Top and Side views.
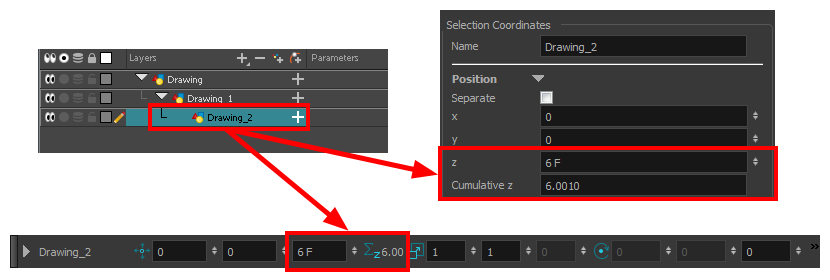
Just like with other transformations, transformations on the Z-axis on a parent layer will also affect the apparent position on the Z-axis of its child layers. Therefore, a child layer's apparent position on the Z-axis can be affected by any of its parents. Once transformations on the Z-axis have been performed on several layers in a hierarchy, it may be difficult to keep track of which layers have been moved on the Z-axis and which ones have not. To help with this, it is possible to compare the selected layer's Z coordinate value with its apparent position on the Z-axis using the Coordinates and Control Point view or the Coordinate toolbar. Both these interfaces feature a field to tweak the layer's Z coordinate, which is independent from parent layers, as well as a field displaying the layer's cumulative Z coordinate, which is the sum of the Z coordinate of the selected layer with the Z coordinate of all its parents.
To enable the Coordinate toolbar, do one of the following:
- From the top menu, select Windows > Toolbars > Coordinate.
- Right-click on any visible toolbar and select Coordinate.
To enable the Coord. and Control Points view, do one of the following:
- From the top menu, select Windows > Coord. and Control Points.
- From any view already open, click the Add View
 button at the top-right corner and select Coord. and Control Points.