
Pencil Tool Properties
When you select the Pencil ![]() tool, its properties and options appears in the Tool Properties view.
tool, its properties and options appears in the Tool Properties view.

| Icon | Tool Name | Description |
| Previewing the Stroke |
The Preview area lets you see a preview of the selected or customized stroke. You can click on the Show Extended Properties arrow to display advanced customization parameters.
|
|
| Maximum Size |
Defines the maximum size of your drawing tool. This parameter defines the width of the stroke. |
|
| Smoothing |
Defines the number of control points added to the centre line. The fewer the control points the smoother (but less faithful) the line. |
|
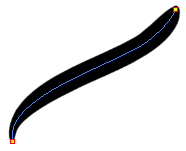
| Shape |
You can adjust the start, end, and joint style of a pencil line.
|
|
| Presets |
Harmony provides a variety of pencil presets A thickness stencil saves the thickness information across the length of the line. When drawing with a thickness stencil, the pressure sensitivity of the tablet is discarded. A thickness stencil can be used while drawing, or applied afterwards.
You can export the pencil presets that you have created and import those that others have created. This is a good way for you and project collaborators to keep a consistent look for the project. |
|
|
|
New Brush |
Allows to create a new preset. |
|
|
Delete Brush |
Allows you to delete your custom presets. |
| Rename Brush |
Allows you to rename a custom preset. |
|
| Import Brushes |
Allows you to import a set of XML Harmony presets previously exported via the Export Brushes command. |
|
| Export Brushes |
Allows you to export Harmony presets to backup or import on a different computer. |
|
| Small Thumbnail, Large Thumbnail, and Stroke View |
Allows you to display the presets as small square thumbnails, large square thumbnails or a list of stroke preview. |
|
|
|
Draw Behind |
When drawing on vector layers, the Draw Behind mode lets you paint behind existing art. By default, strokes appear over your work until you release the tool. 
|
|
|
Automatically Create Colour Art |
As you draw in the Line Art layer, the Automatically Create Colour Art option instantly creates the corresponding strokes in the Colour Art layer.
|
|
|
Auto-Flatten Mode |
When enabled, the Auto-Flatten mode automatically flattens the new lines created with the existing artwork as you draw in the Drawingview. Brush strokes will flatten with brush strokes and pencil lines will flatten with pencil lines.
NOTE:
Using the Select tool, you can use select and remove a segment of flattened pencil lines. Overlapping pencil lines drawn with the Auto-Flatten mode are essentially cut into segments by the overlap and can be treated as individual lines. |
|
|
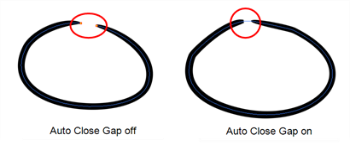
Auto-Close Gap |
When using the pencil tool, you can automatically close strokes with an invisible stroke.
It is recommended to keep this option enabled when drawing with the Pencil tool. |
|
|
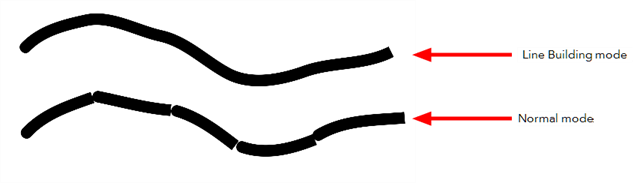
Line Building Mode |
The Line Building mode is very useful when drawing long lines and curves in small increments with pencil lines or the Line tool. As the pencil lines are central vector lines, it may be difficult to align the line tips perfectly to create a uniform stroke and close all gaps. In this mode, you can draw lines in small increments and the tips are merge into one single stroke.
NOTE: This mode only works with pencil lines or the line tool.
|
|
|
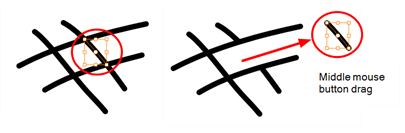
Auto Adjust Thickness |
The Auto Adjust Thickness tool is useful when you want to render a portion of a line thicker. When tracing a drawing on paper, you will often go back to a section of a curve to make it thicker to add dynamism to the line. Using the Auto Adjust Thickness tool, you can draw highlight strokes over the section to make thicker. Once you release the pen or mouse, the line becomes thicker following the shape and curve of the original stroke. This way is much faster and smoother than using the Pencil Editor tool. You do not have to add extra points and adjust the position and Bezier handles.
The default overlay colour is light yellow. If this colour is difficult to see because of the background or drawing colour, you can adjust the colour. |
|
|
Line Pushing Mode |
The Line Pushing Mode option lets you draw highlight strokes over existing pencil lines. You can reshape the curves. Depending how you draw the pushing stroke over your line, the highlighted section will be reshaped in one direction or the other. The default overlay colour is light yellow. If this colour is difficult to see because of the background or drawing colour, you can adjust the colour. |
| Colour |
You can change the colour for the Line Pushing Mode anf the Auto Adjust Thickness option by clicking on the Colour swatch and selecting a new colour in the Colour Picking window.
|


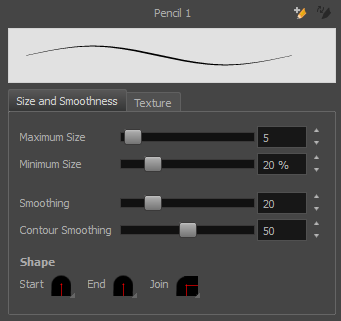
Size and Smoothness Tab
You can access advanced properties by clicking on the Previewing the Stoke button in the Tool Properties view.
| Tool Name | Description |
| Maximum Size | Defines the maximum size of your drawing tool. This parameter defines the width of the stroke. |
| Minimum Size |
Defines the minimum size of your stroke as a percentage of the maximum size. If you do not have pressure sensitivity from a pen table, the minimum size value will be ignored. |
| Smoothing | Defines the number of control points added to the centre line. The fewer the control points the smoother (but less faithful) the line. |
| Contour Smoothing | Defines the number of points on the contour share of your stroke. This will smooth out the bumps and waves on tour contour shape of your brush strokes. |
| Shape |
You can adjust the start, end, and joint style of a pencil line.
|
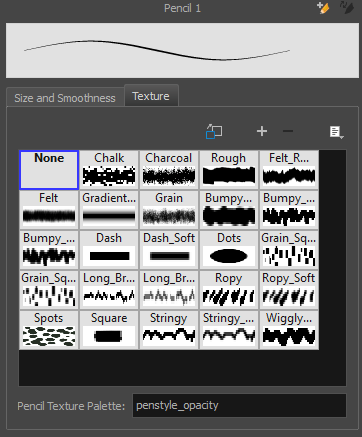
Texture Tab
You can access advanced properties by clicking on the Previewing the Stoke button in the Tool Properties view.
| Icon | Tool Name | Description |
|
|
Copy to Preferences |
You can add a pencil texture to your preset preferences. |
| New Texture |
Adds a new custom pencil texture to the list. |
|
| Delete Texture | Deletes a texture preset from the list. | |
| Rename Texture | Renames the selected texture to keep the list organized. | |
| Presets |
Harmony provides a variety of pencil texture presets and also lets you create and save your own. |
|
| Pencil Texture Palette | Displays the colour palette assigned to hold the pencil textures. Use the Colour View menu to assign a new palette. |