Scene Settings Dialog Box
The Scene Settings dialog box lets you parameters for your scene.
When you created your new scene, you set up the resolution and the alignment. However, if you want to change these initial settings later, you can do it using the Scene Settings dialog box. The different Scene Settings options are separated into four tabs.
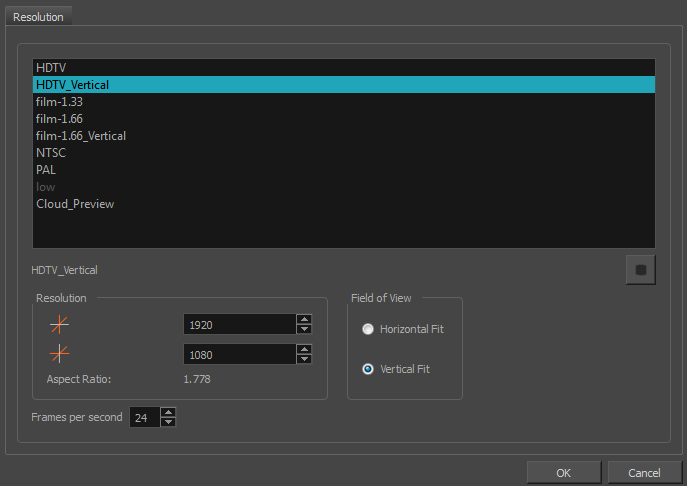
Resolution Tab
| Parameter
|
Description
|
| Resolution Presets |
You can select your project’s resolution (camera frame size) from this preset list.
|
‣
|
HDTV: High definition television delivers a higher quality image than standard television (4:3) does, because it has a greater number of lines of resolution. To take advantage of the superior quality your output device must be compatible with HDTV technology to make this resolution setting useful. |
|
‣
|
HDTV_Vertical: The "vertical resolution" of HDTV_Vertical refers to how the images will be aligned in relation to the actual scene frame (default 4:3 grid). Note that the camera resolution and the scene frame are not the same. When working with 12 or 16 field drawing grids, the grid is a different aspect ratio from the camera frame. When you fit vertically, you fit the images with the top and bottom of the scene grid. |
|
‣
|
film-1.33: Use this resolution setting for the academy film format that conforms to the standard 4:3 aspect ratio. |
|
‣
|
film-1.66: Use this resolution setting for the widescreen film format that conforms to the 16:9 aspect ratio. |
|
‣
|
film-1.66_Vertical: This is essentially the same as film-1.66. Refers to how the drawing is fit into the scene frame. When working with 12 or 16 field drawing grids, the grid is a different aspect ratio from the camera frame. When you fit vertically, you fit the images with the top and bottom of the scene frame.
|
|
‣
|
NTSC: This is the standard analogue television broadcasting system used in North America and conforms to the North American standards on how rectangular pixels are displayed for computer and television screens. |
|
‣
|
PAL: This resolution works best with the European format for television and computer screens, as the rectangular pixels are displayed at a different orientation. |
|
‣
|
Low: This format is ideal for videos destined for the web, where size and fast download of a video file might take precedence over quality. |
|
‣
|
Cloud Preview: This is the resolution used by Web Control Center to create its preview. |
|
| Selected Resolution Preset |
Displays the selected resolution preset.
|
| Save Resolution Setting |
Click the Save Resolution button after you define your new resolution to save it as a preset.
|
| Pixel Dimensions |
Displays the pixel dimensions for your project resolution.
If you decide to type in the pixel dimensions, or use the up and down arrows to change the pixel increments, you will have to save your custom selection in order to save it as a new preset. It will then appear in the resolution selection list. It doesn't modify the current resolution preset.
|
| Aspect Ratio |
Displays the ratio between the horizontal and vertical dimensions of the camera framing. Each resolution setting has a preset aspect ratio that cannot be changed.
|
| Frame per second |
Sets the frame rate for your project. The higher the frame rate, for example 30 fps, the faster the animation will play. The lower the frame rate, for example 12 fps, the slower your animation will play. Avoid going under 12 frames per second as your animation will have a choppy playback. The human eye requires a minimum of 12 frames per second to perceive a fluid animation.
|
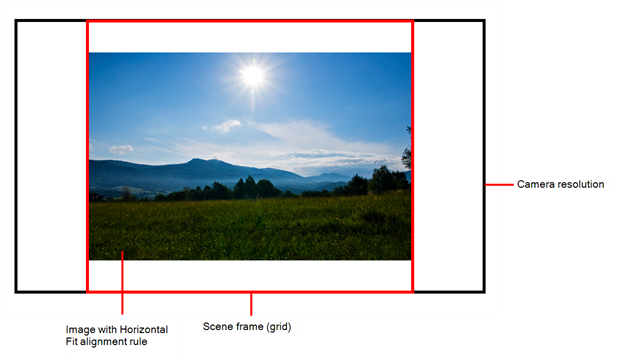
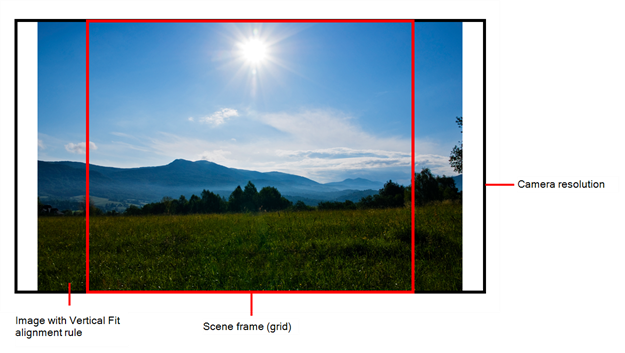
| Field of View |
Use these options to define the FOV (field of view) of the camera (angle of the camera cone) and how the drawing elements (and drawing grid) align to the scene grid. The drawing grid is always scaled proportionally to a 4:3 ratio (unless you change the scene alignment), therefore changing the Field of View setting may not show a visible difference if your project resolution is also 4:3, such as NTSC.
- Horizontal Fit: The camera resolution is set to fit the left and right edges of the scene grid.
- Vertical Fit: The camera resolution is set to fit the top and bottom edges of the scene grid.
|
NOTE: If you change your scene‘s alignment from 4:3 12 Fields to Square 12 Fields part way though your project, you may find that the animation grid becomes offset. To correct this, choose the following setting from the Layer Properties panel‘s Advanced tab: Alignment > Alignment Rule > Centre First Page.
