


Setting Up the Node View
Now that your environment variables have been properly set up, the final step is to prepare your network to call the Autodesk Maya rendering utility. Once this is done, you can render the 3D objects in your Harmony project and preview them in the Camera view in Render View ![]() mode. This will allow you to composite your 3D scene and effects.
mode. This will allow you to composite your 3D scene and effects.
There are two types of script nodes that work with the Harmony-Maya connection:
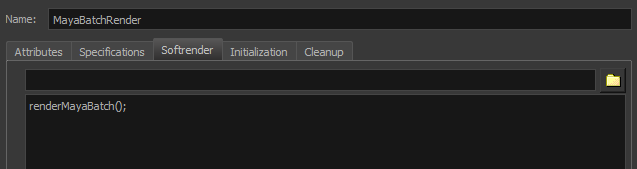
| • | Render Maya Batch
This node uses the script renderMayaBatch(); |
This script starts a Maya Batch session, renders the 3D elements on that frame, and then closes the session. It will open and close the session for every frame to be rendered.
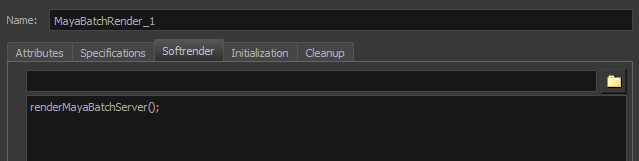
| • | Render Maya Batch Server
This node uses the script renderMayaBatchServer(); |
This script starts a Maya Batch session that stays open so when you render 3D objects through multiple frames, it does not close the session between each of them.
- Start Toon Boom Harmony. It is recommended that you run it from the command line. This way, you will have a printout of the process as it renders. Once it is started, you may also want to display the Message Log view.
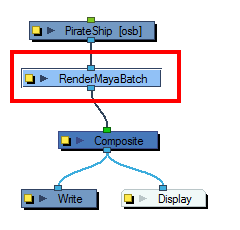
- In the Node view, locate the 3D object node.
| 1. | In the Node Library view, select the RenderMayaBatch or RenderMayaBatchServer node and drag it to the Node view. |
| 2. | In the Node view, hold the Alt key down while dragging the Maya Render node under the 3D object node to connect it. |
- Repeat the previous steps for each 3D object node in your scene.
- Save and reload your scene so Autodesk Maya files can be retrieved from the project folder.
- In the Camera view, click the Render View
 button.
All the elements of your scene appear in this complete preview of the rendered scene.
| 3. | To add effect filter nodes to your 3D object, make sure to connect them under the Maya render node. |

You are now set to render your animation project.
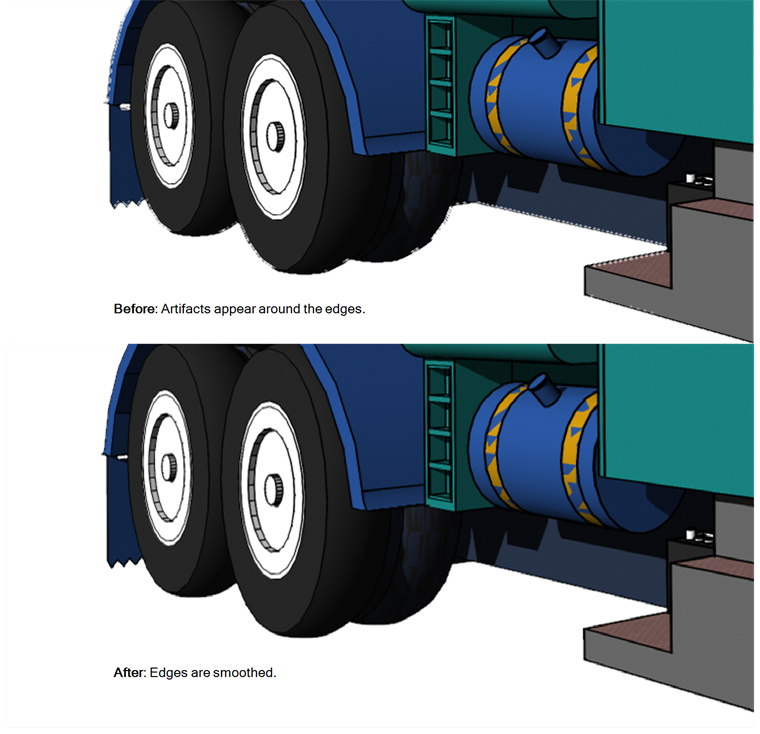
Possible Artifacts Resolved with Z-Buffer Smoothing
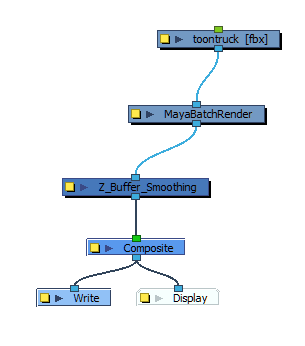
When batch rendering 3D models originating from Maya, some unwanted artifacts may appear, particularly on models with outlines. This is due to problems with the depth information. You can use the Z-Buffer Smoothing node to smooth out the edges.
Z Buffer Smoothing Node Properties
| Parameter | Description |
| Histogram Range |
Lets you define the range of clean pixels in the depth histogram when rendering 3D models. Only opaque or semi-transparent values are considered. A low value means fewer pixels are used in the depth calculations and may flatten your object, while a higher value uses more pixels in the depth calculations, but may not eliminate all the image artifacts. |
| Kernel Size |
Lets you determine the size of the matrix used for calculating the depth of a single pixel. For example, for an operation with a kernel size of 3 pixels, Harmony uses the pixels within a 1-pixel radius to calculate the effect. A larger kernel size means longer calculations. |
- In the Node Library, select the 3D tab.
- Select the Z Buffer Smoothing node and drag it to the Node view.
- In the Node view, place it between a MayaBatchRender node and the final Composite node.
- Display the Z Buffer Smoothing node properties.
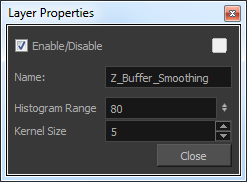
- Adjust the Histogram Range and Kernel Size parameters to achieve the optimal rendering of your Maya models. In most cases, you will have to experiment with a balance between the histogram range and the kernel size.