


Positioning an Element Using the Transform Tool
Using the Transform tool, you can easily reposition, scale, rotate and even skew layers directly in the Camera view.
When positioning a drawing layer using the Transform tool, always make sure the Peg Selection Mode ![]() is deselected in the Tool Properties view. Otherwise, it will limit the selection to pegs in the Camera view.
is deselected in the Tool Properties view. Otherwise, it will limit the selection to pegs in the Camera view.
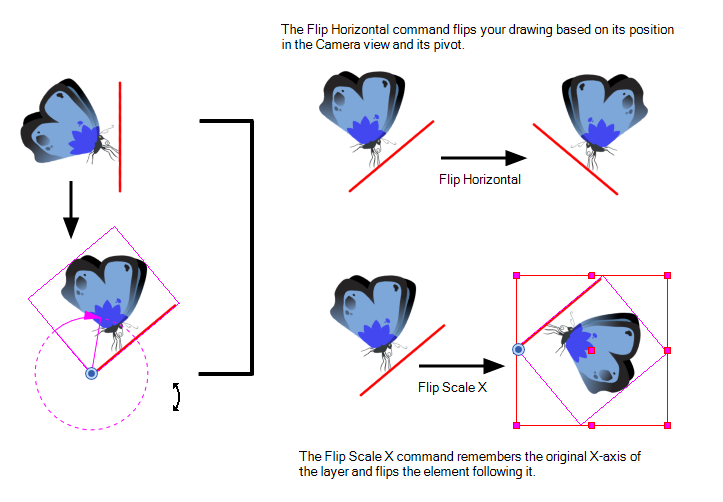
There are two different options you can use when you want to flip your element.
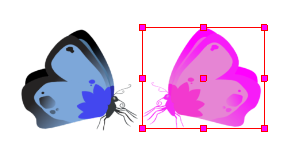
The Flip Horizontal and Flip Vertical options let you flip a drawing layer along the Camera view’s horizontal and vertical axis.
Once your drawing layer is rotated, the original horizontal and vertical axes change. The Flip Scale X and Flip Scale Y will perform a flip on your drawing layer following its original axis.
| • | The Flip Horizontal command flips the layer following the Camera view X-axis. |
| • | The Flip Scale X command uses the original X-axis of the layer and flips the element following it. |
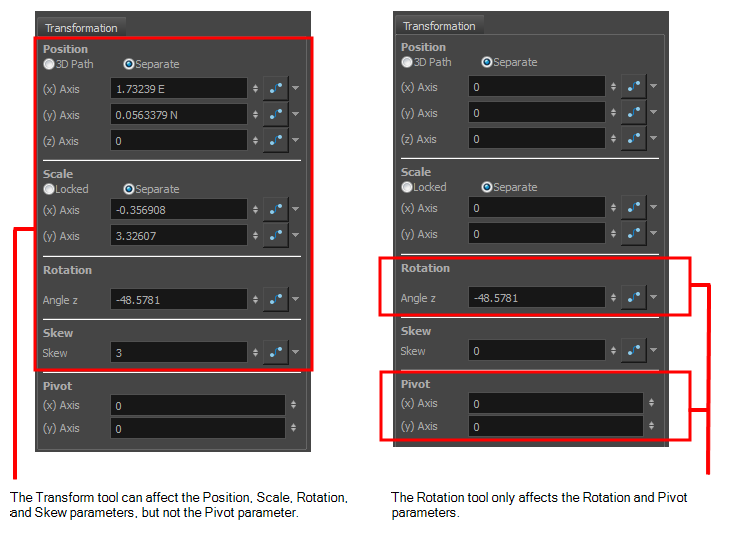
Transformations, such as rotation, scale, skew and flip are made relative to the pivot point position. You can temporarily reposition the pivot point for each transformation using the Transform tool. Note that the pivot is only moved temporarily. When animating the position, the interpolation is calculated from the permanent pivot position—see Positioning an Element Using the Advanced Animation Tools.
- In the Tools toolbar, select the Transform
 tool.
tool.
- In the Tool Properties view, make sure the Peg Selection Mode
 is disabled.
- In the Camera view, select your element.
The pivot point appears at the center of the scene space (coordinates 0, 0, 0), unless previously repositioned.
- Click on the pivot point and drag it to a new position.
This will be the new position of the pivot point for the current transformation. It will remain in this position as long as you do not deselect the drawing. Using the Transform tool to reposition your pivot will temporarily override the existing pivot point position until you complete the current transformation. Then it returns automatically to its original position.
When you translate the pivot point using the Transform tool, the permanent pivot will appear as a ghost so you know where it is and also from where the animation will be interpolated when you create motion paths. The animation is always interpolated from the original pivot and not the temporary pivot.
- In the Tools toolbar, disable the Animate
 mode.
mode.
- In the Tools toolbar, select the Transform tool or press Shift + T.
- In the Tool Properties view, make sure the Peg Selection Mode is deselected.
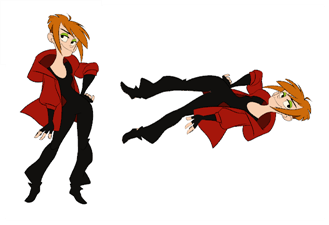
- In the Camera view, select a drawing layer and drag the selection to a new area. You can select multiple layers to reposition them at the same time. Hold down Shift and select the different layers.
![]()
- In the Tools toolbar, disable the Animate mode.
- In the Tools toolbar, select the Transform tool or press Shift + T.
- In the Tool Properties view, make sure the Peg Selection Mode is deselected.
- In the Camera view, select a drawing layer.
- Place the pointer outside of a corner of the bounding box and drag to rotate.
![]()

![]()
- In the Tools toolbar, disable the Animate mode.
- In the Tools toolbar, select the Transform tool or press Shift + T.
- In the Tool Properties view, make sure the Peg Selection Mode is deselected.
- In the Camera view, select a drawing layer and push or pull on the size, top, or corner control point. Hold down Shift to lock the selection's aspect ratio.
![]()
- In the Tools toolbar, disable the Animate mode.
- In the Tools toolbar, select the Transform tool or press Shift + T.
- In the Tool Properties view, make sure the Peg Selection Mode is deselected.
- In the Camera view, select a drawing layer.
- Place the pointer between two controls points and drag sideways or up and down.
![]()
- In the Tools toolbar, disable the Animate mode.
- In the Tools toolbar, select the Transform tool or press Shift + T.
- In the Tool Properties view, make sure the Peg Selection Mode is deselected.
- In the Camera view, use the Transform tool to select a drawing layer to flip.
- Do one of the following:
| ‣ | From the top menu, select Animation > Flip > Flip Horizontal or Flip Vertical. |
| ‣ | In the Tool Properties view, click the Flip Horizontal |
| ‣ | Press 4 or 5. |
- In the Tools toolbar, disable the Animate mode.
- In the Tool Properties view, make sure the Peg Selection Mode is deselected.
- In the Camera view, use the Transform tool to select an element that has already been transformed.
- From the top menu, select Animation > Flip > Flip Scale X or Flip Scale Y.
Transform Tool Properties
![]()
| Icon | Tool Name |
|
|
Lasso and Marquee |
|
|
Peg Selection Mode |
|
|
Snap Options |
|
|
Hide Manipulator Controls |
|
|
Flip Horizontal and Flip Vertical |
|
|
Rotate 90 Degrees CW and CCW |
|
|
Width and Height |
|
|
Offset X and Y |
|
|
Angle |
The Lasso and Marquee options let you choose the type of selection the current tool will perform. The default selection mode is Marquee.
| • | Lasso |
| • | Marquee |
Hold down the Alt key to switch to toggle between the selection modes.
In the Camera view, the Peg Selection Mode![]() limits the selection to peg layers instead of drawing layers. This mode is useful when you have created a character rig using peg layers for each drawing. That way, you do not accidentally select the drawing layer when you want to animate on the peg.
limits the selection to peg layers instead of drawing layers. This mode is useful when you have created a character rig using peg layers for each drawing. That way, you do not accidentally select the drawing layer when you want to animate on the peg.
When disabled, the Transform tool selects the drawing layers.
When transforming or repositioning a layer using the Transform tool, you can enable different snap options to help you.
| • |
|
| • |
|
The Hide Manipulator Controls ![]() button lets you hide the bounding box and manipulator controls from the Camera view when an element is selected.
button lets you hide the bounding box and manipulator controls from the Camera view when an element is selected.
The Flip Horizontal ![]() and Flip Vertical
and Flip Vertical ![]() buttons let you flip the selected element horizontally or vertically. You can also select Animation > Flip > Flip Horizontal and Flip Vertical from the top menu or press 4 or 5.
buttons let you flip the selected element horizontally or vertically. You can also select Animation > Flip > Flip Horizontal and Flip Vertical from the top menu or press 4 or 5.
The Rotate 90 Degrees CW ![]() and Rotate 90 Degrees CCW
and Rotate 90 Degrees CCW ![]() operations rotate the current selection 90 degrees clockwise or counter-clockwise.
operations rotate the current selection 90 degrees clockwise or counter-clockwise.
The Width![]() and Height
and Height![]() fields allow you to enter specific values for accurately resizing a selected layer.
fields allow you to enter specific values for accurately resizing a selected layer.
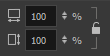
| • | Width: Enter a width value in this field to resize the width of your selection. |
| • | Height: Enter a height value in this field to resize the height of your selection. |
| • | Lock: Click the Lock icon to lock or unlock the ratio between the width and height values. |
Use the Offset X![]() and Offset Y
and Offset Y![]() fields to enter specific values to reposition the selected layer accurately.
fields to enter specific values to reposition the selected layer accurately.

| • | X: Enter an offset value in this field to reposition the selected layer along the X-axis. |
| • | Y: Enter an offset value in this field to reposition the selected layer along the Y-axis. |
The Angle ![]() field lets you enter specific values to rotate the selected layer accurately. A positive value rotates the layer counterclockwise and a negative value rotates the layer clockwise.
field lets you enter specific values to rotate the selected layer accurately. A positive value rotates the layer counterclockwise and a negative value rotates the layer clockwise.

| • | Angle: Enter a degree value in this field to rotate the selected layer. |