


Batch Rendering
Harmony Server has the possibility to render your scene locally or send it to a render farm so other computers can render your scenes while you continue working on your station. This option is not available with Harmony Stand Alone.
The Harmony Server rendering processes are named:
| • | Local Rendering is done directly on the user machine using its CPU. To perform local rendering you must use Stage. |
| • | Batch Rendering lets you send a scene to render while you continue working in Stage. This way, you do not have to wait for the application to complete the render process. |
Batch rendering is a background process divided over several machines or a render farm. Sending your scene to batch render will share the rendering load with other machines in the render farm and lessen the amount of work required by your computer.
- Save all the contents of your scene, all drawings, colour palettes and the palette list.
- Select File > Save or press Ctrl + S (Windows/Linux) or ⌘ + S (Mac OS X).
- From the top menu, select File > Export > Export Images or press Ctrl + Shift + Y (Windows/Linux) or ⌘ + Shift + Y (Mac OS X).
If the system administrator did not complete the resolution configuration tasks, a warning message will open. This message notifies you that the resolution.conf file was not properly inserted in the configuration folder.
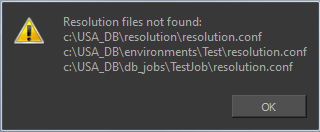
- Click OK to continue. You will still be able to render your scene.
The Export Images dialog box opens.
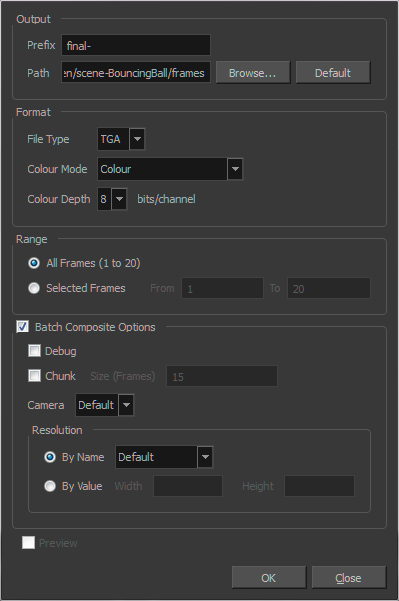
- In the Output section, add a prefix to the images to be output and the path to the location in which the files will be stored.
- In the Format section, select a file type from the File Type list.
- In the Colour Mode list, select an option to export your images: Colour, Colour with Transparency, or Greyscale.
- In the Colour Depth menu, select the number of bits you want for your images.
- In the Range section, select the frames you want to render:
| ‣ | All Frames: Sends all the frames in the scene to be rendered. |
| ‣ | Selected Frames: Sends a range of frames to be rendered. |
- Select the Batch Composite option.
- Select the Chunk option if you want to split the frames into sets of frames or QuickTime movie into small chunks. Note that when the render farm (server) is done rendering all the small movie chunks, it will put them all back together to create one single movie file.
- In the Size (Frames) field, enter the number of frames for each chunk. For example, if your scene is 100 frames long and you enter a value of 20, there would be five entries in the queue of 20 frames each.
- From the Camera menu, select the camera for rendering the scene's images. These are the Camera nodes you created in your scene.
- Click OK to start the rendering process.
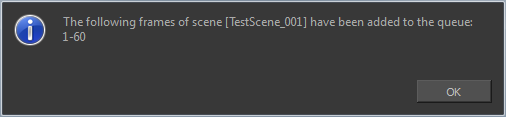
A confirmation dialog box opens to inform you that the frames have been sent to the Render queue.
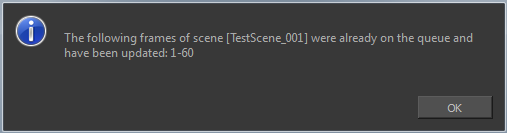
| ‣ | If the selected frames were already sent to the Render queue, a notification dialog box opens to inform you that these frames were already in the queue, but that they have been updated with the latest rendering request. |
You can also send scenes to batch rendering and check the status of the rendering queue from the Control Center node.