


Creating Bitmap Brushes
With bitmap brushes in Harmony, you can create an infinite range of fuzzy, textured and watercolour lines. You can combine two different brush tips, with separate sets of parameters, with the Dual Tip feature. You can also select a paper texture that will mimic the texture of the surface that is being painted on. Uses these features separately or in combination to create distinct, natural-looking strokes.
- In the Timeline view, create a new Bitmap drawing layer.
- In the Tools toolbar, select the Brush
 tool or press Alt + B.
- In the Tool Properties view, select a brush and click the Arrow button to open the Bitmap Brush Properties view.

- In the Tip tab, select a brush tip.
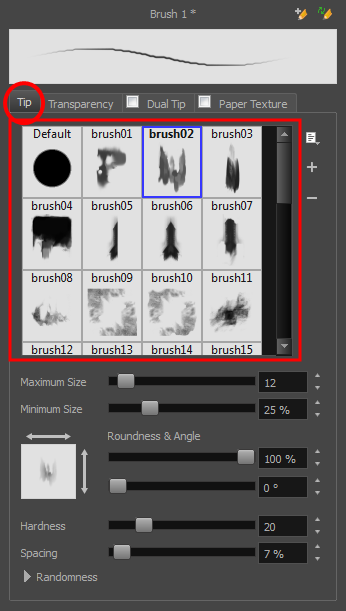
- Click on the different tabs to access the options available for adjustment. You can use the brush stroke preview at the top to view all your adjustments in real time.
| ‣ | Tip tab: Make adjustments to size, brush tip angle, hardness and spacing—see Bitmap Brush Tool Options. |
| ‣ | Transparency tab: Make adjustments to flow and opacity—see Transparency Tab. |
| ‣ | Dual Tip tab: Select this option to enable the Dual Tip feature. Select a dual brush tip and make adjustments to its size, brush tip angle, hardness and spacing—see Dual Tip Tab. |
| ‣ | Paper Texture tab: Select this option to enable the Paper Texture feature. Select a paper texture and make adjustments to its scale, alignment and additivity—see Paper Texture tab. |
- When you are satisfied with the look of your bitmap brush, click the Add New Brush Preset
 button at the top-right corner of the Bitmap Brush Properties window.
- In the New Preset dialog box that appears, enter the name for your brush preset.
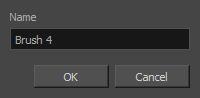
- Click OK.
If you continue to make adjustments to your new brush preset and want to save these changes, click the Update Preset ![]() button. Otherwise, your modifications will only be saved until another brush preset or drawing tool is selected.
button. Otherwise, your modifications will only be saved until another brush preset or drawing tool is selected.