General Preferences

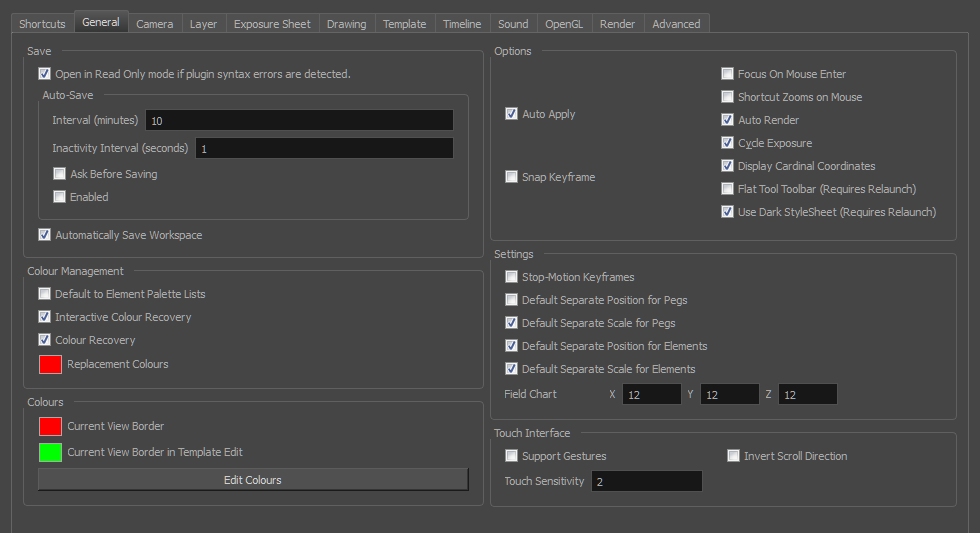
To customize your interface, you will use some of the preferences located in the General tab as well as the Camera tab.
| Parameter | Description | ||||||||||||
| Save |
Open in Read Only mode if plugin syntax errors are detected: Opens scenes that contain plugin node errors in read-only mode to prevent you from losing plugin information on subsequent saves. Auto-Save:
Automatically Save Workspace: This option is enabled by default. Every time you add a view to your workspace, remove a toolbar or change a view’s width, these modifications are saved when you quit the application. If you do not want the system to save these modifications, disable the preference. This preference does not require you to restart the application. |
||||||||||||
| Colour Management |
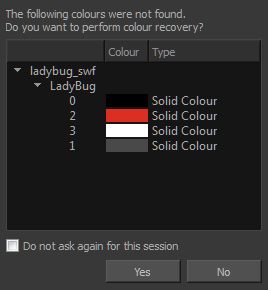
Default to Element Palette Lists: When this option is enabled the new, cloned, duplicated, imported and linked palettes will be stored in the Element Palette list instead of the Scene Palette List. Interactive Colour Recovery: If a colour palette for your scene is deleted or cannot be found, you will be asked if you want to recover colours from the program’s memory. If this option is unchecked, the program recovers missing colours without displaying a dialog box for your input.
Colour Recovery: If this option is unchecked, colour recovery will not occur. Replacement Colours: If certain colours are no longer available, they are automatically replaced with the ones indicated by the Replacement Colour swatch. The default colour is red, as it acts as a missing colour warning device. |
||||||||||||
| Colours |
The Colours preference allows you to modify the colours of the different user interface views and elements. For example, you can change the Camera view’s background colour from grey to white. Altering these preferences requires you to restart the application or to close a view and reopen it for the modifications to be applied. Current View Border: Sets the colour of the frame around the workspace view you are currently using, also known as focus. By default, the colour is red. Click on the red colour swatch to select a new colour in the Colour Picker window. Current View Border in Template Edit: Sets the colour of the frame around the workspace view you are currently using when editing a template from your library view. By default, the colour is green. Click on the green colour swatch to select a new colour in the Colour Picker window. Edit Colours: Click on the Edit Colours button to open the Colours window. |
||||||||||||
| Options |
Auto Apply: When enabled, values entered or options selected in node editors are automatically applied to elements in your scene. The Apply and OK buttons are hidden in the Layer Properties when this feature is enabled. Snap Keyframe: If two keyframes have the same value, they will both update to the same new position when the first of the two keyframes is modified. The previous keyframe has to be a Stop-Motion keyframe. Focus on Mouse Enter: Disabled by default. In Toon Boom Harmony, for the operations or keyboard shortcuts to work in the view in which you are working, the focus must be in that view. When the focus is on a particular view, a red rectangle appears around its frame. You must click in the view or on the view’s header for the focus to be done. If you enable the Focus on Mouse Enter preference, you will not need to click in the view to get the focus. It will be done as soon as your mouse enters the view. NOTE: If you enable the Focus On Mouse Enter preference, certain operations from the top menu may not be available since the view focus may change as you make your way to the top menu. In this case use keyboard shortcuts and quick access menus (right-click menus).
Shortcut Zooms on Mouse: When enabled, shortcut zooming will centre on the cursor location. Auto Render: Automatically enables the Auto-Render option. Cycle Exposure: Make navigation in the Xsheet View wrap-around from the last frame or the last column to the first. Display Cardinal Coordinates: Display coordinates through application either scalar (ex:+1 -1) or cardinal (1N1S). Flat Tool Toolbar (Requires Relaunch): Lets you expand the toolbar so there are no nested toolsets in the toolbar. You will need to close Harmony and relaunch it for the new interface to be displayed. A default set of tools will appear in the toolbar. However, you can customize which tool icons appear in the toolbar to fit your own work pattern. Once you have enabled the Flat Tool Toolbar preference, you can customize the tools that appear in the toolbar. This means you can change the default set of tools and replace the tools which you use less frequently with ones which are used more often. This customizing is done through the Toolbar Manager Use Dark StyleSheet (Requires Relaunch): Application loads a dark skin for the User Interface. |
||||||||||||
| Settings |
Stop-Motion Keyframes: New keyframes are created as stop-motion keyframes. Default Separate Position for Pegs: New pegs are created with separate position functions. Default Separate Scale for Pegs: New pegs are created with separate scale functions. Default Separate Position for Elements: New elements are created with separate position functions. Default Separate Scale for Elements: New elements are created with separate scale functions. Field Chart:
|
||||||||||||
| Touch Interface |
Support Gestures: Enable the gestural touch interface for the OpenGL views. On Mac OS X, this determines whether a two-finger drag gesture is interpreted as a zoom or a pan. Invert Scroll Direction: Inverts the scroll direction. Touch Sensitivity: Control touch sensitivity. On Windows, higher numbers favour scale/rotates over pans. On Mac OS X, higher numbers give a slower response to pans. |


