Deformation Toolbar
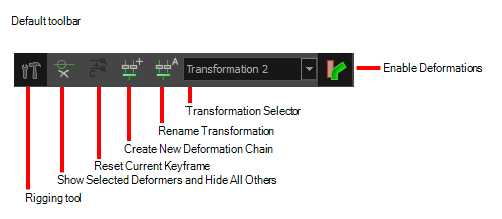
The Deformation toolbar contains the various tools and options used to create a deformation rig. This toolbar is displayed in the default interface.
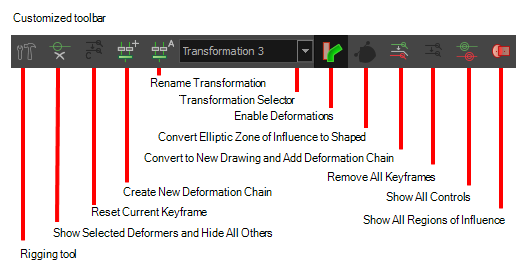
By default, the Deformation toolbar only contains the essential options. If you right-click on the toolbar and select Customize, you can add additional buttons
| Icon | Tool Name | Description |
|
|
Rigging Tool |
The Rigging tool is used to create To learn more about the Rigging tool's properties, see Rigging Tool Properties. |
|
|
Show Selected Manipulators and Hide All Others |
The Show Selected Manipulators and Hide All Others button hides all manipulators displayed in the Camera view. Only the manipulators of the selected deformation node are displayed—see Displaying the Deformation Controls to learn how to make the manipulators visible in the Camera view. |
|
|
Reset Current Keyframe |
The Reset Current Keyframe copies the resting position, the original setup of your skeleton before undergoing any deformation, to your current frame. Once you have created a deformation chain, you can use the Rigging tool to adjust the position and appearance of the rig to fit the element. When the skeleton is in place, you can use the Reset Current Keyframe button to reset the current frame position to the resting position. |
|
|
Create New Deformation Chain | The Create New Deformation Chain option allows you to create a new deformation chain on a same character. For example, if you have drawings for the different views of your puppet (front, profile, back, etc.), you can use this feature to setup a new set of chains for each angle without having to create completely different puppets. |
|
|
Rename Transformation | The Rename Transformation option allows you to give specific names to your different transformation chains. By default, chains are named Transformation plus the number of the chain, such as Transformation 2. You can rename these to identify them easier, such as front, side, back, and so on. |
|
|
Transformation Selector |
The Transformation Selector drop-down menu allows you to assign an existing chain to a set of drawings. For example you might want to reuse the front deformation chains for another series of drawing. When creating a new drawing, the Default Transformation is assigned. While on the new drawing frames, from the drop-down menu, select a different chain to automoatically assign it. |
|
|
Enable Deformations |
The Enable Deformations button allows you to display your drawings in their original state or with deformations while creating additional drawings. Depending on the artwork you need to create, you might need to refer to the other images either deformed or in their original position. Note that this will not affect the exported images. It's only a display mode. You can see the result in OpenGL and Render modes in the Camera view, but the exported images will always be deformed. |
|
|
Convert Elliptic Zone of Influence to Shape |
After you have created a deformation chain using Elliptic as the Zone of Influence type, you can select your deformer and click on this button to convert it to a Shaped type. Control points will appear around the shape making it easy to customize. NOTE: You can also convert the Elliptic zone of influence to a shape. From the top menu, select Animation > Deformation > Convert Elliptic Deformation ROI to Shape. This will create a much smaller initial zone of influence than if you were to convert it directly to a shape.
|
|
|
Convert to New Drawing and Add Deformation Chain |
Takes the pose/drawing and the deformer of the selected frame and converts it to a new pose/drawing with the corresponding deformer. |
|
|
Remove All Keyframes | The Remove All Keyframes option removes all keyframes on the selected deformation chain. |
|
|
Show All Controls |
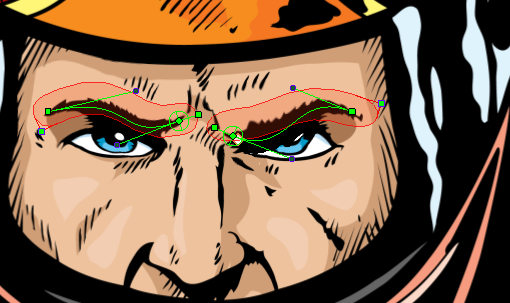
The Show All Controls button lets you visualize the resting position in red (Setup mode) and the active position (Animation) in green at the same time—see Displaying the Deformation Controls to learn how to make the manipulators visible in the Camera view. 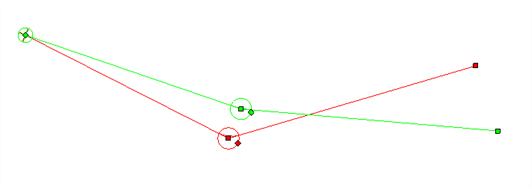
|
|
|
Show All Regions of Influence |
The Show All Regions of Influence button displays all regions of influence in the deformers in your project. Note that the deformer’s controls must be visible in order for its zones of Influence to show. The regions will not be displayed when a deformer’s zone of Influence is set to Infinite or Zero.
NOTE: Region of influences are not available for Game Bone deformers.
|