Pre-installation
Before installing Toon Boom Harmony, you must perform the following tasks:
| • | Verifying the Minimum Requirements |
| • | Prerequisites for Harmony Installation |
| • | Pre-installation Configuration |
Verifying the Minimum Requirements
For the most current Toon Boom Harmony hardware requirements, refer to the Harmony and Your IT Department white paper available from:
| • | Toon Boom Animation Sales Representative |
| • | Toon Boom Animation Support at: support@toonboom.com. |
Prerequisites for Harmony Installation
For a fast database connection, it is necessary to set up extra network settings so clients can perform a fast Name Resolution of the server, as well as the server to the clients.
| • | Obtaining the Product Code |
| • | Additional Network Settings |
| • | Windows 2008 Server |
Obtaining the Product Code
You should obtain a product code from the Toon Boom licensor, so you can finish the installation process without having to wait for the activation code to arrive.
To obtain a Harmony 12.1 product code, send the following information to: licensor@toonboom.com.
| • | Your name and the name of your company |
| • | Email address where to send the license file |
Additional Network Settings
hosts file only if there are problems or slowness when a computer is resolving names. DO NOT edit the hosts file unless there are problems resolving names on the network.- Set up the server and client's IP with a static (fixed) IP address.
- Go to C:\Windows\System32\drivers\etc folder and open the
hostsfile using a plain text editor.
- Go to the end of the file. On a new line, add the static IP address and the machine name accordingly. If you are using a domain, you need to use the fully qualified domain name (
FQDN).
For example, if the server name is server.toonboom.com in the domain and the IP address of the server is 192.168.1.1, the line should be:
192.168.1.1 server.toonboom.com
- Add the rest of the client's IP and hostname on a new line and save the file.
- Copy and paste the
hostsfile to all the machines including the server under theC:\Windows\System32\drivers\etc\folder.
Windows 2008 Server
For a Windows 2008 server, you need to perform some additional steps to complete the task.
If you have a domain, you need to add a usabatch user on the global group where all the Harmony users are. This user should have administrator account rights.
| • | The user name is usabatch |
| • | The password is usabatch |
If an error due to the password policy occurs, you can change the password policies for both the Domain Controller Security Policy and Domain Security Policy. You also need to do this from the Domain server if it is different from the Harmony database server.
- Open the Windows Control Panel and double-click on Administrative Tools.
- In Administrative Tools, select Group Policy Management.
- In the hierarchy view of the Group Policy Management, go into the Domain used by Harmony, right-click on Default Domain Policy and select Edit.
- In the hierarchy view of the Group Policy Management Editor window, go in Computer Configuration > Policies > Windows Settings > Security Settings > Account Policies > Password Policy.
- On the right side of the Group Policy Management Editor window, double-click on Password must meet complexity requirements.
- Select the Define this policy setting and Disabled options.
- Click OK.
Wait for the changes to take effect or restart the Server. It can take several minutes for the domain controller to update and use the new settings.
Once this is done, you can create the usabatch user, which should be inside the Harmony user group.
Pre-installation Configuration
Before installation, configure your computer by performing the following tasks:
| • | Turning Off the Anti-Virus Software |
| • | Turning Off the Windows Firewall |
| • | Turning Off Simple File Sharing |
Turning Off the Anti-Virus Software
- From the Start menu, select Settings > Control Panel.
Vista Users: Click the Start menu and select Control Panel.
The Control Panel opens.
- In the Control Panel window, double-click on the Security Center icon.
Vista Users: Turn off Malware Protection.
The Windows Security Center dialog box opens.
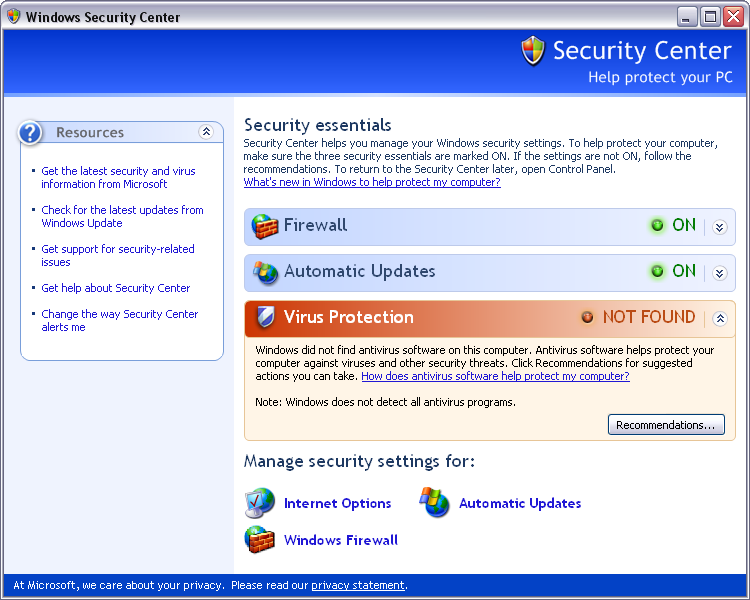
- If your anti-virus software is not detected, open all anti-virus software applications on your computer and disable each one manually.
Turning Off the Windows Firewall
- Open the Windows Control Panel.
- In the Windows Firewall window, click Turn Windows Firewall On or Off on the left side of the window.
The Customize Settings for Each Type of Network dialog box displays.
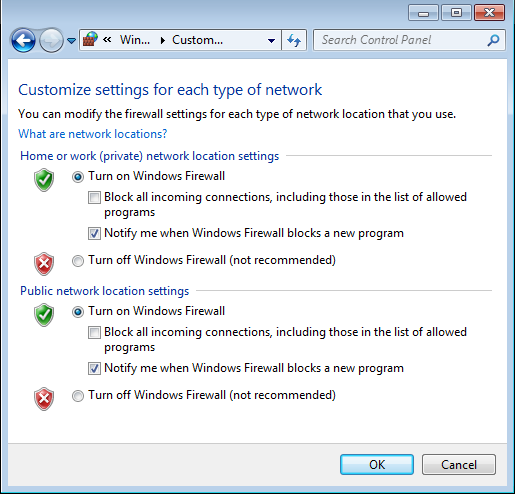
- Select the Turn off Windows Firewall option for both private and public network locations.
- Click OK.
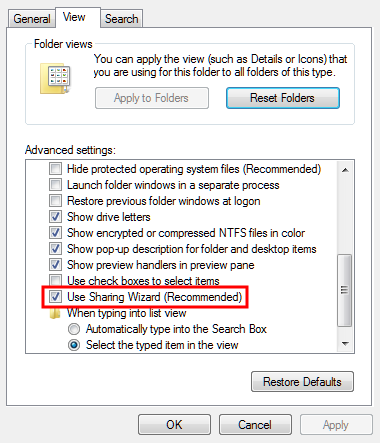
Turning Off Simple File Sharing
- Open the Windows Control panel.
- If you are on Windows 8, click on Appearance and Personalization. Otherwise, go to the next step.
- Open the Folder Options dialog box.
- In the View tab, deselect the Use Sharing Wizard (Recommended) option.