


Configuring Harmony to Share Scene Data
Before you can share scene data between a Mac OS X database and Mac OS X, Linux, and Windows clients, you must configure the Mac OS X database server appropriately.
| • | Sharing Harmony Directories for Mac OS X and Linux Clients |
| • | Setting Up the Server for Windows Clients |
Sharing Harmony Directories for Mac OS X and Linux Clients
Toon Boom Harmony 12.1 uses NFS (Network File System) to share files between Mac OS X and Linux computers. You must use NFS to export directories from the server so clients can mount them and share the contents.
Sharing the Database for Mac OS X and Linux Clients
If your Mac OS X server will have Mac OS X or Linux clients, you must export the USA_DB and USADATA folders using NFS. The clients will then need to be configured to mount those exported folders from the server.
Setting Up NFS Exports on Mac OS X
The following procedure shows you how to export the /USADATA and /USA_DB directories on a Mac OS X workstation, as NFS shared points.
- From the Finder, go to Applications > Utilities and double-click on Terminal.
- Create and edit the exports file in the
/etcdirectory:
sudo vi /etc/exports
- Add the following:
/USA_DB -maproot=nobody
/USADATA -maproot=nobody
- Save and exit the file.
- Verify that the file is correct by running:
sudo nfsd checkexports
If there is no return response, then it is correct.
- Start
nfsd:
sudo nfsd enable
- If nfsd was already started, notify the nfsd daemon that the /etc/exports file has changed:
sudo kill -1 `cat /var/run/mountd.pid`
- Verify that the folders exported correctly:
/usr/bin/showmount -e
The following should appear:
/USA_DB Everyone
/USADATA Everyone
Once the export file is created, client systems can mount /USA_DB and /USADATA located on the Mac OS X server system.
Setting Up the Server for Windows Clients
If Windows clients are going to access the Toon Boom Harmony 12.1 database on a Mac OS X server, you must set up the Link Server, Samba and the server.ini file. These allow the server and clients to communicate and share data.
| • | Configuring and Starting the Link Server |
| • | Configuring Samba on Mac OS X |
| • | Configuring the server.ini File |
| • | Rebooting the Server |
Configuring and Starting the Link Server
If you are running Toon Boom Harmony 12.1 in a mixed environment where the server is on Mac OS X and some of the clients are running Windows, you must start the Link Server, which makes it possible for Windows machines to communicate with the database.
- If you did not already install the Link Server during the server installation, you must do it now. From the Finder, go to Applications > Toon Boom Harmony [version] [edition] > Tools.
- Double-click on the Configuration Assistant.
- Select Create the Startup Items and deselect the other options.
- Click Continue.
- In Create Startup Item, select Create Link Server Startup Item.
- Click Create.
- Enter a user name and password of a user with administrator rights and click OK.
The installation will start Link server automatically.
- A log file is generated in /tmp/com.toonboom.LinkServer.log. Check this file to make sure there are no errors.
Start Link Server:
sudo launchctl load /Library/LaunchDaemons/com.toonboom.LinkServer.plistStop Link Server:
sudo launchctl unload /Library/LaunchDaemons/com.toonboom.LinkServer.plistConfiguring Samba on Mac OS X
Do the following:
| • | Configuring the Samba Service |
| • | Configuring the Samba Shared Files |
| • | Configuring the smb.conf File |
Configuring the Samba Service
By default, Samba is not set up to run automatically on Mac OS X.
- Open System Preferences.
- In the Internet & Wireless section, click Sharing.
- In the Services section, select the File Sharing option.
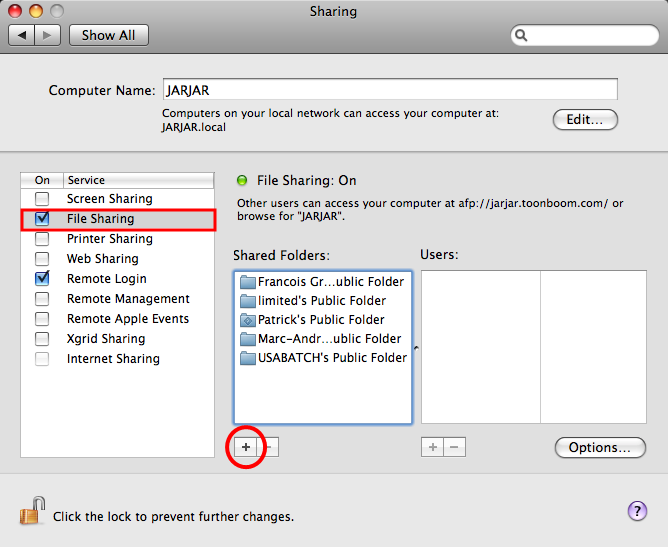
- In the Shared Folders section, click the plus (+) sign.
- Browse and select the /USA_DB folder.
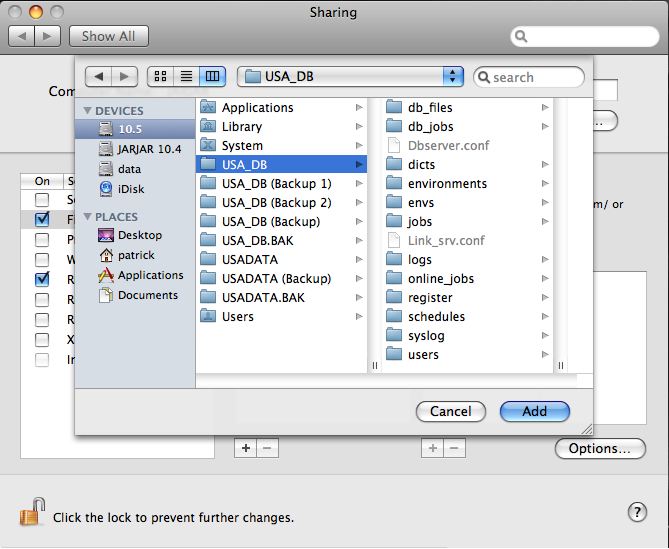
- Repeat steps 4 and 5 for the /USADATA folder.
- Make sure to give the usabatch account Read and Write permissions to the USA_DB and USADATA folders.
- Click Options.
- Select the Share files and folders using SMB option.
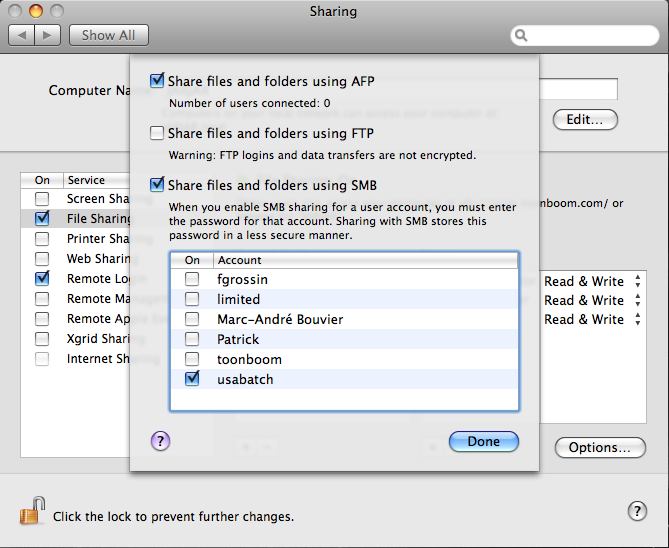
- Select the usabatch option and click Done.
- Close System Preferences.
Configuring the Samba Shared Files
Next, modify the /USA_DB and /USADATA shares in the /var/db/samba/smb.shares and add a usa section to the file.
- Open the Terminal.
- In the Finder, go to Application > Utilities and double-click on Terminal.
- Go to the
sambadirectory:
cd /var/db/samba/
- Open the smb.shares file.
sudo vi smb.shares
- Add or modify options in the file.
The following is an example of entries in the smb.shares shared file. You can add missing options at the end of the list.
[USA_DB]
comment = Harmony database folder
path = /USA_DB
available = yes
guest ok = no
directory mask = 777
create mask = 777
browseable=yes
read only=no
[USADATA]
comment = Harmony USADATA filesystem
path = /USADATA
available = yes
guest ok = no
directory mask = 777
create mask = 777
browseable=yes
read only=no
- Create a [USA] share by making a copy of the [USA_DB] section and pasting it underneath.
- Rename [
USA_DB] to [USA].
- Modify the following lines under
[USA]:
path = /Applications/Toon Boom Harmony 12.1/tba
comment = Harmony binaries and configuration files
- Verify that the
[USA]section looks like the following:
[usa]
comment = Harmony binaries and configuration files
path = /Applications/Harmony 12.1/tba
available = yes
guest ok = no
directory mask = 777
create mask = 777
browseable = yes
read only = no
- Save and exit the file.
Configuring the smb.conf File
You must also add or modify the following entries to the [global] section of the /etc/smb.conf file.
- Create a backup copy of your current /etc/smb.conf file:
cd /etc
sudo cp smb.conf smb.conf.bak
- Open the smb.conf file.
sudo vi /etc/smb.conf
- Add or modify options in the file:
[global]
map to guest = Never
dos charset = 437
unix charset = UTF-8-MAC
display charset = UTF-8-MAC
blocking locks = false
oplocks = false
mangled names = no
no, the mangled names parameter will prevent older smb clients (DOS, Win9X and Windows NT clients) from accessing files and folders that do not have an 8.3 file name.- Save and exit the file.
- Verify that you have not made any basic syntax errors:
testparm
- Notify the smbdservice of the changes:
sudo kill -1 `cat /var/run/smbd.pid`
Configuring the server.ini File
Before you install Toon Boom Harmony 12.1 on Windows clients, you must create the server.ini file on the server. The server.ini file provides information necessary in Windows for the Configuration Wizard to set up a Windows client.
- From the Finder, go to Applications > Toon Boom Harmony [version] [edition] > Tools and double-click on the Configuration Editor.
- In the Configuration Editor opens, click the server.ini tab.
- Copy and paste the following example and modify it accordingly:
This is an example of the server.ini file whose server name is harmonyserver. Also there is one directory named USADATA.
[WizardConfig]
ServerName=harmonyserver
InstallationDrive=C
UsaShare=usa
UsadbDrive=C
UsadbShare=USA_DB
FileSystem0=C USADATA harmonyserver
- From the File menu, select Save and quit the Configuration Editor.
Rebooting the Server
At this point, reboot the server so all of the services which you have just configured will start up.