|
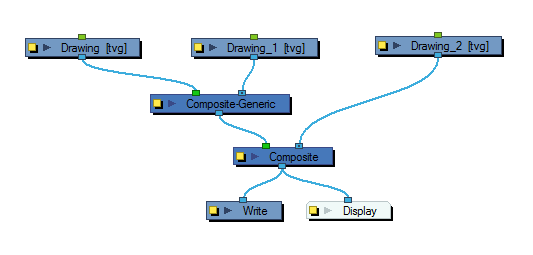
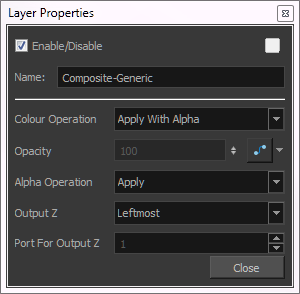
The colour values of the output image are determined based on the alpha and colour values of the left and right image.
Both the Blending node and Composite-Generic node have regular blending modes and legacy blending modes. The regular blending modes will take the source images and unmultiply them before blending the two inputs together. The images will be remultiplied when being output from the node. The legacy blending modes use the pre-multipled source images as is in order to apply the effect. Unmultiplying the images before processing them will give a final result closer to what can be found in software such as Adobe Photoshop.
Right: The colour values in the output image are derived from the image in the right port. Colour values in the left port are ignored.
Left: The colour values in the output image are derived from the image in the left port. Colour values in the right port are ignored.
Apply With Alpha: ORGB=[RRGB*(1-LA)]+LRGB. This is a standard composite operation called "alpha blending." During this operation, colour values of the left and right images are combined based on the alpha value of the left image. Where the left image is completely opaque (LA=1), the ORGB will be replaced completely with LRGB. Where the left image is completely transparent (LA=0), the ORGB is unaffected. Where the left image is partially transparent, you get a blend of the RRGB and the LRGB, where the values are added together and clipped to 255. The LA is the opacity of the left image. This operation (1-LA) calculates the amount of opacity to retain in the output image. The operation [RRGB*(1-LA)] removes as much of the output image as you are about to add from the left image. Remember that LRGB has been pre-multiplied by the LA, so the equation is really ORGB=[RRGB*(1-LA)]+(LRGB*LA), which is simply the weighted average of L and R, with LA supplying the weight.
Apply Tone Highlight: ORGB=RRGB+(LRGB*RA). This operation restricts the output of the tone to the region of the matte (RA), and uses the transparency and colour value of the input image to determine the colour values of the output. This is used to lighten or darken the output image. Darkening occurs when RRGB contains negative values.
Apply Add (Apply Add Legacy): ORGB=RRGB+LRGB. This operation uses the transparency and colour value of the left image to determine the output values. Effects such as shadows and glows are calculated in this manner. Unlike the Apply Tone Highlight operation, the result is not clipped to the matte (RA) of the output image.
Apply Matte For Overlay: ORGB=RRGB*(1-LA).This operation prepares the output image using the overlay's matte; the matte's RGB values are ignored. This operation prepares the output image to receive the colour portion of the overlay. It is typically used when an overlay and its matte are stored in separate images.
Apply Overlay Into Matte: ORGB=RRGB+(LRGB*RA). This operation maps an overlay into an area prepared by a matte. It is typically used when an overlay and its matte are stored in separate images, and Apply Matte For Overlay has been used to prepare the output image to receive the RGB portion of the overlay.
Apply Transparency: ORGB=RRGB*(1-LA). This operation is used for a cutter matte to prepare the output image to receive the colour values of another image. It has the effect of increasing the transparency of ORGB (but not OA), based on the LA. This function is the equivalent to Apply Matte for Overlay. It is almost always used with Apply Transparency Matte, an Alpha Composite Operation.
Apply Multiplicative Tone: ORGB=RRGB*(LRGB+1-LA). This operation multiplies the left and right images (see the Multiply colours selection), to be combined with the right image colour, creating a darker output colour. This effect created by this operation is identical to the Multiply Colour Blending effect in Photoshop.
Multiply Colours: ORGB=RRGB*LRGB. This operation multiplies the left and right image colours. Multiplying colours filters the colour values of the right image from the output image. For instance, to make the left image less blue, you can add a right image to this node with a blue colour value and select this option.
Linear Light: This operation burns or dodges the colours by decreasing or increasing the brightness depending on the colour of the underlying colour. If the blend colour is lighter than 50% grey, the colour is lightened because the brightness is increased. If the blend colour is darker than 50% grey, the colour is darkened because the brightness is decreased.
Pin Light: This operation will replace the colours, depending on the underlying colour . If the blend colour is lighter than 50% grey, pixels darker than the underlying colour are replaced, and pixels lighter than the underlying colour do not change. If the blend colour is darker than 50% grey, pixels lighter than the underlying colour are replaced, and pixels darker than the underlying colour do not change.
Vivid Light: This operation burns or dodges the colours by decreasing or increasing the brightness depending on the colour of the underlying colour. If the colour is lighter than 50% grey, the blend colour is lightened because the contrast is decreased. If the colour is darker than 50% grey, the blend colour is darkened because the contrast is increased.
Exclusion: This operation produces a similar result to the Difference mode, but with a lower contrast.
Dodge: This operation will lighten the colour.
Burn: This operation will darken the colour.
Hue: This operation will result in a colour that will take the luminosity and saturation of the underlying colour, and the hue of the source colour.
Saturation: This operation will result in a colour that will have the same luminosity and hue of the underlying colour, and the saturation of the source colour.
Colour: This operation will result in a colour that will have the luminosity of the underlying colour, and the hue and saturation of the source colour.
Luminosity: This operation will result in a colour which has the hue and saturation of the underlying colour, and the luminosity of the source colour. This mode is opposite to the Colour mode.
Divide Colours (Divide Colours Legacy): ORGB=RRGB/LRGB. This operation divides the right image colour values by the left colour values. The left image colour values are inverted, creating a negative image (1/LRGB). The negative's colour values are then multiplied by the right image colour values.
Lighten (Lighten Legacy): This operation looks at the colour information coming from both the images in the left and right ports and selects the base or blend colour - whichever is lighter - as the result colour. Pixels darker than the blend colour are replaced, and pixels lighter than the blend colour do not change.
Softlight (Softlight Legacy): This operation darkens or lightens the colours in a soft and diffuse way, depending on the blend colour (image in left port). If the blend colour is lighter than 50% grey, the image is lightened. If the blend colour is darker than 50% grey, the image is darkened. Painting with pure black or white produces a distinctly darker or lighter area, but does not result in pure black or white.
Hardlight (Hardlight Legacy): This operation multiplies or screens the colours of the image in the left port with those of the image in the right port, depending on the blend colour. If the blend colour (left port image) is lighter than 50% grey, the image is lightened, as if it were screened. This is useful for adding highlights to an image. If the blend colour is darker than 50% grey, the image is darkened, as if it were multiplied. This is useful for adding shadows to an image. Painting with pure black or white results in pure black or white. Play with the Opacity value to create a subtler look.
Overlay (Overlay Legacy): This operation multiplies or screens the colours from the image connected to the left port, with those on the right, depending on the base colour. Colours from the left-port element overlay the colours of the drawing elements connected to the right, while preserving the highlights and shadows of the base colour. The base colour is not replaced, but mixed with the blend colour to reflect the lightness or darkness of the original colour.
|


