
Managing Jobs
Within each environment is a list of jobs that contains all the segments for your animated sequence. If you are creating a weekly television series called The Show, you could name your job show_ep_06 (the_show would be the name of your environment).
If each episode is composed of 100 animated shots, each job would contain 100 scenes.
Each job must have a unique name. Two jobs cannot have the same name, even if they appear in two different environments, because all the jobs are in the same folder on the server.
As you complete your animation project, you can update a job's status to reflect its progress in the overall production. You can indicate a job as being in production or not. If a job is in production, other modules can still access this job. If a job is no longer in production, it means the job is completed. The Harmony database still has all the job's components (scenes, elements, drawings), but the job neither appears nor is accessible from the Harmony applications.
In most cases, a job is no longer in production after it has been finalized (inked, painted, rendered) and transferred to a medium, such as Blu-ray, or sent to post-production. However, if you need to continue working on a job, you can revert its status at any time.
Before sending a job's scenes to be vectorized or rendered, you can set their priority level for the processing queue. Increasing the priority of a job makes the system process it before other jobs in the queue. For example, if job B is before job A in the queue, you can change the priority, so job A is processed first.
Changing a job's priority does not affect the vectorizing or rendering of jobs already sent to the queue. It will only affect jobs that are sent after the priorities were changed.
When you no longer need a job, you can delete it. Doing so will permanently remove the following:
| • | Scenes |
| • | Elements |
| • | Drawings |
| • | Database information associated with the selected job |
| • | Palettes stored under the selected job |
Before you delete a job:
| • | Make sure no one else is currently using the job. Failure to do this may result in file corruption and loss of your work. |
| • | Wait until everyone is offline. This ensures no one can open the data files while you delete them. |
- From the Environment list, select the project in which you want to create a job.
- Select Job > Create.
The Create Job window opens.
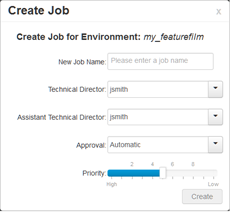
- In the New Job Name field, enter the name of the job to create.
- From the Technical Director list, select a technical director (TD). The names available are generated from a list of all possible users by their login username. You must select a TD to create the job.
A TD is usually the person who oversees the animation project and makes sure the work is done properly. Select the person who most closely resembles this definition. If you do not have a particular user for the task, you can simply assign this field to: BATCH.
When creating Harmony users, you can label a user as a TD.
- From the Assistant Technical Director list, select an assistant technical director (ATD). The names available are generated from a list of all possible users by their login username. You must select an ATD to create the job. If you do not have an ATD, select the same person for the TD and ATD jobs. In some studios, the responsibilities of the TD can be shared by more than one person. This second person is the ATD.
- From the Approval list, select how Harmony will mark the various stages that the scenes will pass through in your production schedule.
| ‣ | Automatic: When you work on scenes, Harmony automatically approves their status at each stage. |
| ‣ | Manual: When you work on scenes, the TD or ATD must approve their status at each stage using the Change Status command in the Scene menu. |
- Adjust the Priority slider to increase or decrease the job's priority (0 means the job has the highest priority for processing through the Vectorize or Render queue, and a job with a priority of 10 is the least important). Jobs with higher priorities pass in front of other projects with lower priorities in the rendering and vectorizing queues.
If you do not know what priority to assign to your project, leave it at 5. You can always change it later.
- Click OK.
Web Control Center adds the new job to the selected environment; it appears in alphabetical order in the Jobs list.
- From the Environment list, select an environment.
- Select Job > Change Status.
The Change Status window opens.
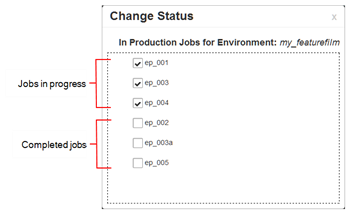
- Deselect any completed jobs and close the window.
The deselected jobs no longer appear in the Jobs list.
- From the Environment list, select the environment with the job whose priority you want to change.
- From the Job list, select a job.
- Select Job > Change Priority.
The Change Priority window opens.
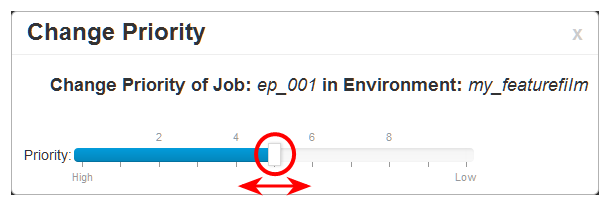
- Adjust the slider to increase or decrease the priority (0 means the job has the highest priority for processing through the Vectorize or Render queue. A job with a priority of 10 is the least important). Jobs with higher priorities will pass in front of other projects with lower priorities in the queues.
- Click OK.
When you send this job to be vectorized or rendered, it will have this new priority in the processing queue.
- From the Environment list, select the environment with the job you want to delete.
- From the Job list, select a job to delete.
- Select Job > Delete.
- Click OK.