
Setting Anchors and Props
An anchor is an attachment point you can use to bind one or several props to a specific location that is predefined by the anchor.
A prop is a game item that will be attached to an anchor. It could be a stick held within the character’s hand, a helmet attached to the character’s head...the possibilities are endless. Props are easy to turn on or off, and easily swappable from within Harmony or Unity.
- Create a new Drawing node and rename it according to the anchor you are creating.
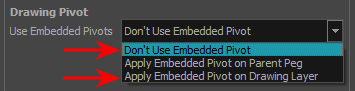
- Inside the Layer Properties of your drawing node, make sure that pivot option is set to Don’t Use Embedded Pivot or Apply Embedded Pivot on Drawing Layer. The Apply Embedded Pivot on Parent Peg does not transition well to Unity and you will lose your pivot information.
- Once this is done, you can use any of the animation tools to reposition the pivot point of your node, such as the Rotate tool in the Advanced Animation toolbar. You should be able to see the pivot coordinates from the Layer Properties of your Drawing node. If the pivot is not repositioned, its default place will be at the centre of your Harmony scene (0,0).
- Once this is set up, select the Drawing node and click the Toggle Anchor
 button in the Game toolbar.
The Drawing node is highlighted in red in the Timeline and Node views. Your anchor can now be used to attach a prop.
- Create a new Drawing node or take an existing prop on which you want to attach an anchor.
- Position the Drawing Pivot of the prop node using a tool on the Advanced Animation toolbar, such as the Rotate tool. The position of the prop’s pivot will align with that of the anchor. Make sure it is positioned accordingly.
- With the prop Drawing Node selected, click the Toggle Prop
 button in the Game toolbar.
The prop Drawing node is highlighted in green in the Timeline and Node views.
- Do one of the following:
| ‣ | Connect the anchor and prop to the parent peg. |

| ‣ | Connect the prop under the anchor to create a parent/child hierarchy. |

| Intro |
|
| Legal Notices |
|
| About this Help System |
|
| About Harmony |
|
| What's New |
|
| Harmony 12.2.1 Release Notes |
|
| Harmony 12.2 Release Notes |
|
| Harmony 12.1.1 Release Notes |
|
| Harmony 12.1 Release Notes |
|
| Harmony 12.0 Release Notes |
|
| System Requirements |
|
| Start Project |
|
| Server and Centralized Database |
|
| Starting Toon Boom Harmony |
|
| Connecting to the Database |
|
| Loading Drawings and Elements |
|
| Verifying the Project Integrity |
|
| Basic Commands |
|
| Preferences |
|
| Concepts |
|
| Animation Workflow |
|
| Pre-production |
|
| Production |
|
| Post-production |
|
| About the Animation Types |
|
| Traditional Animation |
|
| Paperless Animation |
|
| Cut-out Animation |
|
| Production Steps |
|
| Traditional Animation Workflow |
|
| Paperless Animation Workflow |
|
| Cut-out Animation Workflow |
|
| Animation Principles |
|
| Basic Concepts |
|
| Bitmap and Vector Graphics |
|
| Line and Colour Layers |
|
| Colour Palettes |
|
| Exposure Sheet, Timeline and Timing |
|
| Pegs |
|
| Multiplane |
|
| Network |
|
| Frame Rate and Format |
|
| Scenes |
|
| Project Organization |
|
| Database Structure |
|
| File Structure |
|
| Asset Management |
|
| Drawings and Layers |
|
| Palettes |
|
| Libraries and Templates |
|
| Naming Convention |
|
| Production |
|
| Introduction |
|
| Design and Drawing Tools |
|
| Sketching the Model |
|
| Drawing with the Brush or Pencil Tool |
|
| Override Tool |
|
| Relative Size |
|
| Palettes and Colours |
|
| Sketching |
|
| Cleaning and Inking the Model |
|
| Drawing Tasks |
|
| Drawing Using the Pencil Tool |
|
| Working with Thickness Stencils |
|
| Pencil Line Texture |
|
| Drawing with the Brush Tool |
|
| Drawing with Textured Brushes on Vector Drawing Layers |
|
| Drawing with Bitmap Brushes |
|
| Creating Bitmap Brushes |
|
| Viewing the Final Lines as you Draw |
|
| Selecting the Current Colour of a Tool |
|
| Selecting Drawing Objects |
|
| Erasing Parts of a Drawing |
|
| Reshaping a Drawing Using the Contour Editor Tool |
|
| Reshaping Pencil Lines with the Pencil Editor Tool |
|
| Drawing with Shapes |
|
| Drawing with the Polyline Tool |
|
| Drawing Using Invisible Lines |
|
| Deforming a Drawing Using the Perspective Tool |
|
| Warping a Drawing Using the Envelope Tool |
|
| Cutting Drawing Parts |
|
| Smoothing Lines |
|
| Working With Text |
|
| More Drawing Tools |
|
| Drawing Tools Reference |
|
| Pencil Tool Options |
|
| Brush Tool Options |
|
| Bitmap Brush Options |
|
| Select Tool Properties |
|
| Eraser Tool Options |
|
| Bitmap Eraser Tool Options |
|
| Contour Editor Tool Properties |
|
| Pencil Editor Properties |
|
| Shape Tool Options |
|
| Polyline Tool Options |
|
| Stroke Tool Options |
|
| Perspective Tool Properties |
|
| Envelope Tool Options |
|
| Cutter Tool Options |
|
| Smooth Editor Tool Options |
|
| Text Tool Options |
|
| Drawing Pivot Tool |
|
| Colour Styling |
|
| Preparation |
|
| Working with Palettes |
|
| Palette Lists |
|
| Palette File Storage |
|
| Creating a Colour Palette |
|
| Duplicating a Colour Palette |
|
| Cloning a Colour Palette |
|
| Palette Operations |
|
| Importing and Linking Palettes |
|
| Colours |
|
| Adding a Colour Swatch |
|
| Editing Gradients and Textures |
|
| Colour Display Modes |
|
| Copying and Pasting Colours |
|
| Mixing the Colours |
|
| Painting the Model |
|
| Ink and Paint |
|
| Preparation |
|
| Dirt Clean Up |
|
| Art Layers |
|
| Painting |
|
| Painting Using the Paint Tool |
|
| Advanced Painting Features |
|
| Selecting a Colour in a Drawing |
|
| Importing Models |
|
| Editing Gradients and Textures |
|
| Closing Gaps |
|
| Protecting Colours |
|
| Highlighting the Selected Colour |
|
| Inverting a Colour Selection |
|
| Inking the Lines |
|
| Verifying Zones are Painted |
|
| Ink and Paint Tool Properties |
|
| Ink Tool Properties |
|
| Paint Tool Properties |
|
| Interface |
|
| Menus |
|
| Managing the Views |
|
| Managing the Toolbars |
|
| View References |
|
| Colour View |
|
| Drawing View |
|
| Message Log View |
|
| Model View |
|
| Perspective View |
|
| Tool Properties View |
|
| Toolbar References |
|
| Interface Navigation |
|
| Zoom Tool |
|
| Other |
|
| Preferences |
|
| Interface |
|
| Shortcut |
|
| General |
|
| Exposure Sheet |
|
| Drawing Mode |
|
| Template |
|
| Timeline |
|
| Sound |
|
| OpenGL |
|
| Render |
|
| Shortcuts |
|
| Glossary |
|