Bitmap Brush Tool Options
When you're drawing on a bitmap layer and select the Brush ![]() tool, its properties and options appear in the Tool Properties view.
tool, its properties and options appear in the Tool Properties view.
If you are working with vector layers, see Vector Brush Tool Options
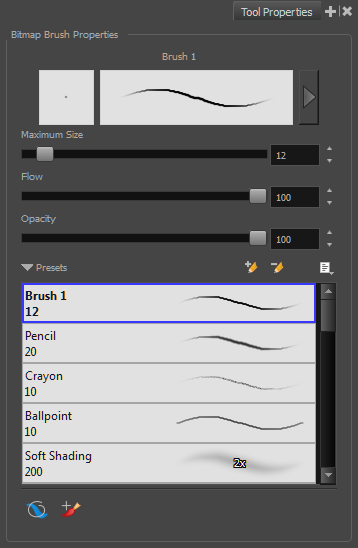
The Preview area lets you see a preview of the stroke that will be produced after you customize the different parameters in the Tool Properties view.
- Select a brush style from the Presets section. It's a good idea to choose a brush preset that is closest to the style you want to create.
- Click on the Show Extended Properties arrow to display advanced customization parameters.

This is where you set the maximum size of your drawing tool. This parameter defines the width of the stroke.
The Flow parameter lets you set the range for the rate at which paint flows from your brush. The analogy works better with a pen. The greater the flow, the more ink comes out, hence the more consistent the colour and texture of the line. If the flow is light, then the colour and texture of the line may look spotty. This feature works with the pressure sensitivity of a pen tablet.
The Opacity parameter are where you set the opacity for a brush mark. This works with the pressure sensitivity of a pen tablet.
Brush presets are created by saving the properties of the current brush to a new preset, which you can reuse for repeated tasks. You can create as many brush presets as you need
- Make sure your current brush has the settings you want in the preset you will create.
- In the Tool Properties view, do one of the following:
| ‣ | Click the arrow button to display the Brush Properties window and click the New Brush |
| ‣ | Click the New Brush |
| ‣ | From the Brush |
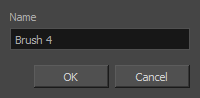
- In the New Preset window, type a name for your new brush preset.
The new brush is added to the end of the list of brush presets.
- Select the brush preset to update and click the arrow button to display the Brush Properties window.
- Change the brush settings and click the Update Brush Preset
 button in the upper-right corner.

When the Draw Behind ![]() mode is enabled, the lines you draw will appear behind the art that already exists.
mode is enabled, the lines you draw will appear behind the art that already exists.

The Repaint Brush ![]() is used to repaint zones that have already been painted, it will not affect empty zones or pencil lines. You can use this mode to paint tones or highlights onto your character.
is used to repaint zones that have already been painted, it will not affect empty zones or pencil lines. You can use this mode to paint tones or highlights onto your character.
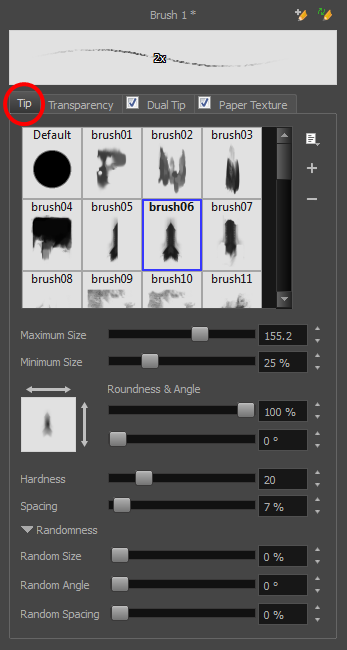
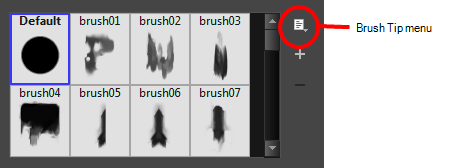
This is where you select the shape of the brush tip. By default it is round. Note that some tips are designed to have semitransparent areas, even when the maximum brush opacity is set to 100%.
To create a custom brush tip, you must prepare the file ahead of time, either in Harmony or in a third-party software, such as Adobe Photoshop. Colour is not supported and transparency is not supported in the traditional sense. Black appears as 100% opaque, white appears as 100% transparent and all the shades of grey in between appear as varying degrees of semitransparency. A range of file formats are supported—.jpeg, .png, .tif, .psd, .tga to name a few. Alpha channels are disregarded on import. It is recommended that your file be between 100 x 100 pixels and 400 x 400 pixels.
You can also import brush tips that you exported from Harmony, so you can share them with colleagues.
- Do one of the following:
| ‣ | From the Brush Tip menu, select Add. |
| ‣ | Click the Add |
- In the browser window that appears, navigate to where you saved your file.
- Click Open to import the file into the Brush Tip Library.
By default, an imported brush tip is given the name of the image file.
- In the Brush Tip Library, select a brush tip.
- From the Brush Tip menu, select Rename.
- In the Rename dialog box that appears, type in the new name of the brush tip.
- Click OK.
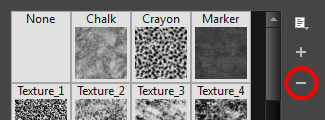
- In the Brush Tip Library, select a brush tip.
- Do one of the following:
| ‣ | In the Brush Tip menu, select Delete. |
| ‣ | Click the Delete |
The linked brush tip file does not get deleted and can therefore be reimported.
- In the Brush Tip menu, select Import.
- In the browser window that appears, navigate to and select the
.xmlfile.
- Click Open.
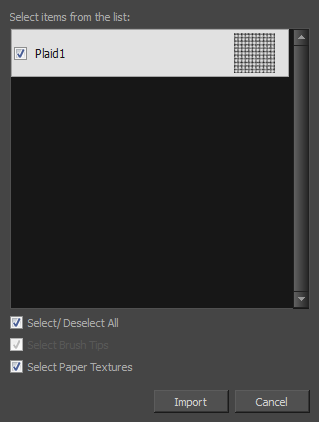
- In the Import Textures dialog box, select the brush tips to import. You can also import paper textures at the same time.
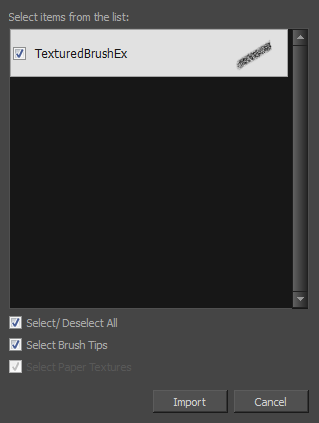
- Click Import.
The imported brush tips appear in the Brush Tips Library. You can reuse any of the imported tips to create other brush style presets.
- In the Brush Tip menu, select Export.
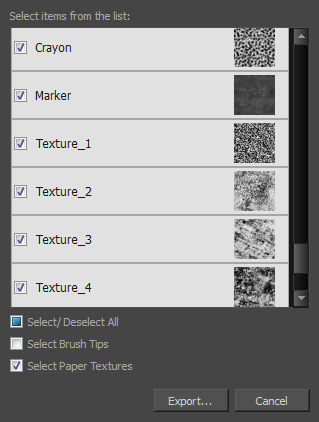
- In the Export Tips and Textures window, select or deselect any of the brush tips to create the list to export. You can also export paper textures at the same time.
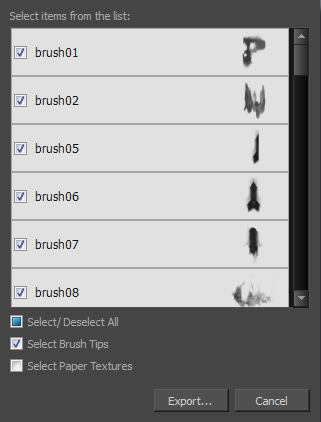
- Click Export.
- In the Export Textures window that appears, browse to a location where you want save the
.xmlfile and give it a name.
- Click Save.
- From Brush Tip menu, select one of the following options:
| Parameter | Description |
| Small Thumbnail | Reduces the size of the thumbnails in order to view more at the same time. |
| Large Thumbnail | Increases the size of the thumbnails in order to see the images more clearly. |
| List View | Allows you to see the name, as well as the thumbnail. |
The minimum and maximum sizes of your drawing tool produce the thick and thin effect on your stroke. This works with the pressure sensitivity of a pen tablet.
| ‣ | Maximum Size: Defines the maximum width of the stroke. |
| ‣ | Minimum Size: Defines the minimum width of the stroke in relation to and as a percentage of the maximum size. |
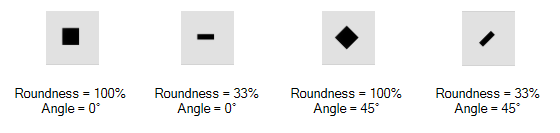
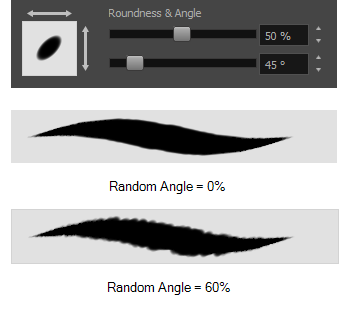
The Roundness and Angle parameters allow you to change the shape and orientation of the brush tip.
| ‣ | Roundness: Squashes the height of the brush tip from its centre point. 100% roundness = the native height of the brush tip. A smaller percentage will make the brush tip look flatter and more narrow. The squashing is NOT relative to the angle value—if the brush tip is rotated, the squashing function still uses the brush tip's original orientation. |
| ‣ | Angle: Rotates the brush tip counter-clockwise. 0° = the brush tip's native orientation. |
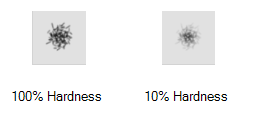
The Hardness and Spacing parameters allow you to change the softness and spacing of the marks made by the brush tip. You can preview the hardness and spacing at the top of the Bitmap Brush Properties window, stroke preview area.
| ‣ | Hardness: The hardness value corresponds to the softness of the brush tip's edges. The lower the value, the softer the tip edge. The higher the value, the sharper the tip edge. Be aware that some brush tips are not 100% opaque, so they will always appear somewhat soft, even at 100% hardness. |
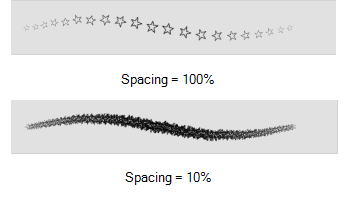
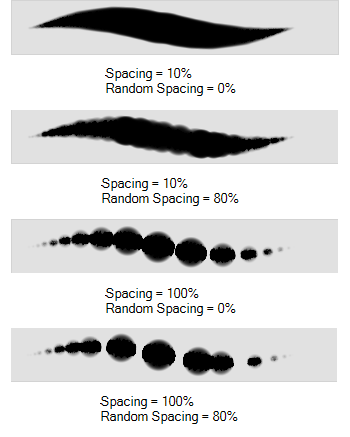
| ‣ | Spacing: Defines the amount of space between each stamp of the brush. A value of 100% sets the stamp marks edge to edge, if there is no white space around the shape. The larger the value, the greater the space between marks. A really large value can make the brush stroke appear as a string of individual marks. Conversely, a small spacing value will give the appearance of a fluid brush stroke. |
Spacing is only evident when making a continuous stroke.
The Randomness parameters let you create a varied bitmap brush stroke. Refining these options can give your stroke a lovely, non-mechanical look.
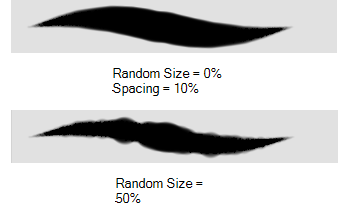
| ‣ | Random Size: You can create variation between the thick and thin of your brush stroke just by setting the Maximum and Minimum Size values. If you add randomness to the mix, pressure sensitivity from your drawing tablet will still be applied. Light pressure will create random values around the minimum, while heavy pressure will create random values closer to the maximum. The larger the percentage, the larger the range of random variation. |
| ‣ | Random Angle: Sets the range for random rotation around the set Angle value. For example, if the Angle is set to 45° and the Random Angle set to 10°, the software will choose values between 40°–50° (plus or minus 5 degrees, equaling a total of 10 degrees). |
| ‣ | Random Spacing: Sets the range for random spacing around the set Spacing value. For example, if the Spacing is set to 50% and the Random Spacing is set to 10%, then Harmony will choose values between 45%–55% (plus or minus 5 percent, equaling a total of 10 percent). |
![]()
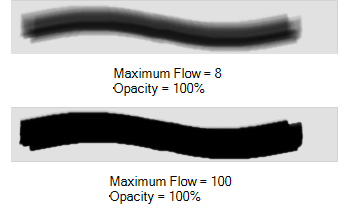
The Maximum and Minimum Flow parameters let you set the range for the rate at which paint flows from your brush. The analogy works better with a pen. The greater the flow, the more ink comes out, hence the more consistent the colour and texture of the line. If the flow is light, then the colour and texture of the line may look spotty. This feature works with the pressure sensitivity of a pen tablet.
| ‣ | Maximum Flow: Sets the maximum rate at which colour and texture are applied as you create a fluid stroke. |
| ‣ | Minimum Flow: Sets the minimum rate at which colour and texture are applied as you create a fluid stroke. It is defined as a percentage of the Maximum Flow value. If the Minimum Flow value is set to 100%, then tablet pressure sensitivity will no longer be applicable. The flow will be set to the constant rate of the Maximum Flow value. |
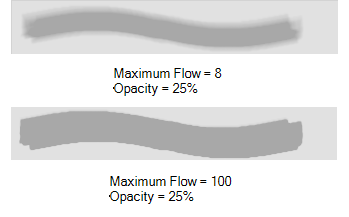
The Maximum and Minimum Opacity parameters are where you set the opacity range for a brush mark. This works with the pressure sensitivity of a pen tablet.
| ‣ | Maximum Opacity: Sets the transparency limit of the brush mark when the pressure is heavy. |
| ‣ | Minimum Opacity: Sets the transparency limit of the brush mark when the pressure is very light. It is defined as a percentage of the Maximum Opacity value. If the Minimum Opacity value is set to 100%, then tablet pressure sensitivity will no longer be applicable. The opacity will be set to the constant rate of the Maximum Opacity value. |
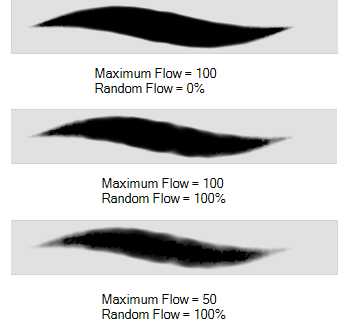
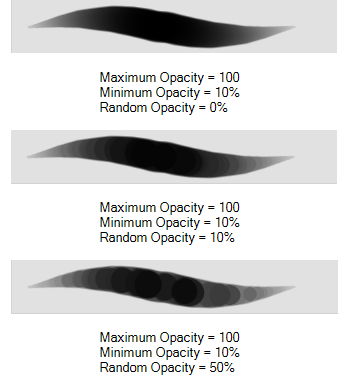
Th Randomness parameter lets you set the range for the randomness of the flow and opacity. This works with the pressure sensitivity of a pen tablet.
| ‣ | Random Flow: You can create variation in the flow of your brush stroke just by setting the Maximum and Minimum Flow values. If you add randomness to the mix, pressure sensitivity from your drawing tablet will still be applied. Light pressure will create random values around the minimum, while heavy pressure will create random values closer to the maximum. The larger the percentage, the larger the range of random variation. |
| ‣ | Random Opacity: You can create variation in the opacity of your brush stroke just by setting the Maximum and Minimum Opacity values. If you add randomness to the mix, pressure sensitivity from your drawing tablet will still be applied. Light pressure will create random values around the minimum, while heavy pressure will create random values closer to the maximum. The larger the percentage, the larger the range of random variation. |
The Dual Tip tab lets you set the parameters for creating a dual tip brush. The primary bitmap brush tip and the dual tip always work together. You can set the parameters for the primary tip in the Tip tab and those for the dual tip in the Dual Tip tab. The Blend mode you select determines how the tips are combined.
You must select the Dual Tip option to access the tab's parameters.
By default, the Blend Mode is set to Multiply and the Random Angle to 360°.
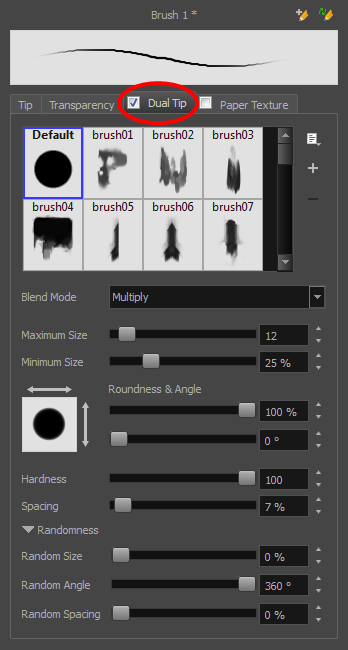
The Blend modes let you decide how the primary tip and the dual tip are combined.
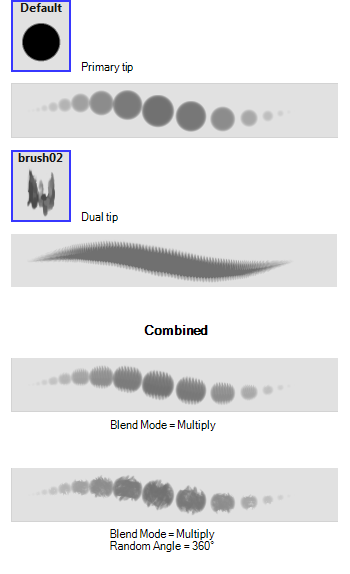
| ‣ | Multiply: This is the default blend mode. When the two brush tips are combined in this mode, they essentially cut each other out in overlapping areas, where one or both tips have an area of 100% transparency. The less opaque the brush tips are, the lighter their combination. |
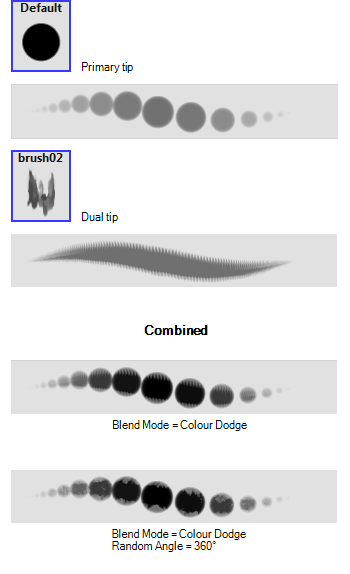
| ‣ | Colour Dodge: In this mode, the primary tip cuts out the shape of the dual tip. Where the tip shapes overlap, within the boundaries of the primary shape, the colour and opacity appear darker. |
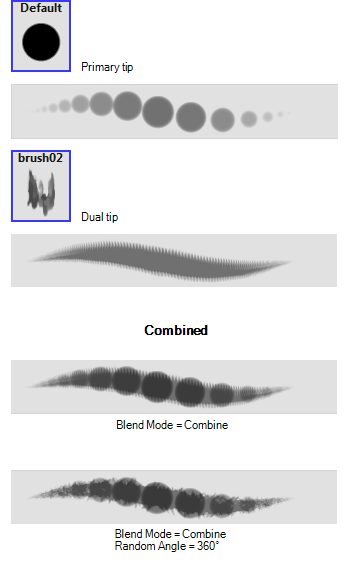
| ‣ | Combine: This mode treats the two tips as two different and separate brushes that have the same colour and follow the same path. |
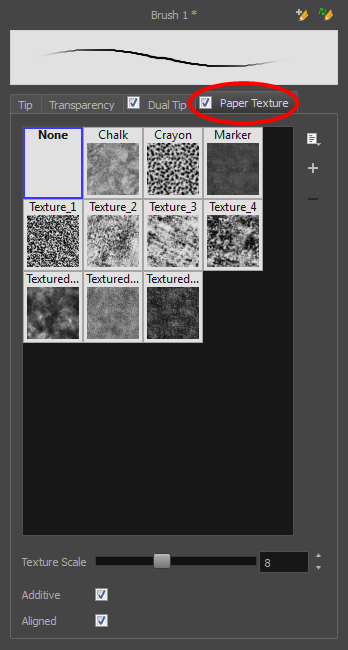
The Paper Texture tab lets you view and select a paperlike texture for your brush. You can also import paper textures that were previously exported.
You must select this option to access the tab's parameters.
- Do one of the following:
| ‣ | From the Paper Texture menu , select Add. |
| ‣ | Click the Add Paper Texture button. |

- In the browser window that appears, navigate to where you saved your texture file.
- Click Open to import the file into the Paper Texture library.
By default, an imported texture is given the name of the image file.
- In the Paper Texture library, select a texture.
- From the Paper Texture menu, select Rename.

- In the Rename Texture dialog box that appears, type in the new name for the texture.
- Click OK.
- In the Paper Texture library, select a texture.
- Do one of the following:
| ‣ | In the Paper Texture menu, select Delete. |
| ‣ | Click the Delete |
- In the Paper Texture menu, select Import.
- In the browser window that appears, navigate to and select the
.xmlfile.
- Click Open.
- In the Import Textures dialog box, select the paper textures that you wish to import. You can import any available brush tips at the same time too.
- Click Import.
The imported paper textures will appear in the Paper Texture Library. You can reuse any of the imported paper textures to create other brush style presets.
- In the Paper Texture menu, select Export.
- In the Export Tips and Textures window, scroll down the textures list to the paper textures and select or deselect any textures to create the list that you wish to export. You can export brush tips at the same time too.
- Click on the Export button.
- In the Export Textures window that appears, browse to a location where you would like to save the .xml file and give it a name.
- Click Save.
- From the Paper Texture menu, select one of the following:
| Parameter | Description |
| Small Thumbnail | Reduces the size of the thumbnails in order to view more at the same time. |
| Large Thumbnail | Increases the size of the thumbnails in order to see the images more clearly. |
| List View | Allows you to see the name, as well as the thumbnail. |
| ‣ | Texture Scale: Increase or decreases the size of the paper texture. |
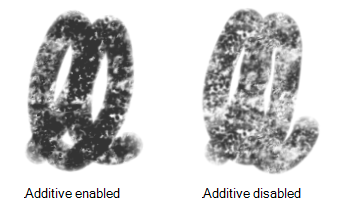
| ‣ | Additive: This option layers the texture on top of itself as you scribble overlapping lines in one continuous stroke. If this option is turned off, areas of overlapping lines from a single, continuous stroke will appear the same, in terms of darkness and texture, as non-overlapping areas. |
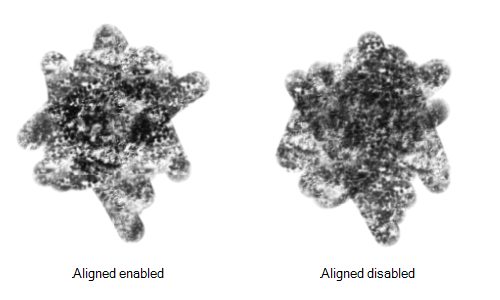
| ‣ | Aligned: This option defines the way separate, overlapping strokes behave. If this option is enabled, the paper texture's position does not change with each sweep of the brush. If this option is disabled, each sweep of the brush produces a different texture position. The texture orientation always stays the same. |