Importing a Bitmap Image Without Vectorization
- Do one of the following:
| ‣ | From the top menu, select File > Import > Images. |
| ‣ | In the File toolbar, click the Import Images |
| ‣ | In the Xsheet view, right-click anywhere in the frame area and select Import > Images. |
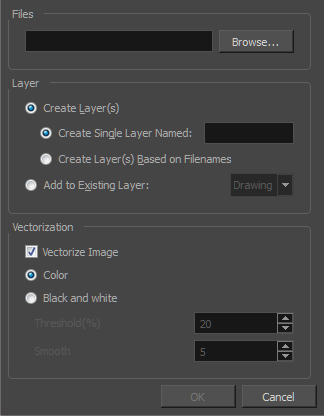
The Import Images dialog box opens.

- In the Files section of the Import Images dialog box, click Browse to find and select one or more images on your computer.
- Decide if the bitmap image will go on a new layer or an existing layer. To add the bitmap image to a new layer, go to step 3. To add the bitmap image to an existing layer, go to step 4.
- Add the bitmap image to a new layer by selecting the Create Layer(s) option and one of the following options and then proceed to step 5:
| ‣ | Create Single Layer Named: Creates a layer you can name. |
| ‣ | Create Layer(s) Based on Filenames: Creates a layer based on each unique filename prefix. For example, the filenames a-1.tga, a-2.tga and b-1.tga will create layers name "a" and "b", where "a" has two drawings and "b" has one. When creating a single layer from these three filenames, all three drawings will be inserted in the new layers. |
- Select the Add to Existing Layer option to place the bitmap image on a layer you select from the list. If only vector layers are available in your scene, they will not be displayed in the list.
- Click OK.
