


Chapter 6: Interface
It’s important that you become familiar with the following elements of the user interface as this will help you to start using Toon Boom Harmony. You can learn more about the highlights described here, and how to use them in a production context, throughout this guide.
When you start Toon Boom Harmony for the first time, the default workspace is displayed. It contains all of the main elements you need to use.
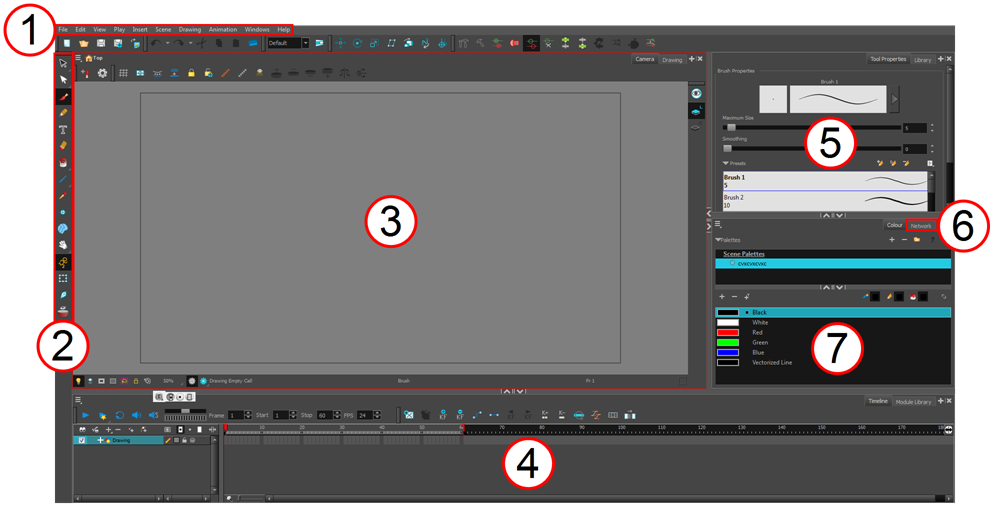
| 1. | Menus |
| 2. | Tools toolbar |
| 3. | Camera view |
| 4. | Timeline view |
| 5. | Tool Properties view |
| 6. | Network view |
| 7. | Colour view |
Adding a View
| 1. | Select the view you want to add from Windows > the desired view. |
| ‣ | You can also use the Window drop-down menu button in each view. Click the Add View button and select a view from the list.You can open several instances of the same view except for the Timeline, Tool Properties, Colour and Drawing views. |

By default, the view appears tabbed.

| 1. | Drag the window’s tab onto one of the workspace’s views. You can drop the view onto the other existing tabs to tab the view with the other ones. You can also drop the view onto either side of an existing view to insert the floating one beside it. When you get close to one of the edges, a black rectangle will appear, indicating where the view will be inserted. |

Tool Properties View
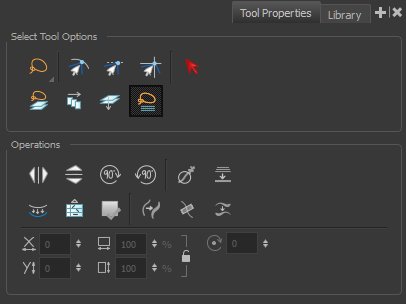
The contextual Tool Properties view contains the most common options and operations related to the currently selected tool. As soon as you select a tool from the Tools toolbar, the Tool Properties view is updated.
For example, if you choose the Select ![]() tool in the Tools toolbar, the Tool Properties view displays the optisons and operations related to the Select tool, such as Snap to Contour, Snap and Align, Flip Horizontal and Flatten.
tool in the Tools toolbar, the Tool Properties view displays the optisons and operations related to the Select tool, such as Snap to Contour, Snap and Align, Flip Horizontal and Flatten.
Interface Navigation
Toon Boom Harmony supports zoom in, zoom out, rotate, pan and reset view for easy interface navigation for the views.
| Command | Action | Access Methods |
|
Zooms into the view. |
View > Zoom In Press 2 or roll the mouse wheel up. In the Timeline view, press Ctrl (Windows/Linux) or ⌘ (Mac OS X) and roll the mouse wheel up. |
|
|
Zooms out of the view. |
View > Zoom Out Press 1 or roll the mouse wheel down. In the Timeline view, press Ctrl (Windows/Linux) or ⌘ (Mac OS X) and roll the mouse wheel down |
|
|
Zooms in or out of the view. |
Roll the middle mouse button up or down. |
|
|
Moving parallel to the view. |
Hold down the Spacebar and drag the mouse in the direction in which you want to pan the view. |
|
|
Recenters the view on your mouse cursor. |
Press N |
|
|
Resets the view’s pan to its default position. |
View > Reset Pan Press Shift + N |
|
|
Resets the view to its default position. |
View > Reset View Press Shift + M
|
|
|
Resets the view’s rotation to its default position. |
View > Reset Rotation Press Shift + X |
|
|
Resets the view’s zoom to its default position. |
View > Reset Zoom | |
|
Enlarges the selected view to full screen. The full screen process is done in three stages. First, the selected view enlarges to the maximum width or height, but keeps the tool views such as Colour or Tool Properties view. Second, the view enlarges to full screen. Third, the view returns to its original size. |
View > Toggle Full Screen Press Ctrl + F (Windows/Linux) or ⌘ + F (Mac OS X) |
|
|
Rotates the Camera view 90 degrees clockwise, like an animation table. |
View > Rotate View CW |
|
|
Rotates the Camera view 90 degrees counter-clockwise, like an animation table. |
View > Rotate View CCW |
|
|
Use the Magnifier tool to quickly center on the mouse position and zoom in to a pre-defined value such as 4X. Then you can zoom out again. Hold the shift key and press Z to zoom in and back out again. Replacing the Reset Zoom by pressing Shift +. The area where you zoom in or out is dependent on the cursor location in the Camera view. If you zoom in and them move the cursor to a different location when you zoom out the mouse will be centered on that location. |