


Timeline View
To set your animation timing, you will mostly work with the Timeline and Xsheet views. It is extremely useful to become familiar with the Timeline view, how it works, and its interface.
The Timeline view is the main view used when adjusting the timing of drawings and ordering layers. The Timeline view displays layers, scene length, layer names, drawings and frames.

The Timeline view allows you to read your timing from left to right. It represents the scene’s elements in their simplest form. You can also see the layers and their names, as well as the drawing’s exposure. The drawing name is displayed when you place your pointer above the drawing’s exposure.

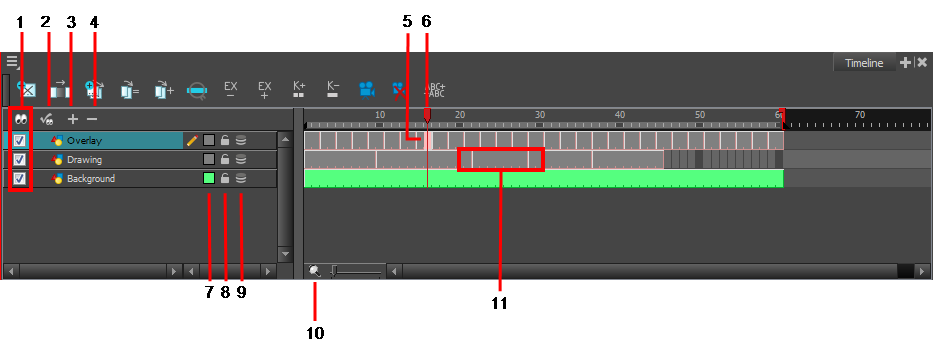
The Enable/Disable All ![]() button is used to show or hide all layers simultaneously.
button is used to show or hide all layers simultaneously.
When you deselect a layer in the Timeline view, the corresponding column is hidden in the Xsheet view. When a column is hidden in the Xsheet view, the corresponding layer is disabled in the Timeline view.
To disable a particular layer, deselect the layer’s checkbox or press D.

To enable a particular layer, select the layer’s checkbox or press A.


The Show Selection and Hide All Others ![]() button is used to show only the currently selected layer in the Timeline view and disable all the other layers.
button is used to show only the currently selected layer in the Timeline view and disable all the other layers.
The Add Layers ![]() button lets you add new layers to the Timeline view.
button lets you add new layers to the Timeline view.
The Delete Layers ![]() button lets you delete the currently selected layers in the Timeline view.
button lets you delete the currently selected layers in the Timeline view.
The highlighted drawing represents the drawing currently displayed and is linked to play head position.

The red play head represents the current frame displayed and marked in the Playback toolbar. If you slide the play head to the left or right, it will scrub through your frames and update the Camera view.

The Change Track Colour  button lets you change the colour of the exposed frames; this helps you to quickly locate a layer in the Timeline view. Double-click on the colour swatch to open the Select Colour window and choose a new colour. You can modify the layer for any type of layer, such as group, peg, drawing, and effects.


The Lock/Unlock Layer![]()
![]() button lets you prevent the selection or editing of a layer in the Camera view. To select some of the layers without selecting others, in the Timeline view, lock the layers you do not want to select.
button lets you prevent the selection or editing of a layer in the Camera view. To select some of the layers without selecting others, in the Timeline view, lock the layers you do not want to select.

You can display the locked drawings as outlines in the Camera view to quickly find out which drawings are locked.

| 1. | From the top menu, select Edit > Preferences (Windows/Linux) or Stage > Preferences (Mac OS X). |
| 2. | In the Preferences dialog box, select the Camera tab. |
| 3. | In the Tools section, select the Show Locked Drawings As Outlines option. |

The Onion Skin ![]() button enables the Onion Skin option on a particular layer. If you want to see the previous and next frames of a specific layer, go to the Timeline view and click the Onion Skin button for that particular layer. Blue arrows appear on both sides of the play head. Pull on the blue arrows to add more frames to the onion skin display.
button enables the Onion Skin option on a particular layer. If you want to see the previous and next frames of a specific layer, go to the Timeline view and click the Onion Skin button for that particular layer. Blue arrows appear on both sides of the play head. Pull on the blue arrows to add more frames to the onion skin display.
To activate the general Onion Skin preview, in the Tools toolbar, click the Onion Skin ![]() button.
button.
The Zoom tool is used to increase or reduce the width of the frames in the Timeline view. Drag the cursor to the right to increase the width or to the left to reduce it. You can also press 1 and 2.

In the Timeline view, when a drawing is exposed, it is represented as a grey block. If the drawing is exposed for several frames, the block is extended. When a second drawing is exposed, a new grey block is displayed.

| • | The exposure’s colour can be changed. To pick a new colour, double-click on the Change Track Colour button in the corresponding layer. |