Setting Up the Scanner
Once you have started the Harmony Scan module and loaded your drawing list, you can set up your scan session with the different scanner options in the Control panel.
How to set up the scan session
|
1.
|
Start the Harmony Scan module and load your drawing list. |
|
2.
|
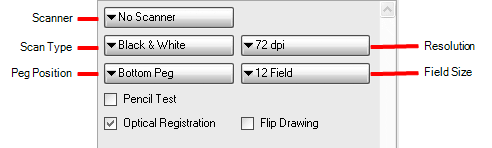
In the Control panel, select a scanner from the Scanner menu. |
The default model appears first in the scanner configuration file, scan.conf.
You can find the scan.conf file here:
|
‣
|
Linux: /usr/local/ToonBoomAnimation/harmony_11/lnx86_64/bin/ConfigEditor |
|
‣
|
Mac OS X: Applications > Toon Boom Harmony11 > Tools > Configuration Editor |
|
‣
|
Windows: All Programs > Toon Boom Harmony11.0 > Tools > Configuration Editor |
|
3.
|
From the Scan Type menu, select a scan type. If there is more than one scanner connected to your computer, only the scanners that support the selected scan type are displayed. |
|
•
|
Black & White: Scans a line art drawing that you will paint in the Paint or Stage module. |
|
•
|
Greyscale: Captures the shades of grey in drawings. |
|
•
|
Colour: Scans a pre-coloured drawing, such as a background or overlay. |
When you select a scan type, additional context-sensitive options appear on the lower part of the Control panel.
|
4.
|
From the Peg Position menu, set the location of the pegs or registration holes on the paper you are scanning. The images will be automatically rotated based on your selection. |
|
•
|
Bottom Peg: The peg holes appear below the drawing. |
|
•
|
Top Peg: The peg holes appear above the drawing. |
|
•
|
Left Peg: The peg holes appear on the left of the drawing. |
|
•
|
Right Peg: The peg holes appear on the right of the drawing. |
|
5.
|
From the Resolution menu, select a resolution. This determines the quality and size of scanned images. The resolutions that appear in the list depend on the selected scanner. |
|
6.
|
From the Field Size menu, select the size of the paper you are scanning. The different choices appear in field units. Note that the autofeed mode does not support paper larger than 12 field. |
|
7.
|
Select the Pencil Test option if you want to perform a line test. A black and white image will be created with no paintable colour art regions. If you select this option, the Scan: Pencil Test Confirmation dialog box opens. |

|
8.
|
Select the Optical Registration option to automate the alignment of the drawings using the registration holes on the drawing paper. |
|
9.
|
Select the Flip Drawing option to flip the scanned image horizontally and realign the registration holes. |
Once you set up the main scanner options from the Control panel, you are ready for a test scan to calibrate the scanned images.


