Exporting OpenGL Frames
You can export the OpenGL frames (fast display mode) if you need a quick render for your scene. Some heavier scenes containing 3D, multiple effects and camera moves can be fairly long to export.
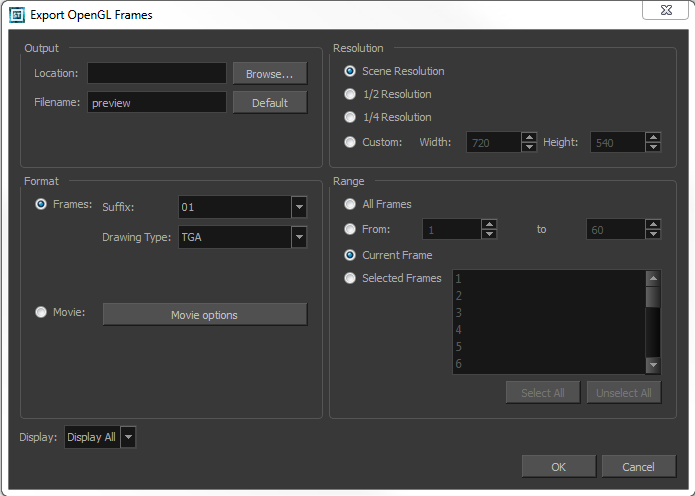
Use the Export OpenGL Frames dialog box to select the frames you want to render from the OpenGL Camera view, then save the rendered frames as image files or as a QuickTime movie.
Frames saved from OpenGL view have neither antialiasing nor special effects. To render final frames with effects, export Images or a Movie.
 How to export OpenGL Frames
|
1.
|
From the top menu, select File > Export > OpenGL Frames. |
The Export OpenGL Frames dialog box opens.

|
2.
|
In the Output section, in the Location field, click Browse to select a folder for the frames. |
|
3.
|
In the Filename field, enter a name (prefix) for the frames or revert to the default name by clicking Default. |
|
4.
|
In the Format section, decide if you want to export individual image frames or a movie. |
|
‣
|
Suffix: Lets you select the desired suffix. If you intend to render only a few frames, use 1 or 01, whereas if you intend to render 1000 frames, you can select 0001. |
|
‣
|
Drawing Type: Lets you select the file type to render, such as TGA or SGI. |
|
6.
|
From the Resolution section, select a resolution for export. If you are running some quick tests, then you might want to reduce the resolution to save time and space. You also have the option to set a Custom width and height to produce smaller or larger frames. |
|
7.
|
In the Range section, decide whether you want to render all your frames, a range of frames, the current frame or selected frames. |
|
8.
|
Use the Display menu to select a Display module to use for rendering your OpenGL frames from. |


