Importing a Bitmap Image Without Vectorization
| 1. | Do one of the following: |
| ‣ | From the top menu, select File > Import > Images. |
| ‣ | In the File toolbar, click the Import Images |
| ‣ | In the Xsheet view, right-click anywhere in the frame area and select Import > Images. |
The Import Images dialog box opens.
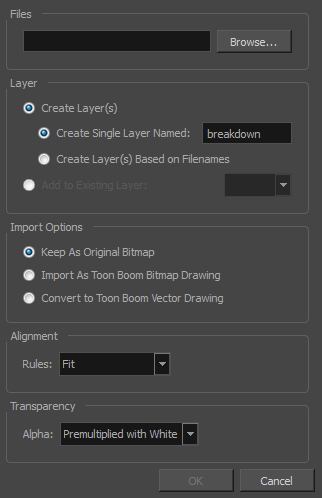
| 1. | In the Files section of the Import Images dialog box, click Browse to find and select one or more images on your computer. |
| 2. | Decide if the bitmap image will go on a new layer or an existing layer. To add the bitmap image to a new layer, go to step 4. To add the bitmap image to an existing layer, go to step 5. |
| 3. | Add the bitmap image to a new layer by selecting the Create Layer(s) option and one of the following options: |
| ‣ | Create Single Layer Named: Creates a layer you can name. |
| ‣ | Create Layer(s) Based on Filenames: Creates a layer based on each unique filename prefix. For example, the filenames a-1.tga, a-2.tga and b-1.tga will create layers name "a" and "b", where "a" has two drawings and "b" has one. When creating a single layer from these three filenames, all three drawings will be inserted in the new layers. |
| 4. | Select the Add to Existing Layer option if you want to place the bitmap image on a layer you select from the list. If only vector |
| 5. | In the Import Options section, select the Keep As Original Bitmapoption. In the Alignment section, decide on the size and placement of your image within the camera frame. Depending on the Scene Settings (the height and width in pixels that you chose for your project), an image that you import may be scaled to the point where all its individual pixels become visible. There are three options available in the Alignment section: |
Parameter Description Fit Enlarges or shrinks (but not distorts) the image height to match the full height of the scene grid.
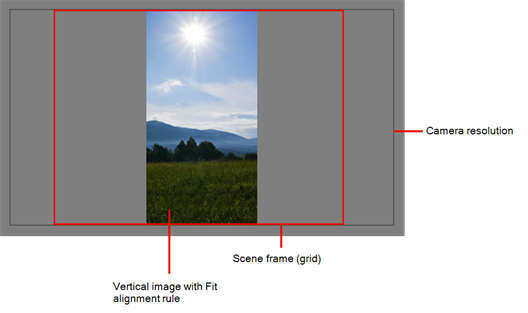
If the image orientation is landscape, this will enlarge or shrink (but not distort) your image width to match that of the scene grid.
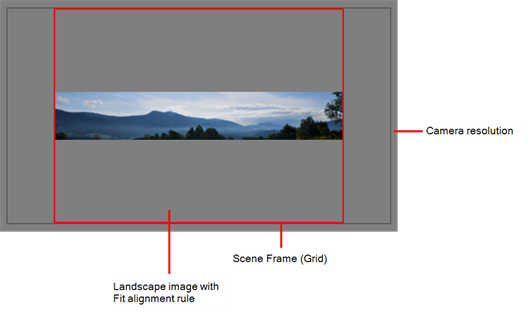
Note that the Fit alignment rule equals the Center Fit rule in the layer properties.
Pan This is the opposite of the Fit parameter. If the image orientation is portrait, its width will be made to match the width of the scene grid. As a result, part of the image’s height will extend beyond the height of the frame. This can be useful if you want to make your background move up and down, or from left to right to make it appear as if the camera is panning, or to actually perform a camera pan.
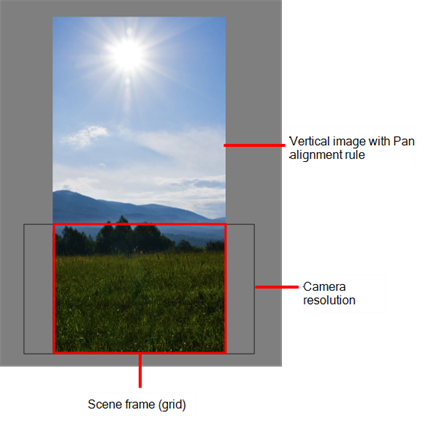
The opposite will apply to a landscape image. Its height will be fit to the scene grid, therefore it is possible that the image will extend beyond the scene grid's boundaries.

Note that the Pan alignment rule equals the Center First Page rule in the layer properties.
Project Resolution Scales the image in proportion to the scene's resolution. The system looks at the resolution of the bitmap image, for example 4000 x 2000, then compares it to the scene's resolution, for example 1920 x 1080, and adjusts the scale factor in proportion. So, in this example, the bitmap would appear at 208% (4000/1920). If you import a bitmap that is 960 x 540, it will be displayed at 50% (960/1920) of the size of the project resolution.
Note that the Project Resolution alignment rule is equal to the As Is rule in the layer properties.
| 6. | In the Transparency section, select one of the following from the Alpha menu: |
Parameter Description Premultiplied with White
Individual pixels at the edge of an image are blended with white.
Premultiplied with Black
Semi-transparent pixels in the original image are blended with black.
Straight
Pixels at the edge of an image are blended with black, white and greys.
Clamp Colour to Alpha
Premultiplies the colour value with the alpha value. When the colour is clamped to the alpha, the colour value cannot be higher than the alpha value. It calculates the real colour value faster. When the RGB values are multiplied with the alpha value, that is, if you have a pixel of value R=247, G=188, B=29 and the alpha is 50% or the image has a 50% transparency, then the actual RGB values that are output would be half of the amounts listed above.
| 7. | Click OK. |


