Scanning and Importing Drawings
Once your scene length is set, you can start scanning drawings and importing them into Harmony in one of the following ways:
A bitmap image is an image composed of pixels that are both size and resolution dependent. In Harmony, you can scan an image as a bitmap drawing.
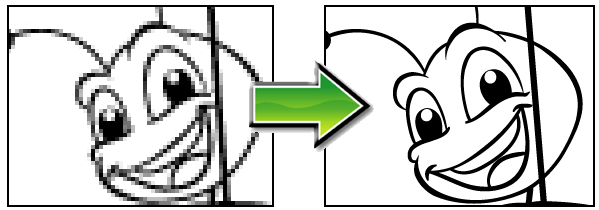
You can turn bitmap images into vector drawings, while maintaining the sketchiness of a pencil line or into vector images with a bitmap fill. Both options can add life to an animation, which straight vectorization with smoothing does not usually afford.
| 1. | From the top menu, select File > Import > From Scanner. |
The Scan Drawings window opens.
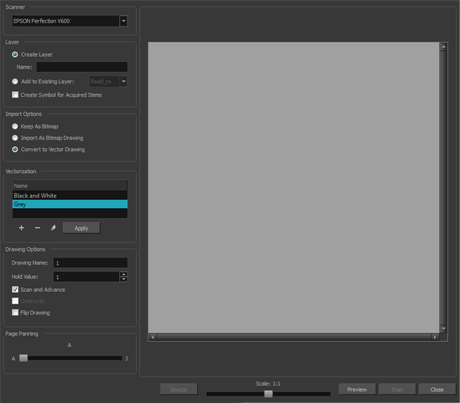
| 2. | Select your scanner from the Scanner list. |

| 3. | In the Layer section, decide if the scanned or imported image will be placed on a new layer or existing layer. |
| ‣ | Create Layer: Scans or imports the image into a new layer. Select one of the following options: |
| Parameter | Description |
| Create Single Layer Named | Creates a layer you can name. |
| Create Layer(s) Based on Filenames | Creates a layer based on each unique filename prefix. For example, the filenames a-1.tga, a-2.tga and b-1.tga will create layers named "a" and "b", where "a" has two drawings and "b" has one. When creating a single layer from these three filenames, all three drawings will be inserted in the new layers. |
| ‣ | Add to Existing Layer: Scans or imports the image into an existing layer. Select a layer from the Layer list. You must scan into the same layer type if you are using an existing layer. |
| ‣ | Create Symbol for Acquired Items: Encapsulates the bitmap image in a symbol. To mix bitmap images with vector drawings on the same layer, the bitmap image must be encapsulated in a symbol and vice versa. Symbols will also be automatically added to the Symbol folder in the Library view. |
| 4. | In the Import Options section, select one of the following: |

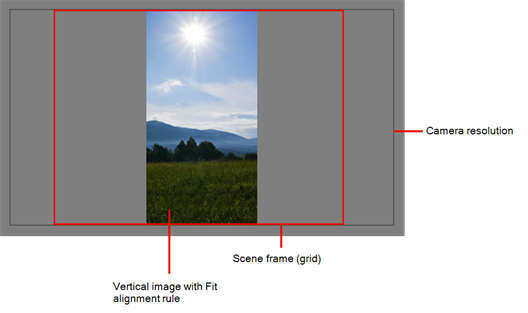
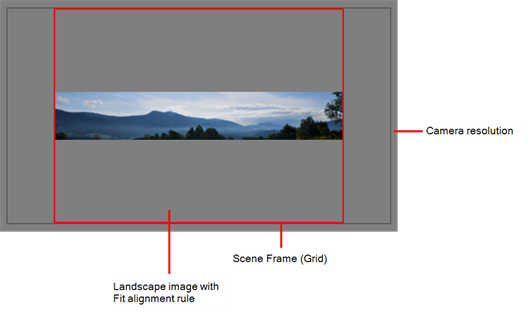
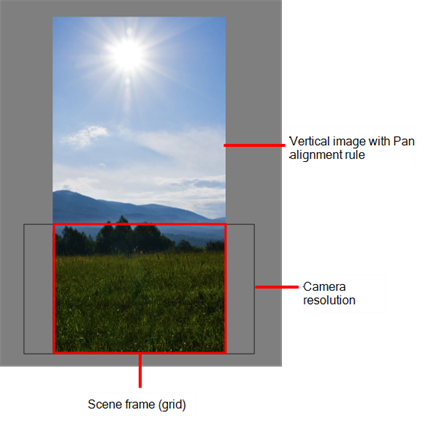
| ‣ | Keep As Bitmap: Retains the imported image as a bitmap. In the Alignment section, decide on the size and placement of your image within the camera frame. Depending on the Scene Settings (the height and width in pixels that you chose for your project), an image that you import may get scaled to the point where all its individual pixels become visible. There are three options available in the Alignment section: |
| Parameter | Description |
| Fit |
Enlarges or shrinks (but not distorts) the image height to match the full height of the scene grid.
If the image orientation is landscape, this will enlarge or shrink (but not distort) your image width to match that of the scene grid.
Note that the Fit alignment rule equals the Center Fit rule in the layer properties. |
| Pan |
This is the opposite of the Fit parameter. If the image orientation is portrait, its width will be made to match the width of the scene grid. As a result, part of the image’s height will extend beyond the height of the frame. This can be useful if you want to make your background move up and down, or from left to right to make it appear as if the camera is panning, or to actually perform a camera pan.
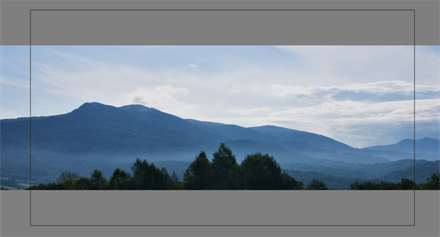
The opposite will apply to a landscape image. Its height will be fit to the scene grid, therefore it is possible that the image will extend beyond the scene grid's boundaries.
Note that the Pan alignment rule equals the Center First Page rule in the layer properties. |
| Project Resolution |
Scales the image in proportion to the scene's resolution. The system looks at the resolution of the bitmap image, for example 4000 x 2000, then compares it to the scene's resolution, for example 1920 x 1080, and adjusts the scale factor in proportion. So, in this example, the bitmap would appear at 208% (4000/1920). If you import a bitmap that is 960 x 540, it will be displayed at 50% (960/1920) of the size of the project resolution.
Note that the Project Resolution alignment rule is equal to the As Is rule in the layer properties. |
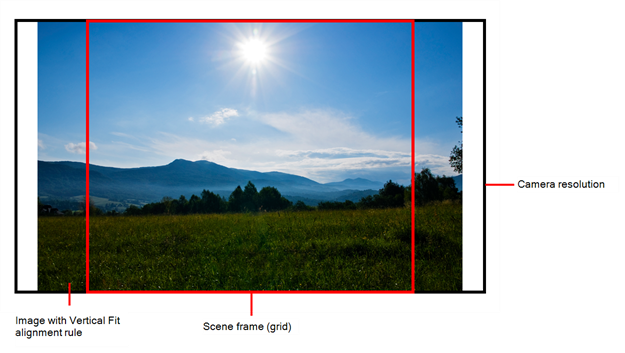
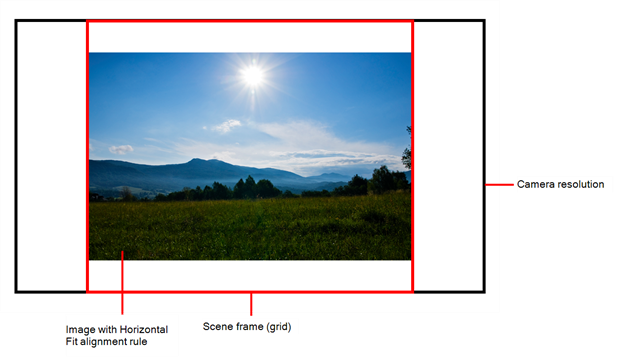
| ‣ | Import As Bitmap Drawing: Imports a bitmap drawing into a vector layer where you can edit the image using the drawing tools. In the Alignment section, select one of the following: |
| Parameter | Description |
| Vertical Fit |
Enlarges or shrinks (but not distort) to your image height to match the full height of the scene frame (alignment grid).
|
| Horizontal Fit |
Enlarges or shrinks (but not distort) to your image height to match the full width of the scene frame (alignment grid).
|
| Actual Size |
Scales the image in proportion to the scene's resolution. The system looks at the resolution of the bitmap image, for example 4000 x 2000, then compares it to the scene's resolution, for example 1920 x 1080, and adjusts the scale factor in proportion. So, in this example, the bitmap would appear at 208% (4000/1920). If you import a bitmap that is 960 x 540, it will be displayed at 50% (960/1920) of the size of the project resolution. |
| 5. | In the Drawing Options section, set the following options if desired: |
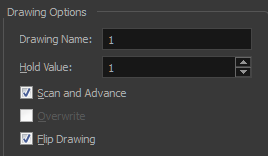
| ‣ | Drawing Name: Name of the drawing to import. |
| ‣ | Hold Value: Type the number of frames that the drawing will be exposed. |
| ‣ | Scan and Advance: Lets you scan one drawing after another every time you click Scan. |
| ‣ | Flip Drawing: Mirrors the drawings horizontally and scans it this way. |
| 6. | Adjust the Scale control and sliders in the Preview Image window until you are satisfied with the view. |

| 7. | Click Scan to scan your drawing. |
| 8. | If you are scanning panoramic drawings, in the Page Panning section, move the slider to the next letter to capture your next frame. |

| 9. | If you have more than one drawing, set the next drawing in place and click Scan again. Repeat until you have finished scanning all your drawings. |
| 1. | From the top menu, select File > Import > From Scanner. |
The Scan Drawings window opens.

| 2. | Select your scanner from the Scanner list. |

| 3. | Click Preview to get a test scan of your drawing. |
| 4. | In the Layer section, select one of the following: |
| ‣ | Create Layer: Imports an image into a new layer. Type a name for the layer in the Name field. |
| ‣ | Add to Existing Layer: Imports the image into an existing layer. Select a layer from the Layer list. |
| 5. | In the Import Options section, select the Convert to Vector Drawing option. |
| 6. | In the Vectorization section, select one of the following: |
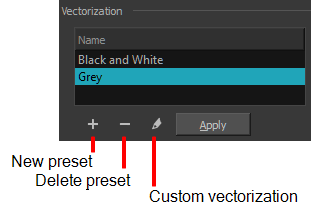
| ‣ | Black and White: Vectorizes drawings as a solid black line; creates a 100% vector-based drawing. |
| ‣ | Grey: Vectorizes the image as a mix of vector contour and greyscale bitmap filling. Lines keep the texture from the scan, and the white of the paper becomes transparent. |
| ‣ | New Preset: Lets you create a new preset. |
| ‣ | Delete Preset: Lets you delete any preset in the list. |
| ‣ | Custom vectorization: Lets you set custom vectorization parameters—see Creating a Vectorization Style . |
| 7. | In the Drawing Options section, set the following options if desired: |

| ‣ | Drawing Name: Name of the drawing to import. |
| ‣ | Hold Value: Type the number of frames that the drawing will be exposed. |
| ‣ | Scan and Advance: Lets you scan one drawing after another every time you click Scan. |
| ‣ | Flip Drawing: Mirrors the drawings horizontally and scans it this way. |
| 8. | Adjust the Scale control and the sliders in the Preview Image window until you are satisfied with the view. |

| 9. | Click Scan to import your drawing. |
| 10. | If you are scanning panoramic drawings, in the Page Panning section, move the slider to the next letter to capture your next frame. |

| 11. | If you have more than one drawing, set the next drawing in place and click Scan again. Repeat until you have finished scanning all your drawings. |


