Toolbar References
Harmony has several toolbars. The Top toolbars are available at the top of the interface and the View toolbars are in individual windows. View toolbars are only shown if the particular view is displayed in the workspace. This is a complete list of the toolbars available in Toon Boom Harmony.
Top Toolbars
The Advanced Animation Toolbar contains tools to position and animate layers. The Scale, Translate and Rotate tools can be used to reposition the permanent pivot position of your layer. Unlike the Transform tool, each tool in the Advanced Animation toolbar performs a single operation either rotate, scale, translate or scale in relation to the camera distance.

A drawing is composed of two layers, a line layer and a colour layer. The colour layer is always placed under the line layer. These layers are accessible in the Drawing or Camera view (using drawing tools). When you view the final drawing, you will see the final composition of the lines and colours, not two separate layers.

You can draw and paint in all layers. If you prefer to work in a single layer, everything can be done in Line Art.
| • | Line Art |
| • | Colour Art |
Each time you select a keyframe or control point in the Camera, Timeline or Xsheet view, its parameters appear in the Coordinate toolbar. You can edit keyframes and control point parameters, such as the position, scale and rotation coordinates.

Toon Boom Harmony has a flipping feature that lets you rapidly flip through the drawings in the Drawing view as is done with paper drawings.

The Edit toolbar contains common operations such as Copy, Paste, Cut, Undo and Redo. These options can also be found in the Edit menu.

The File toolbar contains the common file operations such as New, Save and Open. These options can also be found in the File menu.

This toolbar lets you enable what type of drawing to include in your flipping selection. You can flip through the key, breakdown or in-between drawings individually, or view a combination.

The Mark Drawing toolbar lets you identify drawings such as Key, Breakdown and In-between. The drawing Identification feature can help the animator stay well organized and save time when identifying key, breakdown or in-between drawings in the Xsheet and Timeline views.

When designing or animating, it is useful to be able to see your previous drawings. The Onion Skin tool is used to preview the previous and subsequent drawings. By default, the previous drawings will appear with a shade of red and the next drawings will be displayed with a shade of green, but you can change the display options in the Preferences dialog box. In the Onion Skin toolbar, you can select what type of drawing you want to display in your onion skin display.


The Playback toolbar lets you play back your animation and sound. Use it to scrub the sound to create your lip-sync, loop the playback, navigate through frames, and change the playback range and speed.
The Scripting toolbar lets you import and access the scripts created to automate actions and operations.


The Tools toolbar contains all of the main tools you will use while working in Harmony. In the default workspace, you will find this toolbar on the left-most side of the interface.
The Tool Presets toolbar lets you create new tool presets and manage them.

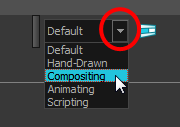
The first time you open Harmony, the default workspace is loaded. Other workspaces are available such as the Hand-Drawn Animation and Compositing workspaces; these display different views and toolbars. You can access these workspaces and any you create, from the Windows menu and the Workspace toolbar.

View Toolbars
Here is a list of the view toolbars available in Harmony:
| • | Camera View Toolbar |
| • | Drawing View Toolbar |
| • | Library Toolbar |
| • | Model View Toolbar |
| • | Script Editor View Toolbar |
| • | Timeline View Toolbar |
| • | Xsheet View Toolbar |


