


Exporting and Importing Data
With Harmony, you can import and export data.
You can use the Control Center module's export utility to migrate scenes from your system for archival purposes or third parties, and you can use the import utility to integrate scenes into a Harmony environment.
You can use the Control Center module's export utility to copy scene data. After Harmony copies the exported data to a temporary directory, you can move the archived data to your storage device (for example, a CD or tape drive).
Harmony creates two files during export:
| • | README.txt: Includes export statistics, such as creation date and user ID |
| • | IEContents.dat: Includes export parameters |
In Linux, exporting your scenes using the Export command makes Harmony copy scene information and link information to the temporary export directory you selected. Therefore, you must retrieve the animation data from your server and copy it, along with the database information, to your storage device.
Copying the exported data to a storage device is a two-fold process. Copy the exported animation files to a file on the storage device. Then remove the temporary export data from your system.
If the imported files are compressed, you must decompress them to a temporary directory before you can import them into Harmony. If you don't know how to decompress these files, see your system administrator.
If you have any problems importing or exporting in Harmony, review the instructions to make sure you have followed them completely. If you continue to have problems, consult the following list to troubleshoot common import and export problems.
Problem: Import or Export Not Successful
If the transfer is not successful, an error dialog box appears to describe the problem. The most common reason for a failed transfer is due to your current network permissions. See your system administrator for help.
If the transfer fails in the middle of the process, the files that were imported or exported may be corrupt or incomplete.
| • | For a failed import, use Control Center to delete the scene. |
| • | For a failed export, manually delete the incomplete export folder. |
If you click the Message Log tab, you can see more detailed descriptions, including error messages.
| 1. | Launch Control Center. To learn more about the different launch methods, see Starting the Control Center. |
| 2. | From the top menu, select Admin > Export. |
The Export Scene(s) dialog box appears.

| 3. | Enter the path where you want to export the files. You can also use the Browse button to select the path and create a folder. The destination must be an existing empty folder or a new folder that will be created during the export process. |
| 4. | Click Add to select the scenes that you want to export from the Harmony database. You can select a job to select all the scenes in the job. The scenes you select will appear in the list. |
| 5. | Select one or more scenes and click Remove to remove scenes from the export list. |
| 6. | In the Data Options tab, select what you want to export: |
| Parameter | Description |
| Audio | Exports the Audio directory. |
| Databases |
Selected by default, this option exports the elements in the scene. If you select this option and deselect the Elements option, you can access the elements from the Element Manager in the Control Center, but their drawing and bitmap files will not be included. The list of available versions in the scene is also exported. It will not be possible to open a scene if this is not selected for export. |
| Final Frames |
Exports the directory that contains final, rendered frames. |
| Other Directories |
Exports all other directories and files in the scene's data structure. |
| Elements |
Selected by default, this option exports the contents (drawing and bitmap files) of the Element directories. |
| Timing Drawing |
Selected by default, this option exports the contents of the Timing directories. |
| Annotation |
Allows you to export the different drawings created while drawing in the Annotation columns and imported images. |
| Stage (Xsheet and Network) |
Selected by default, this option exports the Stage directory, which contains the Stage files for each scene you export. These files are necessary if you want to have the ability to reuse the exposure sheet (timing) and the effects network from the original scene. If this option is selected, you can select the Get Outside Drawings option to copy drawings into the scene folder that is referred to by the Timing columns and their Element (Drawing) modules. |
| Palettes |
Exports the palette-library directories. When you select this option, you must decide if you want to export the palette-library from the environment, job or scene level. When you select a level, the palette-library in lower-level directories will also be exported. |
| Macros |
Exports the macros (customized effect and module connections) that were created and stored in the environment, jobs or scenes to be exported. |
| Libraries |
Exports templates created at the selected levels. |
| 7. | In the Advanced Options tab: |
| ‣ | Windows: Due to constraints in the operating system, you do not have any choices on the Advanced Options tab. In Linux, you can make the following selections. |
| ‣ | (Mac OS X and Linux): Select how you want to package the exported scene. The choices you make here are related to the size of the export package as well as the speed of the export process. In Linux, you can make the following selections. |
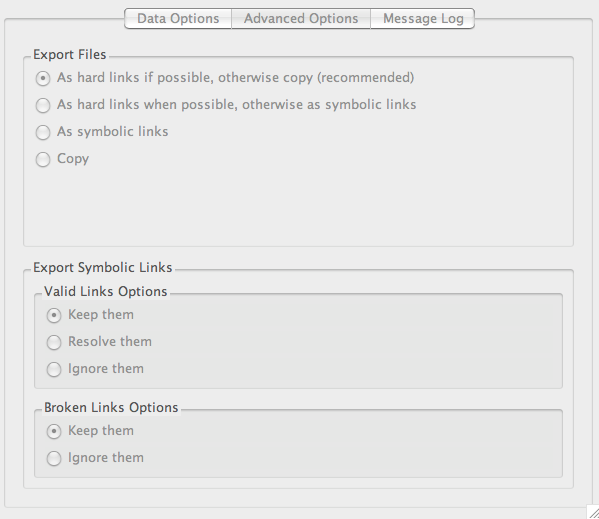
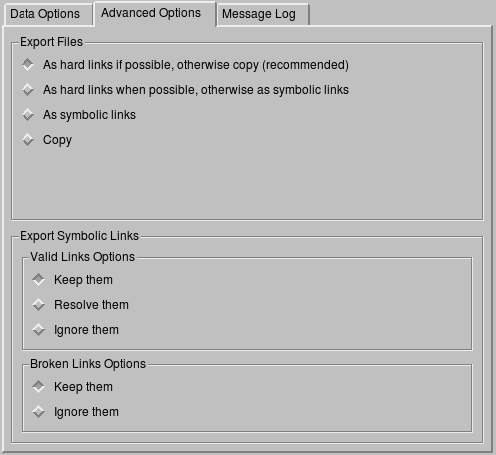
| ‣ | Select one of the following options in the Exporting Files section: |
| Parameter | Description |
| As hard links if possible, otherwise copy |
Speeds up the export process by making hard links to the original files on the file system. Hard links keep disk space usage to a minimum and ensure a quick export process. If it is not possible to create hard links (because the links cross file systems, for example), the entire contents will be copied to the destination directory, which will be a slower process that will take up more space on your file system. |
| As hard links when possible, otherwise symbolic links | Ensures a quicker export process. However, if symbolic links are used and the original file is deleted, the symbolic link will be broken. |
| As symbolic links | Exports the scene using symbolic links to the original scene files (when importing, imports the scene using symbolic links to the export directory). While this process will reduce the size of the export directory, if the original file is deleted, the symbolic link will be broken. |
| Copy | Copies all scene data to the export location. This produces the largest export package and therefore takes the longest to complete. However, it is the simplest method. |
| 8. | In the Valid Links Options section, select one of the following options: |
| Parameter | Description |
| Keep them | Maintains symbolic links. |
| Resolve them | Removes symbolic links, replacing them with the actual files. When you use this option, the export package will contain real files, rather than symbolic links. |
| Ignore them | Does not include valid symbolic links in the export package. |
| 9. | In the Broken Links Options section, select of the following options: |
| Parameter | Description |
| Keep them | Keeps symbolic links to missing files. When the missing files are placed in the path searched by the symbolic link, broken links will be valid again. |
| Ignore them | Does not include broken symbolic links in the export package. |
| 10. | Click Calculate to get a preview of the size of your export package. |
| 11. | Click Export. |
The selected files and components are exported. Use the Message Log tab to view messages generated during the export process.
Unlike Windows, where the database information and scene data have been copied to a different directory, Linux creates a set of links to the data. You must use additional Linux commands to retrieve the animation data pointed to by the links.
| 1. | Open a Linux shell and log in to the machine that connects to the storage device. |
| 2. | Copy the exported files using links from the source directory to the selected destination file. To export to a file on a storage device, type the following command in a shell: |
tb_backup_export_data -from [source_directory] -to [destination_file] -writetarfile
| ‣ | Where [source_directory] is the folder where the scene was exported to. |
| ‣ | Where [destination_file] is the file that will be created by the tb_ backup_export_data script. |
| 3. | After a successful copy of the exported data, remove the temporary export directory using the following command: |
tb_remove_export_data [export_directory]
| ‣ | Where [export_directory] is the folder where the scene was temporarily exported to before it was copied to the file or storage device. |
| 1. | Select Admin > Import. |
The Import Scene(s) dialog box appears.
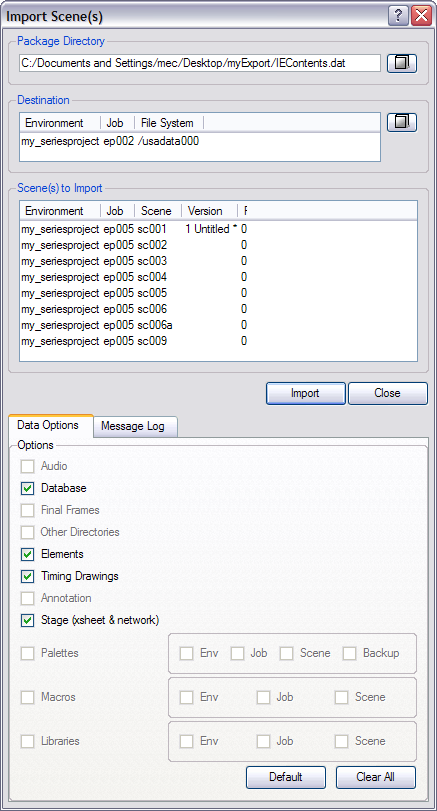
| 2. | Any supported Stage file can be imported, including IEContents.dat files. The IEContents.dat file includes database and scene file information. Specify the path of IEContents.dat for the scene(s) you want to import. |
| 3. | Click Browse to select the environment, job and file system where you want to place the imported scene. |
| 4. | If you want to import only some of the scenes in the Scenes to Import list box, select the scenes. If no scenes are selected, all scenes will be imported. |
| 5. | In the Data Options tab, select what you want to import. |
| Parameter | Description |
| Audio | Exports the Audio directory. |
| Databases |
Selected by default, this option exports the elements in the scene. If you select this option and deselect the Elements option, you can access the elements from the Element Manager in the Control Center, but their drawing and bitmap files will not be included. The list of available versions in the scene is also exported. It will not be possible to open a scene if this is not selected for export. |
| Final Frames |
Exports the directory that contains final, rendered frames. |
| Other Directories |
Exports all other directories and files in the scene's data structure. |
| Elements |
Selected by default, this option exports the contents (drawing and bitmap files) of the Element directories. |
| Timing Drawing |
Selected by default, this option exports the contents of the Timing directories. |
| Annotation |
Allows you to export the different drawings created while drawing in the Annotation columns and imported images. |
| Stage (Xsheet and Network) |
Selected by default, this option exports the Stage directory, which contains the Stage files for each scene you export. These files are necessary if you want to have the ability to reuse the exposure sheet (timing) and the effects network from the original scene. If this option is selected, you can select the Get Outside Drawings option to copy drawings into the scene folder that is referred to by the Timing columns and their Element (Drawing) modules. |
| Palettes |
Exports the palette-library directories. When you select this option, you must decide if you want to export the palette-library from the environment, job or scene level. When you select a level, the palette-library in lower-level directories will also be exported. |
| Macros |
Exports the macros (customized effect and module connections) that were created and stored in the environment, jobs or scenes to be exported. |
| Libraries |
Exports templates created at the selected levels. |
| 6. | In the Advanced Options tab, select how you want to import the scene. Select one option in the Valid Links Options and the Broken Links Options section. |
| 7. | Click Import. |
If the scene already exists, the Scene Exists dialog appears.
| 8. | Click Import Scene for each scene or Import All Scenes to confirm your selection. |
| 9. | Use the Message Log tab to view messages generated during the import process. |
If the name of the scene you are importing in Control Center is too long, you will be prompted with an error message stating that it will be truncated. A scene's name cannot exceed 23 characters.
If you are importing scenes that were exported from the Harmony Network, or worked on in Harmony Stand Alone, the system will try to retrieve the version name.