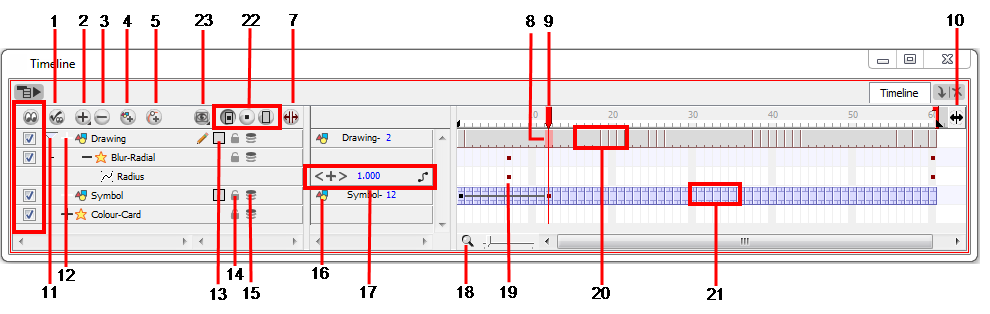
Timeline View
These are described later in this section.
| 1. | Enable/Disable All |
| 2. | Show Selection and Hide All Others |
| 3. | Add Layers |
| 4. | Delete Layers |
| 5. | Add Drawing Layer |
| 6. | Add Peg |
| 7. | Show/Hide Data View |
| 8. | Current Drawing Displayed |
| 9. | Current Frame |
| 10. | Split |
| 11. | Show/Hide Children |
| 12. | Show/Hide Functions |
| 13. | Change Track Colour |
| 14. | Lock/Unlock Layer |
| 15. | Onion Skin |
| 16. | Drawing Substitution |
| 17. | Keyframe Value |
| 18. | Zoom |
| 19. | Keyframe |
| 20. | Drawing Exposure |
| 21. | Symbol Exposure |
| 22. | Dragging and Pasting Modes |
| 23. | Timeline View Modes |
The Timeline view is the main view used when adjusting the timing of your drawings, connect effects and order your layers. The Timeline view displays the following:
| • | Layers |
| • | Effects |
| • | Sounds |
| • | Keyframe Values |
| • | Scene Length |
| • | Layer Names |
| • | Drawings |
| • | Keyframes |
| • | Timing |
| • | Frames |
Enable/Disable All
The Enable/Disable All ![]() button is used to show or hide all your layers simultaneously.
button is used to show or hide all your layers simultaneously.
To disable a particular layer, uncheck the layer’s checkbox or press [D]
To enable a particular layer, place a checkmark (tick) the layer’s checkbox or press [A].
Show Selection and Hide All Others

The Show Selection and Hide All Others ![]() button is used to show only the currently selected layer in the Timeline view and disable all the other layers.
button is used to show only the currently selected layer in the Timeline view and disable all the other layers.
Add Layers
The Add Layers ![]() button is used to add new layers to the Timeline view. When you click on the Add Layers button, a drop-down menu will appear displaying the layer types available. You can add several different types of layers:
button is used to add new layers to the Timeline view. When you click on the Add Layers button, a drop-down menu will appear displaying the layer types available. You can add several different types of layers:
| • |
 Camera Camera |
| • |
|
| • |
|
| • |
 Group Group |
| • |
|
| • |
|
| • |
|
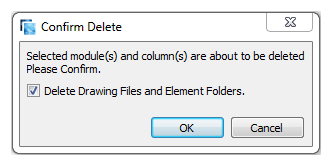
Delete Layers
The Delete Layers ![]() button is used to delete the currently selected layers in the Timeline view. When you click on the Delete Layers button, a Confirm Delete dialog box appears. Click OK to delete the layers or Cancel to stop the operation.
button is used to delete the currently selected layers in the Timeline view. When you click on the Delete Layers button, a Confirm Delete dialog box appears. Click OK to delete the layers or Cancel to stop the operation.
Add Drawing Layer
The Add Drawing Layer ![]() button is used to automatically add a new drawing layer to your timeline. By default, the layer is named
button is used to automatically add a new drawing layer to your timeline. By default, the layer is named Drawing.
Add Peg
The Add Peg ![]() button is used to add a peg layer to your timeline. There are several ways to use the Add Peg button. Refer to Animation Paths for more information about pegs and how to use them.
button is used to add a peg layer to your timeline. There are several ways to use the Add Peg button. Refer to Animation Paths for more information about pegs and how to use them.
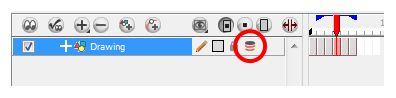
Show/Hide Data View
The Show/Hide Data View ![]() button is used to display the current frame’s drawing exposure and keyframe values corresponding to each individual layer.
button is used to display the current frame’s drawing exposure and keyframe values corresponding to each individual layer.
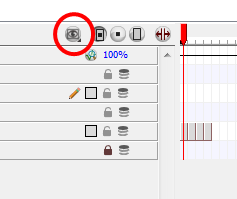
Hidden Data View
Visible Data View

Current Drawing Displayed
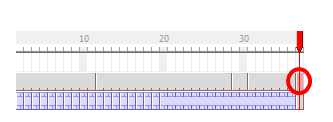
The drawing selected in red represents the drawing currently displayed and is linked to play head position.
Current Frame

The red play head represents the current frame displayed and marked in the Playback toolbar. If you slide the play head to the left or the right it will scrub through your frames and update the Camera view display.
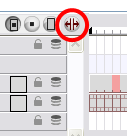
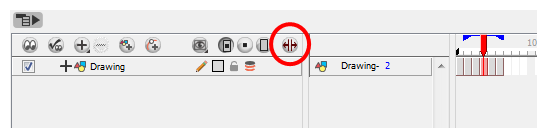
Split
The Split  button is used to split the Timeline view in two sections allowing you to see two different portions of your Timeline view. This way, if your scene length is very long, you can see the beginning and the end at once.
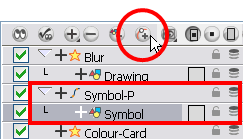
Show/Hide Children
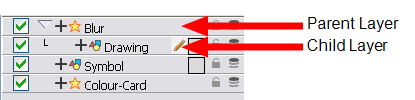
The Show/Hide Children  button is used to display the children layers of a parent layer. Once a layer is parented to another layer, it is indented to the right and the Show/Hide Children button appears on the parent layer allowing you to show or hide the child layer.
Show/Hide Functions
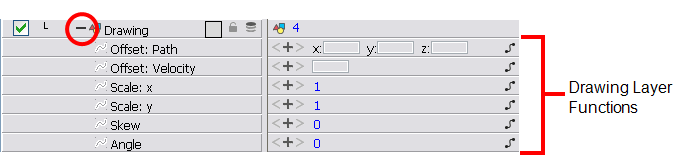
The Show/Hide Functions ![]() button is used to display the functions embedded in each layer. The Functions are the different position and intensity information used to remember a layer’s position, scale or rotation as well as an effect’s look on each frame. This information is stored on the function curves using keyframes. Refer to Animation Paths for more information about the function layers.
button is used to display the functions embedded in each layer. The Functions are the different position and intensity information used to remember a layer’s position, scale or rotation as well as an effect’s look on each frame. This information is stored on the function curves using keyframes. Refer to Animation Paths for more information about the function layers.
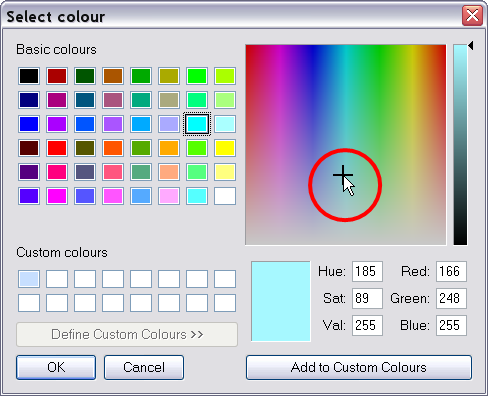
Change Track Colour

The Change Track Colour  button is used to change the colour of the exposed frames, this helps you to quickly locate a layer in the Timeline view. Double-click on the swatch to open the picking window and choose a new colour.
Lock/Unlock Layer
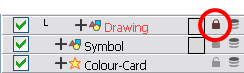
The Lock/Unlock Layer ![]()
![]() button is used to prevent the selection or editing of a layer in the Camera view. To select some of the layers without selecting others, in the Timeline view, lock the layers you do not want to select.
button is used to prevent the selection or editing of a layer in the Camera view. To select some of the layers without selecting others, in the Timeline view, lock the layers you do not want to select.
In the top menu, there are a series of locking options. Select Animation > Lock > select one of the following actions:
| • |
This option locks the currently selected element. |
| • |
This option unlocks the currently selected element. |
| • |
This option locks all the elements in the Camera view. |
| • |
This option unlocks all the elements in the Camera view. |
| • |
This option locks all the elements in the Camera view except the currently selected one. |
You can display the locked drawings as outlines in the Camera view if you want to quickly find out which drawings are locked.
To display locked drawings as outline:
| 1. | In the top menu, select Edit > Preferences (Windows/Linux) or Stage > Preferences (Mac OS X). |
| 2. | In the Preferences panel, go to the Camera tab. |
| 3. | In the Tools section, enable the Show Locked Drawings As Outlines option. |
Onion Skin
The Onion Skin ![]() button is used to enable the Onion Skin option on a particular layer. If you want to see the previous and next frames of a specific layer, go to the Timeline view and click on the Onion Skin button for that particular layer. Blue arrows appear on both sides of the play head. Pull on these blue arrows to add more frames to the onion skin display.
button is used to enable the Onion Skin option on a particular layer. If you want to see the previous and next frames of a specific layer, go to the Timeline view and click on the Onion Skin button for that particular layer. Blue arrows appear on both sides of the play head. Pull on these blue arrows to add more frames to the onion skin display.
To activate the general Onion Skin preview, in the Tools toolbar, click on the Onion Skin ![]() button.
button.
Drawing Substitution
The Drawing Substitution ![]() field is used to change the drawing exposed at the current frame. To access the Drawing Substitution field, you must first expand the Data view by clicking on the Show/Hide Data View
field is used to change the drawing exposed at the current frame. To access the Drawing Substitution field, you must first expand the Data view by clicking on the Show/Hide Data View ![]() button.
button.
To change the current drawing either click and slide your cursor left or right when you see the hand ![]() cursor, or double-click on the drawing name and type a new value.
cursor, or double-click on the drawing name and type a new value.

The drawing exposure will be changed for the entire block it is exposed, not just the current frame.
Keyframe Value

The Keyframe Value field is used to add, remove or modify a keyframe at the current frame. To access the Keyframe Value field, you must first expand the Data view by clicking on the Show/Hide Data View ![]() button.
button.
| • | To add a keyframe at the current frame, click on the Add Keyframe |
| • | To remove an existing keyframe at the current frame, click on the Delete Keyframe |
| • | To change the current keyframe, either click and slide your cursor left or right when you see the hand |
| • | To navigate through the existing keyframes, click on the Previous Keyframe |
| • | To link your layer to an existing function or to create a new function, click on the Show Function Menu |
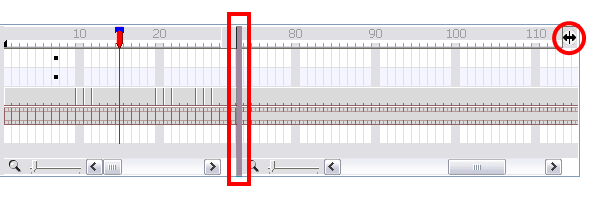
Zoom

The Zoom tool is used to increase or reduce the width of the frames in the Timeline view. Drag the cursor to the right to increase the width or to the left to reduce it. You can also press [1] and [2].
Keyframe
A black square is displayed in the Timeline view when a keyframe exists. You are able to select these keyframes and drag them wherever you want on the timeline. You can also copy, cut and delete them.
| • | To delete a keyframe without deleting the drawing exposure, go to the Timeline view and select the keyframe to be deleted and then select Animation > Delete Keyframes from the top menu. |
When a parent layer is collapsed and a child layer contains a keyframe, a white square will be displayed.
Drawing Exposure

In the Timeline view, when a drawing is exposed, it is represented as a grey block. If the drawing is exposed for several frames, the block is extended. When a second drawing is exposed, a new grey block is displayed.
| ‣ | The exposure’s colour can be changed. To pick a new colour, double-click on the Change Track Colour button in the corresponding layer. |
Symbol Exposure

In the Timeline view, when a symbol is exposed it is represented as a small film frame. If the symbol is exposed for several frames, the film frame is extended. When a second symbol’s frame is exposed, a new film frame is displayed.
Timeline View Modes
To streamline the process of working with elements in the Timeline, there are three different view modes you can choose to work in. With each mode you select, certain elements may or may not be visible in the Timeline. Depending on your workflow, this can come in useful to quickly hide elements when you want to focus on specific ones. To select a view mode, use the drop down menu located in the Timeline view.
Dragging and Pasting Modes
As you animate you will find that you may reuse a lot of positions, drawings and keys. However, you may only want to paste the drawings, or just the keys or maybe everything. There are different paste options available in the Timeline view which will give you the maximum flexibility when reusing and pasting.
There are three different modes for pasting your selection:
| • |
Pastes the drawing exposure and keyframes. |
| • |
Pastes only the keyframes. |
| • |
Pastes only the drawing exposure. |
Refer to Copying and Pasting Animation
Related Topics
| • | Timing |
| • | Character Building |
| • | Scene Setup |
| • | Animation Paths |
| • | Cut-out Animation |
| • | Effects |