Blending


Effects modules, like the Tone module and Highlight module, can control the colour and alpha composite operations for you. These modules were created with pre-set colour and alpha composite operations to fit the most frequently used, composite operations.
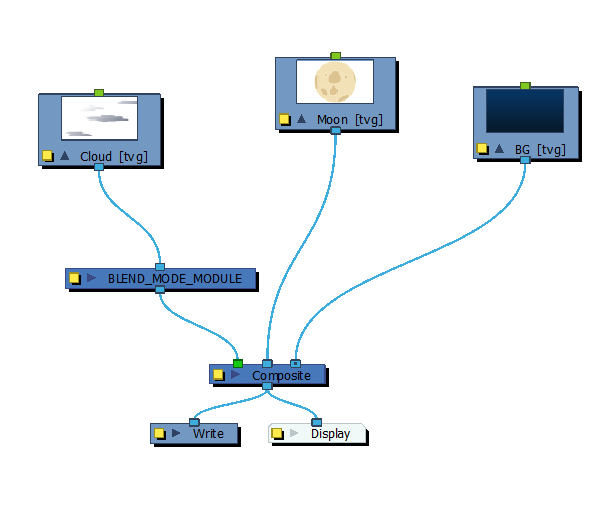
You might, however, still want to control the colour and alpha composite operation between two images using the Blending module, to create a multiplicity of lighting, shadow, filter or ambient effects. The Blending module combines two images into one output image, following the parameters you choose for your movie and images sequence or SWF movie exports.
The drawing module connected to the Blending effect will act as the blending image and will be applied to all the drawing layers situated under them in the Composite module or Timeline view order.
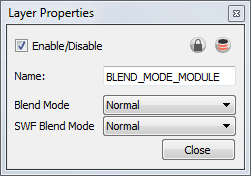
Use the Blending editor to control the settings of the Blending effect.
|
•
|
Name: Use this field to rename the module. |
|
•
|
Blend Mode: Choose the blending effect mode you wish to apply to your layer. The Blend Mode type will only be visible when the Camera view is set to Render  mode and will only export to a bitmap movie file or sequence of images. mode and will only export to a bitmap movie file or sequence of images. |
|
•
|
SWF Blend Mode: Choose the blending effect mode you wish to apply to your layer. The SWF Blend Mode result will only be visible when exported to a SWF movie. |
Blend Mode and SWF Blend Mode
Both the Blending module and Composite-Generic module have regular blending modes and legacy blending modes. The regular blending modes will take the source images and unmultiply them before blending the two inputs together. The images will be remultiplied when being output from the module. The legacy blending modes use the pre-multipled source images as is in order to apply the effect. Unmultiplying the images before processing them will give a final result closer to what can be found in software such as Adobe Photoshop.
Here is a list of the available Blending modes:
|
•
|
Normal: The layer attached to the effect acts as a normal layer and will not create any blending mode effect. |
|
•
|
Multiply: This operation multiplies the blending element colour with the output image. This will darken the colour of the overlapping area. |
|
•
|
Screen: This operation multiplies the inverted colour of the blending element with the image. This will lighten the colour of the overlapping area. |
|
•
|
Lighten (Lighten Legacy): This operation lightens the area of the output image which, is darker than the blending element’s colours. The lighter colours will remain unchanged. |
|
•
|
Darken: This operation darkens the area of the output image, which is lighter than the blending element’s colours. The darker colours will remain unchanged. |
|
•
|
Difference (Difference Legacy): This operation subtracts the blending elements colour from the output image colours or vice-versa, depending on which of them has more bright colours. The final result will be colours that are more vibrant. |
|
•
|
Add (Add Legacy): This operation lightens the output image using the blending element. |
|
•
|
Subtract (Subtract Legacy): This operation darkens the output image using the blending element. |
|
•
|
Invert: This operation inverts the output image colours on the area overlapping the blending layer colours. |
|
•
|
Overlay (Overlay Legacy): This operation multiplies or screens the colours from the blending image, with those of the output image, depending on the base colour. Colours from the blending element overlay the colours of the drawing elements, while preserving the highlights and shadows of the base colour. The base colour is not replaced, but mixed with the blend colour to reflect the lightness, or darkness, of the original colour. |
|
•
|
Hardlight (Hardlight Legacy): This operation multiplies, or screens, the colours of the blending layer with those of the output image, depending on the blend colour. If the blend colour is lighter than 50% grey, the image is lightened, as if it were screened. This is useful for adding highlights to an image. If the blend colour is darker than 50% grey, the image is darkened, as if it were multiplied. This is useful for adding shadows to an image. Painting with pure black or white results in pure black or white. Play with the Opacity value to create a subtler look. |
|
•
|
Alpha: This operation will blend the alpha value of the blending layer with the output image. This effect is not available for SWF Blend Mode. |
|
•
|
Erase: This operation produces a cutter effect using the blending element. This effect is not available for SWF Blend Mode. |
|
•
|
Divide (Divide Legacy): This operation divides the output image colour values by the blending layer colour values. The blending image colour values are inverted, creating a negative image. The negative image’s colour values are then multiplied by the right image colour values. This effect is not available for SWF Blend Mode. |
|
•
|
Replace: This operation replaces the output image by the blending layer. This effect is not available for SWF Blend Mode. |
|
•
|
Softlight: This operation darkens or lightens the colours in a soft and diffuse way, depending on the blend colour (image in left port). If the blend colour is lighter than 50% grey, the image is lightened. If the blend colour is darker than 50% grey, the image is darkened. Painting with pure black or white produces a distinctly darker or lighter area, but does not result in pure black or white. |
It is possible to select two different blending modes in the same Blending effect layer, in the event that you want to export your project to both a Bitmap and an SWF movie file with different results.
Related Topics