Timing Columns
Timing columns are unique in that they can reference a source folder outside of the project folder to bring images into the project. An example of how this feature can be used is if you have many background scenes created in a third party software that you might need to update in the future. By using Timing columns, you can dynamically link your backgrounds, expose different backgrounds at different times, and have live, automatic updating capabilities.
The danger with this type of dynamic linking is that if the project file is moved, or the folder that the column is linked to is moved, then the link is broken and the images that were in that folder will disappear in Toon Boom Harmony.
To use a Timing column:
|
1.
|
In the Xsheet view, click on the Add Columns  button. button. |
|
2.
|
In the Add Column dialog box that appears, type in the name of the new column, then from the Type drop-down menu select Timing. |
|
3.
|
Click OK if you are finished, or on the Apply button if you want to continue adding more columns and column types. |
A peach coloured column appears in your Xsheet with the name that you typed in, and for the moment, <unused>.

|
4.
|
In the Network view, add a new element module. |
|
5.
|
Open the Layer Properties editor by clicking on the yellow square. |
|
6.
|
In the Drawing tab, select the Timing Columns option. |
|
7.
|
In the Name field, enter the path of the folder you want to access. If you use the Browse button to locate a folder, you will have to select a file in the folder you want and then delete the dash and the suffix (for example, background-01 should be renamed to background) from the file name in the field. If you leave the full file name selected, Stage will display that file for the entire duration of the scene, regardless of the contents of the Timing Column field. |
This means that all the images in the folder that you are linking to are named using the naming convention described above. If for some reason you are unable to access a certain directory, type the directory extension directly in the path extension field at the top of the Browser window.
|
8.
|
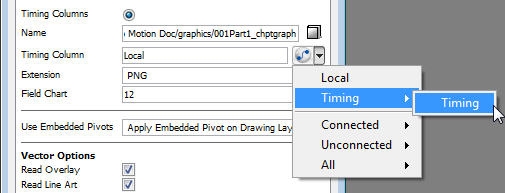
In the Timing Column field, click the Arrow button to create a new timing column, or select the name of the column from the drop-down list. If you have an element directory selected in the Name field, the Timing Column will indicate which files are called up from that element directory. Remember that the file displayed at each frame is based on the element name, the cell label, and the extension. If the element is toto, the timing column is labeled 1, 2, and 3, and the extension is TVG, Stage will display drawings totobody-1.tvg, totobody-2.tvg, and totobody-3.tvg at the selected frames. |
In the Xsheet, the <unused> should now have changed to the name of your module in the Network view.
|
9.
|
From the Extension drop-down list, select the extension of the files you want to display. |
|
10.
|
Click OK when you are done. |
|
11.
|
In the Xsheet, in your Timing column, type in the number that corresponds to the suffix of the drawing file that you wish to expose to make it appear in the Camera view. |
Related Topics