Changing a Scene's Stage
The Change Stage command allows to change the approval stage name of a selected scene that is in Manual approval mode. You can also create customized approval stages that reflect the approval process in your production environment.
A scene's stage is a method of tracking its progress in your production; the scene's current stage doesn't stop you from advancing the scene to other stages.
Changing a scene's stage and making manual approvals allows you to assign and change a scene's approval stages to keep track of its current status. For example, if you have a scene whose drawings are being scanned, you'll mark it as the Scan stage. After you begin adding colour to these line drawings, you can change the scene's stage to Paint.
To change a scene's stage status:
| 1. | In the Scenes section, select a scene. |
| 2. | In the top menu, select Scene > Change Stage. You can also right-click anywhere in the Scenes list and select Change Stage. |
The Change Scene Stage dialog box appears.
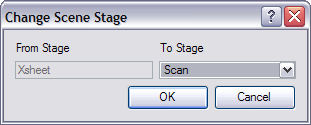
The current stage of the selected scene appears in the From Stage field.
| 3. | Select the stage you want to apply to the current scene from the To Stage drop-down menu. |
| 4. | Click on the OK button. |
Related Topics
| • | Updating Scenes |