Asset Manipulation
In this section, the components Harmony Mesh and Harmony Renderer in Unity will be described.
TBG Workflow
If you are importing sprites to Unity through the TBG workflow, asset manipulation options for TBG files will display in the inspector view.
TBG Asset Renderer
Harmony Renderer for the TBG file workflow is used to control the animation and rendering of Harmony assets for TBG files as well as expose important variables you may want to change during runtime.
-
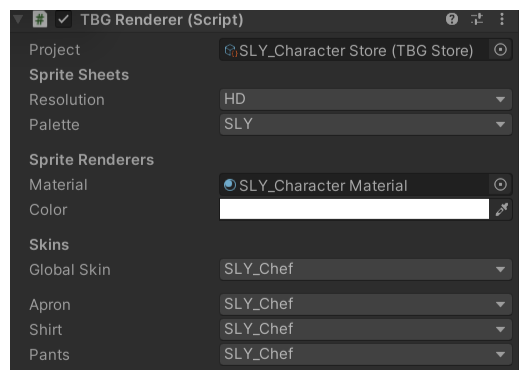
Select a character in the scene. The TBG Renderer (Script) section will appear in the Inspector tab to the right.
-
Control your character's assets by setting the following:

- Project: A reference to the TBGStore asset. This asset is generated by the importer and contains the TBG project data not covered by the generated AnimationClips.
- Resolution: The resolution used to display this character. This matches associated sprite sheets names.
- Palette: The palette used to display this character. This matches associated sprite sheet names.
- Material: The material used to shade this character. Hardware Skinning is the default unlit material provided with the SDK.
- Color: Option that multiply the selected color onto the asset.
-
Skins: Allows you to change in real-time the skin you’ve exported from Harmony. Each group has its own drop-down to change the skin, as well as a global dropdown to change the skin of all groups at once.
TBG Importer
When TBG files are imported to Unity, the Harmony assets are converted to Unity prefabs, AnimationClips, and other assets. The TBG Importer allows you to specify how the assets and animations are created.
-
Select a .tbg character file in your Project view. The inspector tab will open.
-
At the top of the Inspector view, click Select for the Model. The TBG Importer view will open and display the TBG Importer options.
-
Control how animations will import by setting the following:

- Animation Settings
-
Discretization Steps: A slider representing the number of columns / rows that sprites will get split into if they are being deformed by bones
-
Frame Rate: The animation frame rate used by Unity's animation system to playback the Harmony frames. This should match your frame rate in Harmony.
-
Stepped: If checked, the animations will pass between integer frames and thus not interpolate smoothly. If unchecked, the animation will be played back between integer frames, for a smooth animation.
-
Create Animator Controller: If checked, this importer will automatically create a new Animator Controller containing all the generated AnimationClips and place the asset beside the prefab in the Project view.
-
Animator Controller: When changes are made to the .tbg file, the Animator Controller referenced will be updated with the new AnimationClips.
-
-
Material Settings
-
Shader: When the prefab is created, all SpriteRenderers will reference a generated material using this shader.
-
SRGB Texture: If checked this will map gamma color space from generated textures into Linear color space rendering.
-
Filter Mode: How neighboring pixels of the texture interpolate.
-
Mipmap Enabled: Generate lower resolution textures to render at further distances.
-
Create Sprite Atlas: If checked, this importer will automatically create a new Sprite Atlas containing all the generated Sprites and place the asset beside the prefab in the Project view.
-
Sprite Atlas: When changes are made to the .tbg file, the Sprite Atlas referenced will be updated with the new Sprites.
-
XML Workflow
If you are importing sprites to Unity through the XML workflow, asset manipulation options for XML files will display in the inspector view. The asset manipulation options displayed are different from the asset manipulation options displayed in the TBG workflow.
Harmony Mesh
The Harmony Mesh component is used by the Harmony Renderer to create asset meshes based on the exposed drawings in your animation.
XML Asset Renderer
Harmony Renderer for the XML workflow is used to control the animation and rendering of Harmony assets for XML files as well as expose important variables you may want to change during runtime.
-
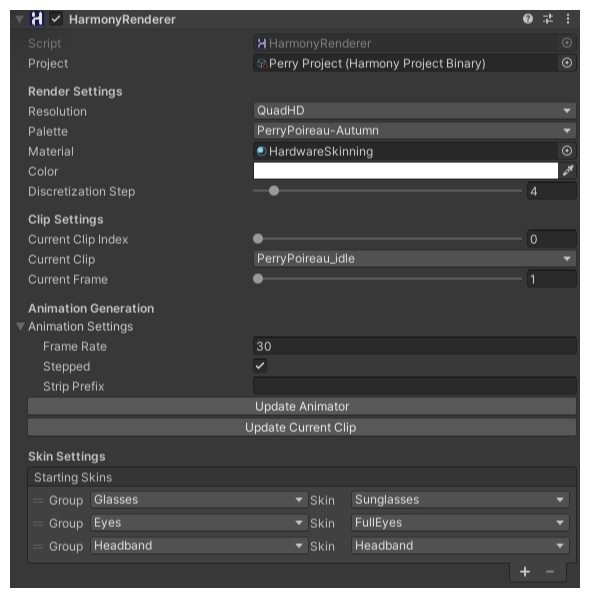
Select a character in the scene
-
In the Inspector view, select Add Component at the bottom of the view. The HarmonyRenderer section will appear.
-
Control your character's assets by setting the following:

- Project: A reference to the Harmony Project Binary asset. This asset is generated by the importer and contains the Harmony project data in an efficient binary format.
- Render Settings: The render settings are used to modify your asset, either by changing the resolution or the Shader used to render or the quality of the deformation.

- Resolution: The resolution used to display this character. This matches associated sprite sheets names.
-
Palette: The palette used to display this character. This matches associated sprite sheets names.
- Material: The material used to shade this character. Hardware Skinning is the default unlit material provided with the SDK.
- Color: Option that multiply the selected color onto the asset.
-
Discretization Steps: Slider that defines the arrangement of all the deformed drawings.
- Clip Settings: The clips settings are used to see the animations without opening the Animation window. This only affects the project when in Editor mode, when you play the game, the Animator overrules the settings inside the Clip Settings.
- Current Clip Index: A numerical clip index to display. It can be animated in the Animation window.
- Current Clip: A drop down for selecting which animation to display. It matches the Current Clip Index.
- Current Frame: The frame number currently being displayed.
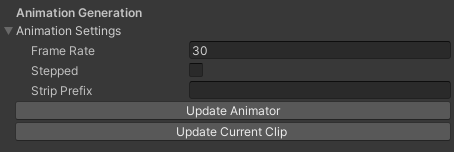
- Animation Settings: These settings are same as importing Asset settings. It is useful while importing or re-importing asset modifications inside Harmony. Once modifications are done click Update Animator or Update Current Clip in order to save your modifications.
- Frame Rate: The animation frame rate used by Unity's animation system to playback the Harmony frames. This should match your frame rate in Harmony.
- Stepped: If checked, the animations will pass between integer frames and thus not interpolate smoothly. If unchecked, the animation will be played back between integer frames, for a smooth animation.
- Strip Prefix: This is used to remove a prefix on the animation name. For instance, if we want "Wishling_Idle" to become "Idle", we set the prefix to "Wishling_". This is useful where the animation name for games is same for all the characters.
- Update Animator: Click this button to update the entire set of animations on this character to match what is in the Harmony project. This will update existing animations with the new settings you entered and add any missing ones.
- Update Current Clip: This will update only the currently selected clip.


Skin Settings
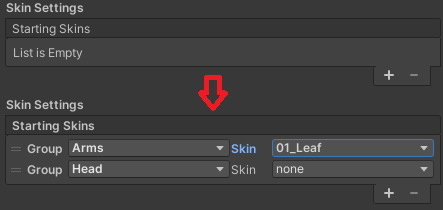
The Skin Settings allow you to change in real-time the skin you’ve exported from Harmony. To change a skin you first need to press the + button to add a group. You need to add as many groups as you had in your Harmony export. If you had no groups, just add one and leave it on all. You can define which group you want to modify, and then which skin to assign to which group. You can then remove a group by selecting any group and pressing the - button.

- Click
button to add a group/groups.
- Modify the group, and assign the skin to group.
- Remove a group by selecting any group and clicking
button.