Working in 3D
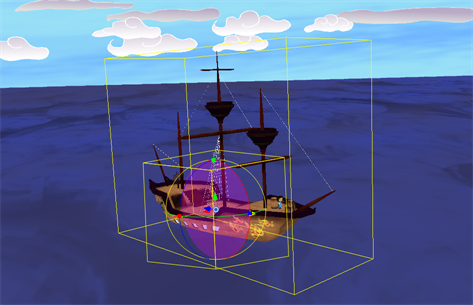
Harmony is able to integrate 3D models into your animation. Any 3D objects that are imported into your Harmony scene can be manipulated on both its geometry and bones by translating it, rotating it or scaling it on the X, Y and Z axes.

For more information on Vulkan 3D rendering, see Vulkan 3D Rendering.
Harmony can support the following 3D objects:
-
Filmbox (.fbx)
-
3DS Max (.3ds)
-
Wavefront OBJ (.obj)
-
Allembic (.abc)
-
Collada (.dae)
-
USDZ (.usdz)
By default, a 3D model in a Harmony scene will be rendered using OpenGL or Vulkan, which will render the model at fast quality intended for previewing. To render a 3D model at a higher quality or as a beauty pass, you must configure your scene to render the model with an external application, such as Autodesk Maya or Blender.
Importing 3D
Any 3D object created in both Maya and Blender can be imported into your Harmony scene. There are two main methods for importing 3D objects and they are the following:
-
Importing it as a 3D model: This method allows you to manipulate and animate the 3D model in all three dimensions, to separate and animate its sub-nodes, and to render the 3D model through Autodesk Maya using your preferred rendering engine when rendering your scene.
 How to import 3D models
-
In Harmony, select File > Import > 3D Models.
The Import 3D Models dialog box opens.

-
In the Files field, click on Browse.
An Open dialog appears.
-
Browse to an select your 3D model, then click on Open.
NOTE You can only import .osb, .3ds, .obj, .fbx, .abc and .dae type 3D models.
- In the Layer section, choose your import options.
- Create Layer(s): This option is selected by default. A new layer will be created for the selected files for the import. You have two choices:
- Create Single Layer Named: Imports all the selected files into a single layer. The layer will be named after the name you enter in the text input field to the right.
- Create Layer(s) Based on Filename: Creates a different layer for each file selected for import. The layers will be automatically named according to the name of each file.
- Add to Existing Layer: Imports the selected files into an existing 3D layer in the scene. Use the drop-down menu to select which 3D layer to import it to.
- In the Conversion section, select the Convert to FBX format option if your file isn't already a *.fbx file and you would like it to be. This format incorporates all associated files, such as the texture files.
-
Make sure the Convert to 2D options is unchecked.
NOTE If you want to convert a 3D model to a 2D layer, see Importing a 3D Object as a Rendered 2D Image.
-
Click OK.
The 3D model is imported into the scene.
-
-
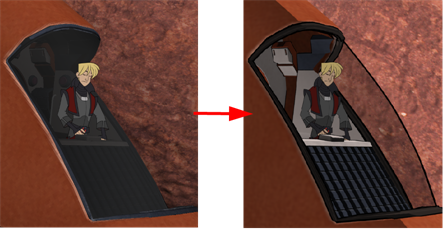
Rendering it as a 2D layer: This method allows you to render the 3D model from a fixed position and angle and import it into your scene as a 2D bitmap layer. This is mostly useful if you intend to use the 3D model as a reference to draw backgrounds, characters or props. This will keep your scene lighter.
 How to import a 3D model as a rendered 2D image
-
In Harmony, select File > Import > 3D Models.
The Import 3D Models dialog box opens.
-
In the Files field, click on Browse.
An Open dialog appears.
-
Browse to an select your 3D model, then click on Open.
NOTE If you want to import a 3D model as a rendered 2D image, you can only import a single 3D model at a time.NOTE You can only import .osb, .3ds, .obj, .fbx, .abc and .dae type 3D models.
- In the Layer section, select Create Layer(s). When you import a 3D model as a rendered 2D image, you must import it into a new layer. Then, choose one of the following options:
- Create Single Layer Named: Imports the model into a layer named after the name you enter in the text input field to the right.
- Create Layer(s) Based on Filename: Imports the model into a layer named after its file name.
- In the Conversion section, check the Convert to 2D option.
-
Click OK.
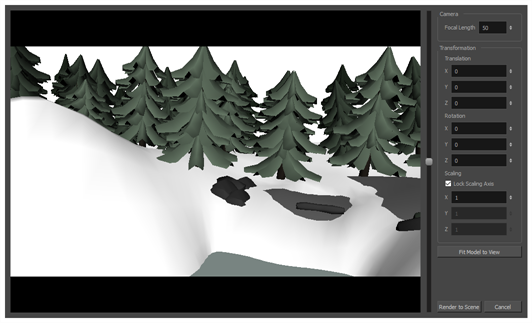
The Render 3D Model dialog appears.
 NOTE For information on all the parameters in this dialog, see Render 3D Model Dialog Box.
- If you want the model to fit inside the camera field, click on the Fit Model to View button just beneath the parameters to the right.
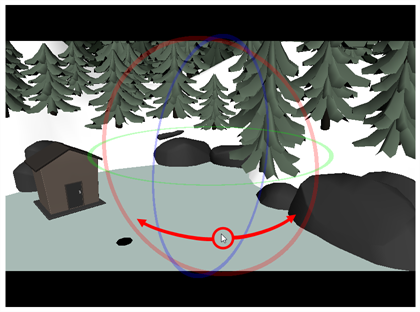
- In the preview area, do the following to adjust the camera's point of view relative to the 3D model:
- Either click and drag on the vertical slider to the right or scroll the mouse wheel up or down to adjust the distance between the camera and the model.
-
Hold Ctrl + Shift (Windows/Linux) or ⌘ + Shift (macOS), then click and drag on the preview area to rotate the camera.
-
Hold Spacebar, then click and drag on the preview area to pan the camera laterally.
- If you want to adjust the amount of perspective applied on the way the 3D model is rendered, adjust the Focal Length parameter. Increasing it will reduce the amount of perspective applied on the model, and decreasing it will increase the amount of perspective applied on the model.
NOTE Increasing this setting will also decrease the perceived size of the 3D model, and decreasing it will increase its perceived size. You must then adjust the camera's distance from the model or the model's scaling to compensate.- Adjust the Translation parameters until the 3D model is in the right position for the scene:
- X: The horizontal position of the 3D model, from west to east.
- Y: The vertical position of the 3D model, from south to north.
- Z: The position of the 3D model relative to the camera, from near to far.
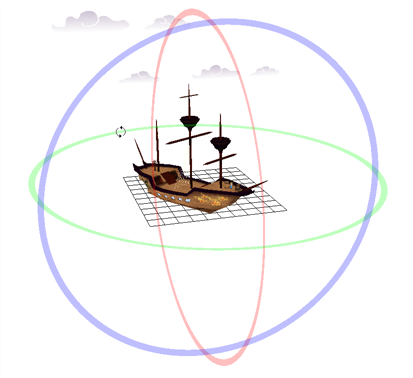
- Adjust the Rotation parameters until the 3D model is in the right angle for the scene:
- X: The rotation angle of the model around the horizontal axis.
- Y: The rotation angle of the model around the vertical axis.
- Z: The rotation angle of the model around the z-axis.
- Adjust the Scaling parameters until the 3D model is in the right size for the scene:
- Lock Scaling Axis: When enabled, you can use the X scaling field to set the scaling of the 3D model on all axes, preserving its proportions.
- X: The horizontal scaling of the model.
- Y: The vertical scaling of the model.
- Z: The scaling of the model on the z-axis.
- Once the model is in the right position, angle and size, click on Render to Scene.
The model is added to the scene, rendered into a 2D bitmap layer.
-
The 3D object that is being imported can either be static or contain animation. By default, a 3D model will be imported with only the first frame exposed. If it was animated in a 3D software prior to export, the 3D project file will contain the animated information.
In order to import a 3D object with animation, it must be imported in one of the following file types:
-
Filmbox (.fbx): This file type can be imported with their subnode animations. This means the geometric transformations on each subnode in each frame of the model can be imported and played out.
-
Alembic (.abc): This file type can be imported with their deformations baked into every frame. This is useful if you need to use models that are animated with deformations. However, Alembic files do not have texture and hence appear solid white in the preview.
If the 3D object has been exported with animations in it, Harmony can play out its animation in the scene, manipulate the animation and render the 3D object with its animations later.
For more information about importing a 3D object that contains animation, see Importing Animated 3D Sequences.
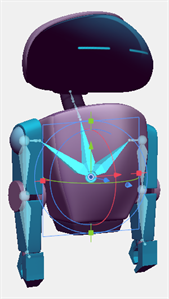
Manipulating 3D Objects
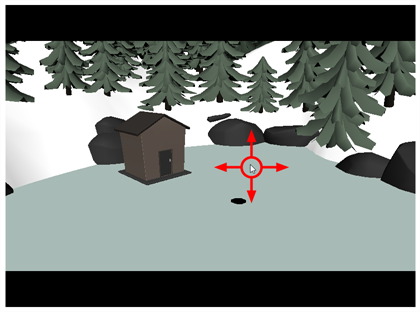
Once you have imported the 3D model into your scene, you can easily manipulate it to set up your scene. You can even add keyframes, just like any other element, and animate it on a trajectory.
Once the 3D option is enabled, your transformation tools automatically become 3D transformation tools. This means you can now manipulate them on the Z-axis as well. The Translate ![]() , Rotate
, Rotate ![]() and Scale
and Scale ![]() tools are found in the Advanced Animation toolbar and the Transform
tools are found in the Advanced Animation toolbar and the Transform ![]() tool can be found in the Tools toolbar. You can use these tools to set up or animate your 3D model.
tool can be found in the Tools toolbar. You can use these tools to set up or animate your 3D model.
For more information about manipulating 3D objects, see About 3D Object Manipulation and Animation.
Manipulating Subnodes
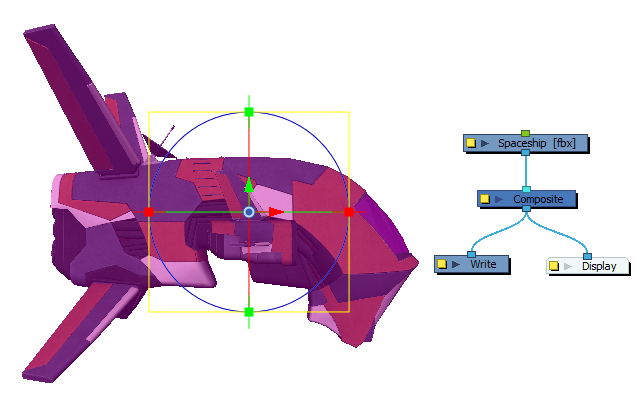
A 3D model can be rigged so that different parts of it, referred to as subnodes, can be subjected to their own geometric transformations.
In order to animate a 3D model subnode, you must connect the 3D object's node to a Subnode Animation node, which will store the animation information for each of the model's subnodes that you animate.
- In the Node Library view, select 3D in the sections list and locate the Subnode Animation node.

- Drag and drop the Subnode Animation node from the Node Library into the Node view.
- In the Node view, connect the Subnode Animation node under the element node of your 3D model.

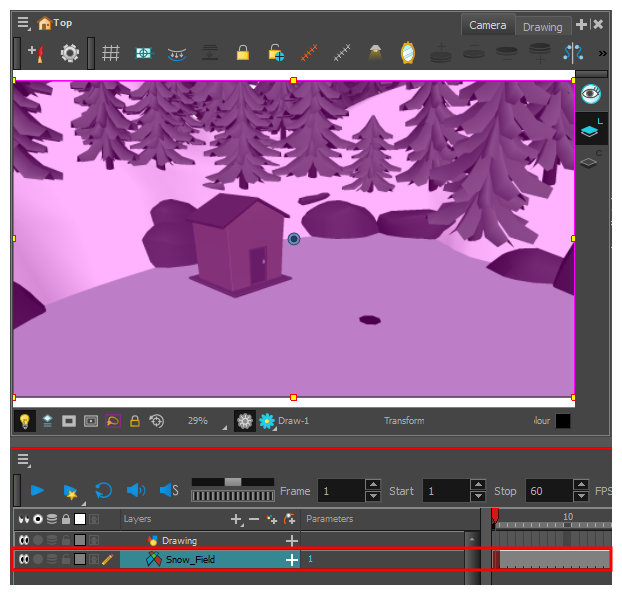
The Subnode Animation node automatically appears in the Timeline view, under the layer of the 3D model.

- In the Timeline view, select the frame where you want your first animation keyframe to be created.
- In the Tools toolbar, select the Transform tool
 .
.
- Do one of the following:
- In the Camera or Perspective view, click on your 3D model once to select the whole object, then click again on the part you wish to animate to select it.
- In the 3D Graph view, select the subnode you wish to animate.

- Use the Transform tool to move, rotate or scale the individual part.

- The subnode appears in the Timeline view.

- In the Timeline view, expand the subnode layer to view its properties.

A keyframe appears in the first frame, recording the movement that was just made.
- Continue adding keyframes and making changes to the properties values to animate the individual part of the 3D model.
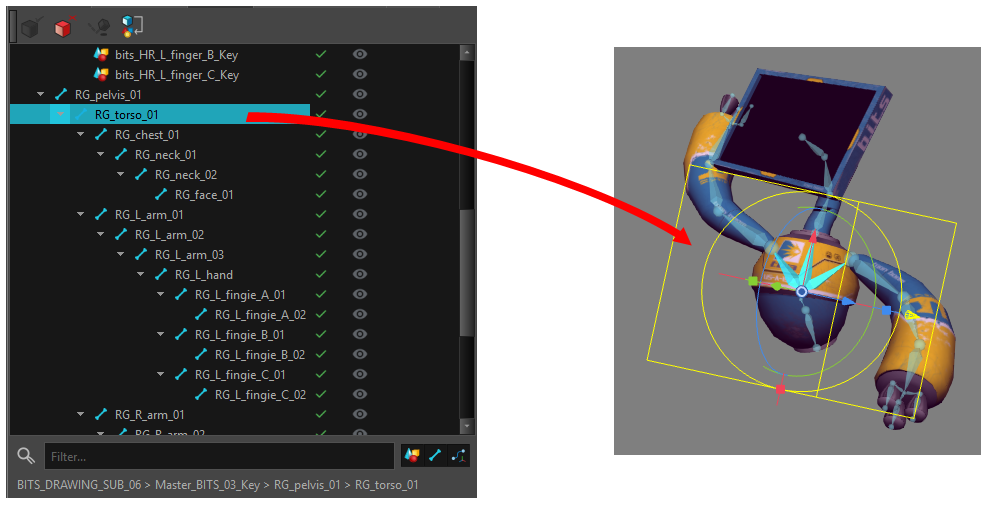
Using the 3D Graph view, you can see the list of subnodes available for the selected 3D model. Each subnode represents a part of the 3D model that can be transformed and animated independently, or even hidden. Like with peg hierarchies, subnodes that are children of other subnodes will be transformed along with their parents. If you select a subnode in the 3D Graph view, it will be highlighted in the Camera view, and the Transform tool will be set to manipulate that subnode rather than the whole 3D model.
There are three types of subnodes that appear in the Subnode List. They are the following:
-
 Geometry Subnodes: Identifies the polygonal shapes that construct the mesh of a 3D model. These shapes appear in the Render view and can be transformed with the Transformation tool.
 -
 Bone Subnodes: Identifies all the bones in the armature of the 3D model. Each bone will be listed based on its place in the hierarchy of the armature. By articulating the bone, the mesh of the 3D object can be transformed, affecting the geometry.
 -
 Transformation Subnodes: Applies an offset or transformation to an attached mesh and/or bone. When transformed, the subnode will apply its transformation to all connected children in the subnode graph. The Transformation Subnodes do not contain geometry or bone definitions and only supply a transformation.
For more information about the 3D Graph view, see 3D Graph View.
Bone Skinning
Bone Skinning refers to the ability to articulate the bones in a 3D model’s armature and have the geometry of the model transform with the armature. In order for the Toon Boom software to access the armature, the 3D object must be imported in a supported 3D file format and Vulkan 3D Rendering must be enabled.
-
Open Tool Properties.
-
Click

3D Rendering
In order to properly render 3D models in Harmony scenes, both the scene and your workstation must be configured to allow rendering the model through Autodesk Maya or Blender. This is required to render the 3D models with the same rendering quality as originally intended. Otherwise, Harmony will use OpenGL to render the 3D model, which might not give the expected results.
Harmony uses the original Autodesk Maya or Blender project, to which it applies the transformations done on the model and its subnodes inside the scene, and sends it to Autodesk Maya or Blender for rendering. Then, it takes the rendered image and composites it with other elements in the scene to create the full image. This works just as well when outputting the final rendering images as when switching to Render Preview mode in the Camera view.
When rendering a 3D object through Autodesk Maya or Blender, the object will be rendered using the rendering engine its project file is configured to use. You may change the rendering engine used by selecting it in the layer properties of the Render Maya Batch Node or the Render Blender Batch Node. It is important to always use the rendering engine the model was intended to be rendered with.
Harmony supports the following rendering engines:
-
Maya:
-
Mental Ray.
-
Renderman Reyes.
-
Renderman RIS.
-
Arnold.
-
-
Blender:
-
Cycles.
-
workbench.
-
Eevee.
-
-
In the Node view, locate the Render Maya Batch Node or Render Blender Batch Node, and click on its Layer Properties
 button.
The Layer Properties dialog for the Render Maya Batch Node or Render Blender Batch Node appears.
- In the Renderer field of the Attributes tab, enter one of the following values, depending on which rendering engine you wish to use:
-
For Render Maya Batch Node, enter one of the following:
-
Maya’s native rendering engine: mayasoftware or maya.
-
Renderman (Reyes): renderman, rendermanreyes or reyes.
-
Renderman (RIS): rendermanris or ris.
-
Arnold: arnold.
-
-
For Render Blender Batch Node, enter one of the following:
-
Blender’s native rendering engine: blender.
-
Cycles: CYCLES.
-
Workbench: BLENDER_WORKBENCH.
-
Eevee: BLENDER_EEVEE.
-

- Click on Close.
- In the Camera view, click on the Render View
 button.
The 3D model will now be rendered in the newly selected rendering engine.
Render Maya Batch Node
The Render Maya Batch Node can be used to render a 3D model through Autodesk Maya while operating in Harmony. When a render is launched, The Render Maya Batch Node will take the 3D model as its input, render it through Autodesk Maya, then composite the rendered image into the Harmony scene. The 3D model rendered by Autodesk Maya will appear in Harmony in both the final rendered image and in the Render Preview mode in the Camera view.

When Autodesk Maya is launched through Harmony, Autodesk Maya will stay live and receive render requests from Harmony for the duration of the Harmony session.
For more information about the Render Maya Batch node, see Render Maya Batch Node.
- In the Node Library view, search for the RenderMayaBatch or RenderBlenderBatch node..
- Drag and drop the selected Renderer from the Node Library to the Node view.
-
In the Node view, connect the selected renderer under the node of the 3D object.
 NOTE If the 3D object is connected to a Subnode Animation node, connect the renderer under the Subnode Animation node.
 -
Repeat the steps 1 to 3 for each 3D object in your scene.
-
In the Camera view, click the Render view
 button to verify that the 3D object is rendered through the chosen renderer.

You are now set to render your animation project.
Render Blender Batch Node
Harmony can render 3D models through Blender. The Render Blender Batch Node has the same functionality and behaviour as the Render Maya Batch Node.
The Render Blender Batch Node can be used to render 3D models through Blender while operating in Harmony. When a render is launched, The Render Blender Batch Node will take the 3D model as its input, render it through Blender, then composite the rendered image into the Harmony scene. The 3D model rendered by Blender will appear in Harmony in both the final rendered image and in the Render Preview mode in the Camera view.

When Blender is launched through Harmony, Blender will stay live and receive render requests from Harmony for the duration of the Harmony session.
For more information about the Render Blender Batch node, see Render Blender Batch Node.
- In the Node Library view, search for the RenderMayaBatch or RenderBlenderBatch node..
- Drag and drop the selected Renderer from the Node Library to the Node view.
-
In the Node view, connect the selected renderer under the node of the 3D object.
 NOTE If the 3D object is connected to a Subnode Animation node, connect the renderer under the Subnode Animation node.
 -
Repeat the steps 1 to 3 for each 3D object in your scene.
-
In the Camera view, click the Render view
button to verify that the 3D object is rendered through the chosen renderer.

You are now set to render your animation project.
External Rendering Toolbar
The External Rendering Toolbar contains four actions to allow you to communicate between your source 3D scene and Harmony in real time. These External Rendering actions will allow you to render using an external 3D software, bake the 3D information into your Harmony scene or bake it into an external 3D project file.

The four external rendering actions are as follows:
-
 Render Nodes: The Render Nodes action will render your 3D scene through an external 3D software. All the renders made will appear in the cache of the elements folder of your scene. This means that after the initial render, the 3D software will no longer need to re-render materials as you scrub through the frames while in the Render view.
 -
 Bake Nodes: The Bake Nodes action will allow you to render out a 3D sequence through Autodesk Maya or Blender and save it as a sequence of EXR files. By baking the rendered 3D information into an EXR element node, Harmony will be able to load the rendered images without relaunching the 3D software or re-rendering. The rendered frames will be available as bitmap images and will be available in the camera view and in the soft render preview.
 -
 Bake to External Project: The Bake to External Project action allows you to create a new project file in the external 3D software containing all the animation and transformations on the 3D model from Harmony. This action allows you to send the keyframe animations, transformations, subnode transformations and camera manipulations made in Harmony back to the original 3D software and saved to a new project file. These changes will be made in the new file, preserving your original 3D project file. This allows the 3D project file to be updated, shared and rendered externally.
 -
 Cache Manager: The Cache Manager is a utility that allows you to manage the caches generated when the RenderMayaBatch and RenderBlenderBatch nodes are used. When a RenderMayaBatch or RenderBlenderBatch node is selected, all available cache entries for that node will load in the Cache Manager.
For more information about the External Rendering toolbar, see External Rendering Toolbar.