
Download Documentation
Customizing Your Effect
To customize and animate your Forces of Nature and Blockbuster effects, you must adjust the parameters in the Properties panel. Use the Static Parameters to customize the general settings for the effect. Any frame of the effect layer can be selected in the Timeline view when modifying values in this tab. If you want to animate the properties of the effect, add keyframes accordingly, then change the keyframe values in the Dynamic Parameters tab.

Effects
From the top row of icons, click the button corresponding to the Forces of Nature or Blockbuster effect that you want to use. It will turn dark grey to indicate that it is selected. If you are unsure as to which Forces of Nature or Blockbuster effect is depicted on a given button, hover your pointer over the button and a tooltip will appear.
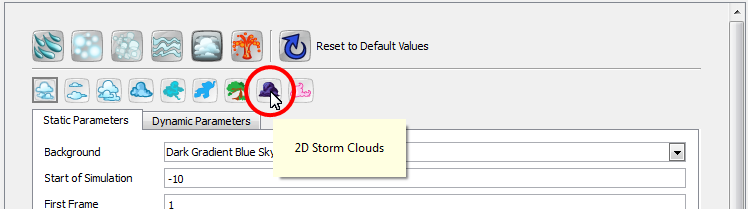
The effect will change in the Camera view depending on which effect you choose. Click on the effect you want to use; the corresponding sub-menu appears with its associated parameters.
In the above example, Clouds is the general option that has been selected. Every effect has a sub-menu featuring numerous options, ones that vary in density, shape and character. To determine what each effect does, hover your mouse over the effect icon. The tool tip appears, indicating the name of this particular effect. To activate the effect, click on the icon. A dark grey box surrounds the icon, indicating that it is activated.
The six different Nature effects are discussed in more detail in their own individual sections below.
General Properties Buttons
|
•
|
 Reset to Default Values: After you have made adjustments to the parameters in the Static or Dynamic Parameters tab and you would like to bring back the defailt settings, click this button to reset the default values in both tabs. Reset to Default Values: After you have made adjustments to the parameters in the Static or Dynamic Parameters tab and you would like to bring back the defailt settings, click this button to reset the default values in both tabs. |
|
•
|
 Add Fill: Use this button to divide an effect on the Timeline. Once divided, a different effect can be applied to one of the two halves. This allows for two different effects to exist on the same layer in the Timeline. Add Fill: Use this button to divide an effect on the Timeline. Once divided, a different effect can be applied to one of the two halves. This allows for two different effects to exist on the same layer in the Timeline. |

|
•
|
 Delete Fill: Use this button to delete all the cells of a single effect, in a layer where multiple effects exist. Delete Fill: Use this button to delete all the cells of a single effect, in a layer where multiple effects exist. |

Static Parameters Tab

|
•
|
Background: Choose from one of three background colour options: Dark Gradient Blue Sky, Light Gradient Blue Sky, or Transparent. |
|
•
|
Start of Simulation: The frame number where you want the generation of particles to start. If you want the effect to be in progress beginning at the start of your scene, keep the default value of -1. This number is relative to the First Frame value. |
|
•
|
First Frame: The frame number where you want the effect to start. You could have your effect start on frame 20, but not have the particle generation start until four frames in. |
|
•
|
Duration: The number of frames that you want the effect to last. |
|
•
|
Max Amount of Objects: The maximum number of particles (copy of the sprite) that can be generated at one time in the Camera view. These particles are not all created at the same time, but eventually fill the Camera view with their number. For example, if a value of 2 is entered, then only two particles are generated until they disappear from the Camera view (finish their life span). At that time, another two or less particles are generated to replace the two that disappeared from view. |
|
•
|
Max Visibility: The maximum number of frames that a particle exists in the Camera view, otherwise known as the particle life span. For example, even if the Max Amount of Objects is set to 3000, if the Max Visibility is set to 10, then most particles disappear well before 3000 particles can be created. In addition, if it takes 60 frames for a particle to fall from sky to ground, then most of these particles will never touch the ground, as they will die or disappear before the 10th frame. |
|
•
|
Fade: Select this option if you the particles to slowly fade out as they reach the end of their life span instead of disappearing abruptly. |
|
•
|
Region: Think of the region where the particles are generated, live and die as a 3D cube. Use the sliders to select a value between 0 and 36 for the Width, Height and Depth of this 3D region. Although you cannot see the depth of the region, you may notice that some particles appear larger or smaller than others, even though they are all generated from the same sprite. This is because some are closer or further back in depth. |
|
•
|
Floor Height: The value in this field represents the height of an invisible floor. This floor is where the simulation ends. With the example of snow, if you want to see snow hitting and covering the ground, raise the height of the floor to be visible in the Camera view. |
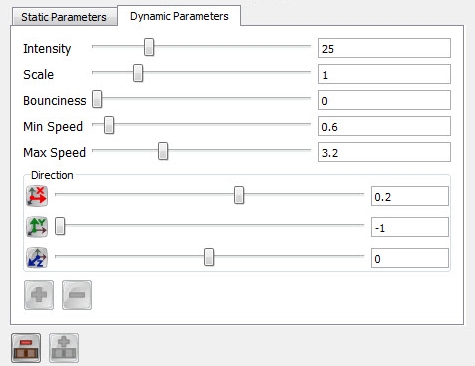
Dynamic Parameters Tab
The parameters in this tab only become active when a frame with a keyframe is selected in the Timeline view.
|
•
|
Intensity: This value determines the strength of the simulation. For example, if the first keyframe has an Intensity of 1 and the second keyframe has an Intensity of 25, then only a few particles will be produced at the start of the animation, producing progressively more and more. |
|
•
|
Scale: This value determines the size of the particles as a percentage. For example, a value of 1.5 would be 1.5 times the size of the original particle or Sprite. Remember that all the particles are the same size; it is just that some are further back or closer in space. |
|
•
|
Bounciness: This value determines the height of a particle's bounce, or in other words, how bouncy the particle is. The greater the value, the higher the bounce, hence the more bouncy the particle. This parameter is important for the Hail and Shatter effects. |
|
•
|
Min Speed: The minimum speed at which the particles can move. |
|
•
|
Max Speed: The maximum speed at which the particles can move. |
|
•
|
Direction: These parameters can be used to push the particle movement at an angle, giving the illusion that they are being blown in a certain direction by the wind. Use the sliders in this section to manipulate the following: |
 East-West: Direction along the X-axis.
 North-South: Direction along the Y-axis.
 Back-Front: direction along the Z-axis.
You can use both positive and negative values, as well as decimal increments.
|
•
|
 Add Keyframe: Add a keyframe on the Forces of Nature layer in the Timeline view. The keyframe will be added to whichever frame is selected in the Timeline view, indicated by the position of the red playhead. Once the keyframe is created, modify the values in the Dynamic Parameters tab to have those parameters recorded in the keyframe. Add Keyframe: Add a keyframe on the Forces of Nature layer in the Timeline view. The keyframe will be added to whichever frame is selected in the Timeline view, indicated by the position of the red playhead. Once the keyframe is created, modify the values in the Dynamic Parameters tab to have those parameters recorded in the keyframe. |
|
•
|
 Delete Keyframe: Delete a selected keyframe from the Forces of Nature layer in the Timeline view. Delete Keyframe: Delete a selected keyframe from the Forces of Nature layer in the Timeline view. |