
Download Documentation
Forces of Nature Effects
Effects that are the result of natural phenomenon can be among the hardest create in an animation, as they involve drawing and animating hundreds of tiny particles or fluctuating organic shapes. Toon Boom Studio helps you bypass this labour-intensive process by providing six Forces of Nature Effects.
To add a Forces of Nature effect:
|
1.
|
In the Special Effect toolbar, click the Forces of Nature Effect  button. button. |
A Forces of Nature effect layer, as well as its child, a Sprite-Drawing layer, is added to the Timeline view. A Sprite is the particle multiplied and generated by the Forces of Nature effect. In the example below, a drawing of a raindrop is used as the Sprite.

By default, the Rain effect is selected and visible in the Camera view.
|
2.
|
Create your own Sprite on a Drawing layer, or import an image to use as a Sprite. In the case of the Forces of Nature effects, Sprites animated using keyframes and/or pegs lose their animation. Only the original image is used. |

Traditionally animated drawings are treated as multiple versions of the same particle type. For example, a traditionally drawn walk-cycle appears as a series of frames on the same layer. Each frame contains a slightly modified version of a character's legs and arms moving. If this layer were to be used as a Sprite, all those different drawings would be randomized and appear as non-sequential, static, singular particles in the effect.
However, you can use this behaviour to your advantage. For example, if you want to create five types of snowflakes to be multiplied and generated, you could simply create five different drawings on the same layer. Each drawing is on their own frame.

|
3.
|
Drag your newly created Sprite layer onto the Sprite-Drawings layer to parent it. The Forces of Nature effect Sprite (unseen in the Timeline view) is automatically overridden by your custom Sprite. |

If no Sprite is created for a Forces of Nature effect, the default Sprite will be visible.
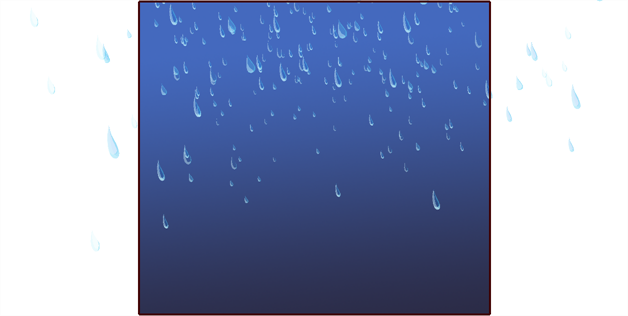
Rain Effect

The Rain effect produces a simulation of water droplets falling from the sky in nine various presets:
|
•
|
Rain: The default setting. |
|
•
|
Tropical Storm: The rain drops are bigger and greater in number, producing a more intense effect. |
|
•
|
Mist: The rain drops are smaller and fewer for a less intense effect. |
|
•
|
Straight: The rain falls on a diagonal, suggesting a driving rain shower. |
|
•
|
Bubble: The rain falls in large, rounded drops of water. |
|
•
|
Droplets: The rain falls in droplets of water. |
|
•
|
Gummy Bears: A sweet shower of red and yellow gummy bears. |
|
•
|
Rays: Sun rays caught by particles of light illuminate your scene. |
|
•
|
Stars: Your scene is showered by stars, both near and far. |
Notes
Parameters such as Bounciness and Floor Height are less applicable to this effect. However, Max Amount of Objects and Direction are good parameters to modify and animate for the Rain effect.
Snow Effect
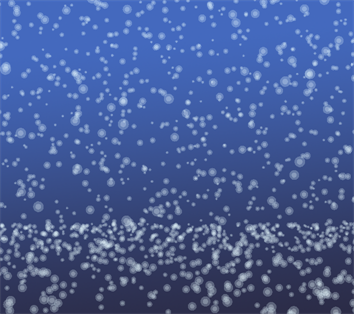
The Snow effect produces a simulation of snowflakes falling from the sky in ten various presets:
|
•
|
Snow: This is the default setting. |
|
•
|
Snow Flurries: Fewer snowflakes produced than with snow for a less intense effect. |
|
•
|
Snow Storm: The snowflakes are bigger, falling faster and are greater in number, thereby creating a more intense effect. |
|
•
|
Simple Snowflakes: These are soft, light paper cut-out snowflakes. |
|
•
|
Shiny Snowflakes: Large, shiny snowflakes, great for an icy winter scene. |
|
•
|
Sun Dust: Soft snow raised by a gust of wind and lit by a bright winter's sun. |
|
•
|
Ashes: Light ashes fall, gently filling your scene. |
|
•
|
Leaves: Brown, last-to-fall autumn leaves float gently downwards. |
|
•
|
Cotton Candy: Fluffy pink cotton candy for a sweet, playful scene. |
|
•
|
Dandelion Puffs: Fluffy dandelions, ideal for lazy summer scenes and making wishes. |
Notes
The Floor Height can play a role as snow can land and accumulate on the ground. While Bounciness does little to change this effect, as it is not a natural property of snow, the Intensity and Min Speed can make the difference between Snow Flurries and a Snow Storm. If you are looking to produce an effect where the snow melts before it hits the ground, you can lower the Floor Height so that it is not visible in the Camera, as well as check off the Fade box to have your snowflakes lightly melt away.
Hail Effect

The Hail effect produces a simulation of ice pellets falling from the sky in nine various presets:
|
•
|
Hail: This is the default setting. |
|
•
|
Light Hail: There are fewer ice pellets produced for a less intense effect. |
|
•
|
Hail Storm: The ice pellets are bigger, falling faster and in greater in number, creating a more intense effect. |
|
•
|
Crystallized Hail: Sparse, gentle flecks of crystal fall steadily throughout your scene. |
|
•
|
Baseball Hail: Heavy, large, quick-falling hailstones, to be avoided by all windshields. |
|
•
|
Diamonds: A different kind of ice, these yellow, pink and blue diamonds fall hard and fast. |
|
•
|
Candy: Colourful bonbons populate your scene to create a candyland effect. |
|
•
|
Coins: Bright pennies (and more) from heaven enrich your scene with a little fun. |
|
•
|
Gears: Rust, gold and grey gears tumble from top to bottom; great for gear heads. |
Notes
The Floor Height and Bounciness play a big role in identifying the effect, as ice pellets bounce when they hit a surface or ground. Subtle differences in the Dynamic parameters determine the difference between a Light Hail and a Hail Storm, as well as the Max Amount of Objects and Max Visibility values.
Fog Effect

The Fog effect produces a simulation of a gaseous vapour hanging in the air in nine various presets:
|
•
|
Fog: This is the default setting. |
|
•
|
Misty: There are fewer particles produced in a smaller region for a less intense effect. |
|
•
|
Thick Fog: There are a greater number of particles in a larger region, creating a more intense effect. |
|
•
|
Curly Fog: A cluster of fog tendrils floats and expands to cover the majority of your scene. |
|
•
|
Smokey Fog: A dark fog that expands ominously across your scene. |
|
•
|
Sumi-e Fog: In various shades of grey, this fog has a classic Japanese ink wash sensibility. |
|
•
|
Balloons: Red, yellow and blue balloons radiate, then float, from the center of your scene. |
|
•
|
Fireflies: Growing green fireflies evoke a balmy summer evening. |
|
•
|
Bushes: A row of lush bushes rises, gently expanding and rustling, from the bottom of the screen. |
Notes
The Region dimensions, including the Floor Height, play a role in the intensity of this effect. The smaller the region, the less intense the effect, as you can see some sky in the background.
The Max Amount of Objects contributes to the fog's density, which can also make it more or less intense. It is recommended that you explore the parameters for this effect, as they are a little less obvious than the other effects.
Cloud Effect

The Cloud effect produces a simulation of a condensed gaseous vapour floating through the sky in nine various presets:
|
•
|
Cloud: This is the default setting. |
|
•
|
Fluffy Clouds: There are fewer particles produced, with lower visibility at a slower speed, thereby creating a less intense effect. |
|
•
|
Storm Clouds: There are a greater number of particles produced, with higher visibility, thereby creating a more intense effect. |
|
•
|
2D Puffy Clouds: Dense fairweather clouds in various shades of blue. |
|
•
|
2D Stylized Clouds: Swirling, curly-Q clouds in shades of blue and cafe au lait. |
|
•
|
Shape Clouds: Fluffy clouds in the shape of a duck , a dragon and an elephant. Perfect for daydreaming. |
|
•
|
Forest: A dense forest of trees and foliage sweeps through your scene. |
|
•
|
2D Storm Clouds: Enormous, ominous clouds sweep past, filling your scene from front to back. |
|
•
|
Candy Clouds: Swirling clouds in shades of candy pink. |
Notes
The Cloud effect is one of the most complicated Forces of Nature effects, due to the number of parameters that need to be adjusted in order to make both subtle and dramatic differences to this effect. Some of the key parameters to look out for are Start of Simulation, Max Amount of Objects, Max Visibility (including Fade), as well as Intensity and Speed.
Volcano Effect

The Volcano effect produces a simulation of flowing lava bubbles from a single source in nine various presets:
|
•
|
Volcano: This is the default setting. |
|
•
|
Puff: There are fewer particles produced, with a lower intensity for a less intense effect. |
|
•
|
Volcano Eruption: There are a greater number of particles produced, with higher intensity, creating a more intense effect. |
|
•
|
Deformed Lava: Lava flows, radiating outward towards the floor of your scene. |
|
•
|
Popcorn: Popped kernels of corn bubble from the center of your scene. |
|
•
|
Petroleum: Dark petroleum gushes and oozes outward from the center of your scene. |
|
•
|
Fountain: A fountain of water emanates up and out in a wash of blues. |
|
•
|
Colour Candy: Pink, gold and blue candies spring up and out for a visual sugar rush. |
|
•
|
Steam: Droplets of steam and wispy vapour rise from the bottom of your scene, emanating outwards. |
Notes
The Volcano effect is a unique effect in that it is the only effect that is produced from a single source. You can move the position of the source by changing the value of the Floor Height. The number of particles (Max Amount of Objects), as well as the size of the particles (Scale) are important factors. The Start of Simulation value determines whether you see the lava erupt from the source (either 0, or a positive value), or if it will already be flowing when the scene starts.