Configuring Processes
Different types of processes can be configured in different ways. However some configuration options are available for several types of processes. Here is a descriptions of all the options available:
In the Basic Information area:
| Option | Description |
|---|---|
| Name |
The name of the process is grayed out as it cannot be changed after the creation. To rename a process, you would have to duplicate it and delete the original. |
| Process Type |
You can change the type of process. There are four types of process available: Manual process is the most basic. It corresponds to typical assignable artists’ tasks. Manual tasks may have target durations or completion dates. Approval process acts as milestones for a supervisor to validate work from previous tasks. Approval tasks do not have a set duration. Asset progress reports when workflows of assets used in a scene are completed. They are used in conjunction with Asset Assembly. Overview processes are available only for job workflow. They provide a cumulative overview of the task statuses for all scenes within a job. |
| Colour |
You can set the colour used everywhere to identify this process. The colour selector is simple to use. Note that you can click on the dropper icon to pick a colour from anywhere on the desktop. You also have the possibility to specify a colour using a numerical value. Three modes are available: RGB, HSL and HEX. Simply click outside the colour widget area to confirm your choice. The task (which you can view in Production and Asset > Manage tabs) associated with the node takes on the same colour. |
| Position | You can set the Position to determine where this process will appear in the workflow, the number one position being the leftmost. |
In the Task Information area:
| Option | Description |
|---|---|
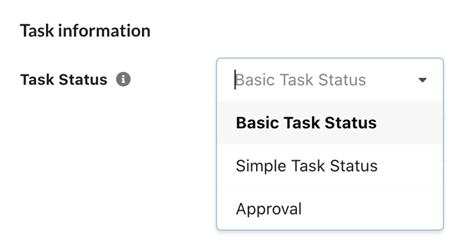
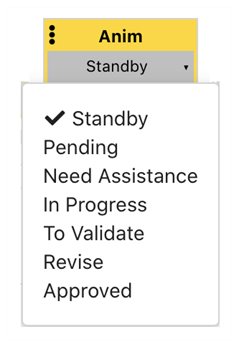
| Task Status (Available for Manual and Approval Processes) |
Select a Task Status workflow from the drop-down menu to link it to this Process.
The Task Status options of that workflow become instantly available as a drop-down menu in the sample task above. . |
| Assignee Group |
Set an Assignee Group to restrict the assignment of these tasks to members of a specific group. This is especially useful if there are many users.
|
| Completion |
Set a number from 0 to 100 to represent the overall progress of the item (job, scene or asset) once this manual task is completed. For example, if a scene is considered 20% completed when the layout is finished, set the “Completion” value of the manual process “Layout” to 20. |
| Duration |
Use this field to specify how many days are needed to complete all the tasks of this process for the whole job. This will set the default value to calculate the due date for the production schedule that can be seen in the GANTT chart. Note that the due date can later be modified per task. |
| Effort |
Use this field to specify how many hours a task should typically take. This can be used to measure performance and track costs when compared to worked hours. Note that the effort can later be adjusted for specific tasks. |
| Take/Retake |
This field will determine whether to keep a track of “Takes" or "Retakes”. For example, a task process will typically track a Take number whereas an approval process will typically track a Retake number. You can also set the initial Take or Retake value. To determine when the Take or Retake number will increment, you will set behaviours. To view the current Take or Retake number in the Production page, you will have to edit the column options. |

The Asset Progress have different configuration options:
| Option | Description |
|---|---|
| Tracked Workflow |
Select the workflow of the assets (associated with the current scene) that you would like to track. For example, if you would like this “Asset Progress” to report on background completion, you should select the asset workflow that you use to build the background assets. |
| Tracked Process | Select the process that the asset should reach to be considered “complete” for the purpose of this “Asset Progress” report display. For example, If you would like that an asset be considered complete when the Process “BG_Final_Approuval” has been set to “Approved”, then select “BG_Final_Approval” as the “tracked process”. |